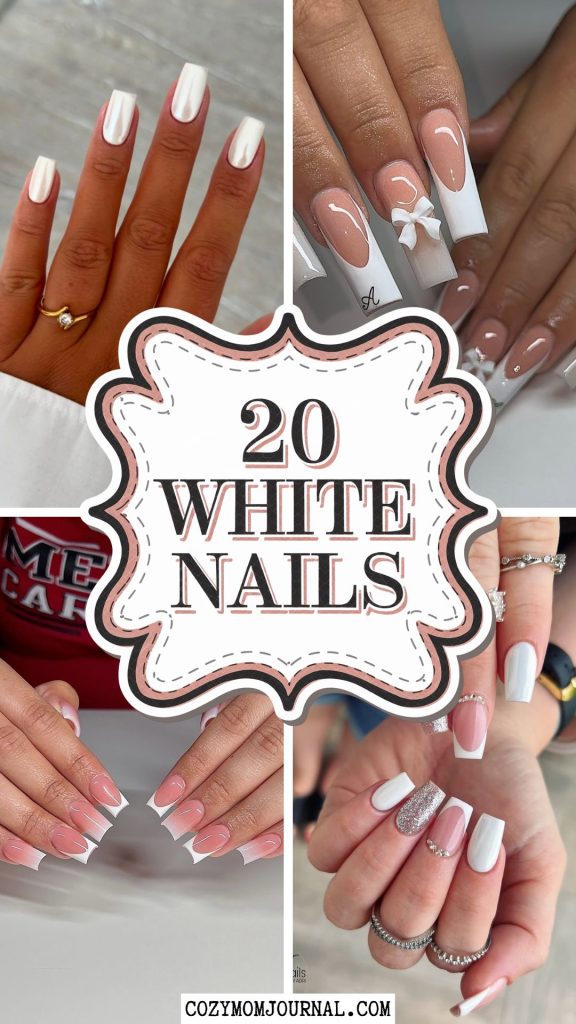
If there’s one thing I’ve learned from my endless love for nail art, it’s that white nails are anything but boring. They’re like that little black dress in your closet—timeless, versatile, and perfect for any occasion.
I still remember the first time I got a set of classic white nails for a summer party; they instantly made me feel elegant yet playful. Whether you’re into minimalist chic or extravagant designs, white nails are a canvas for endless creativity.
So, grab a coffee (or a matcha if you’re fancy like me), and let’s dive into these stunning ideas that will leave you booking your next nail appointment.
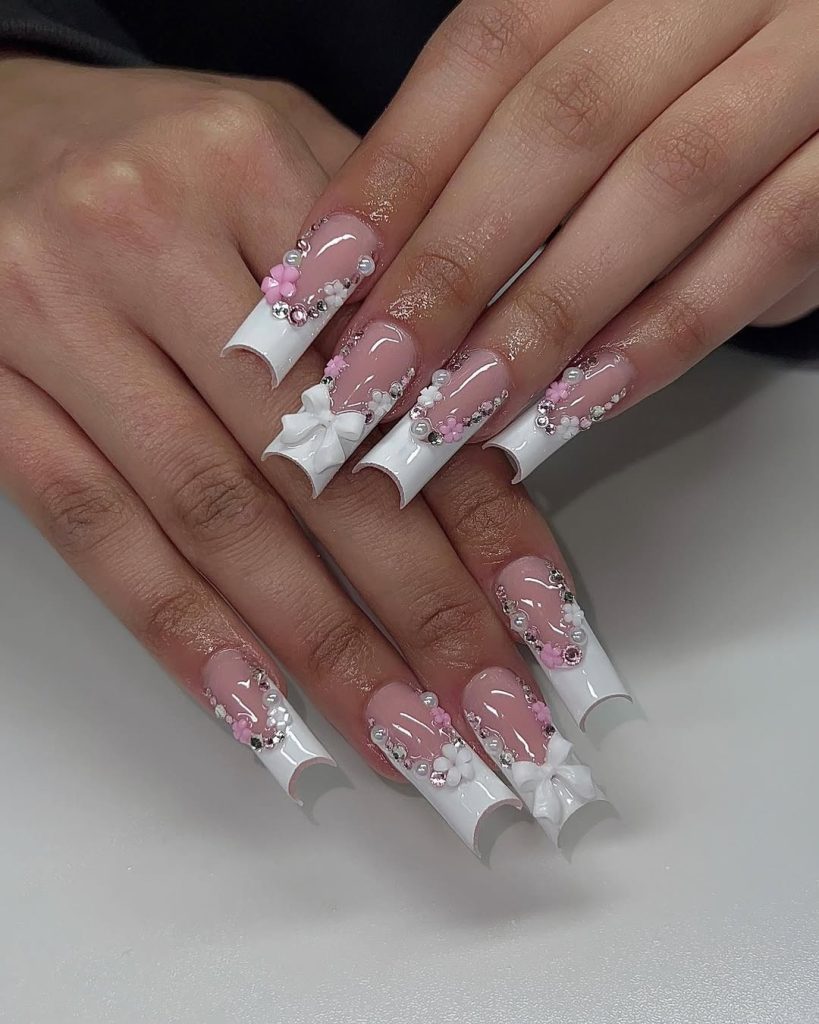
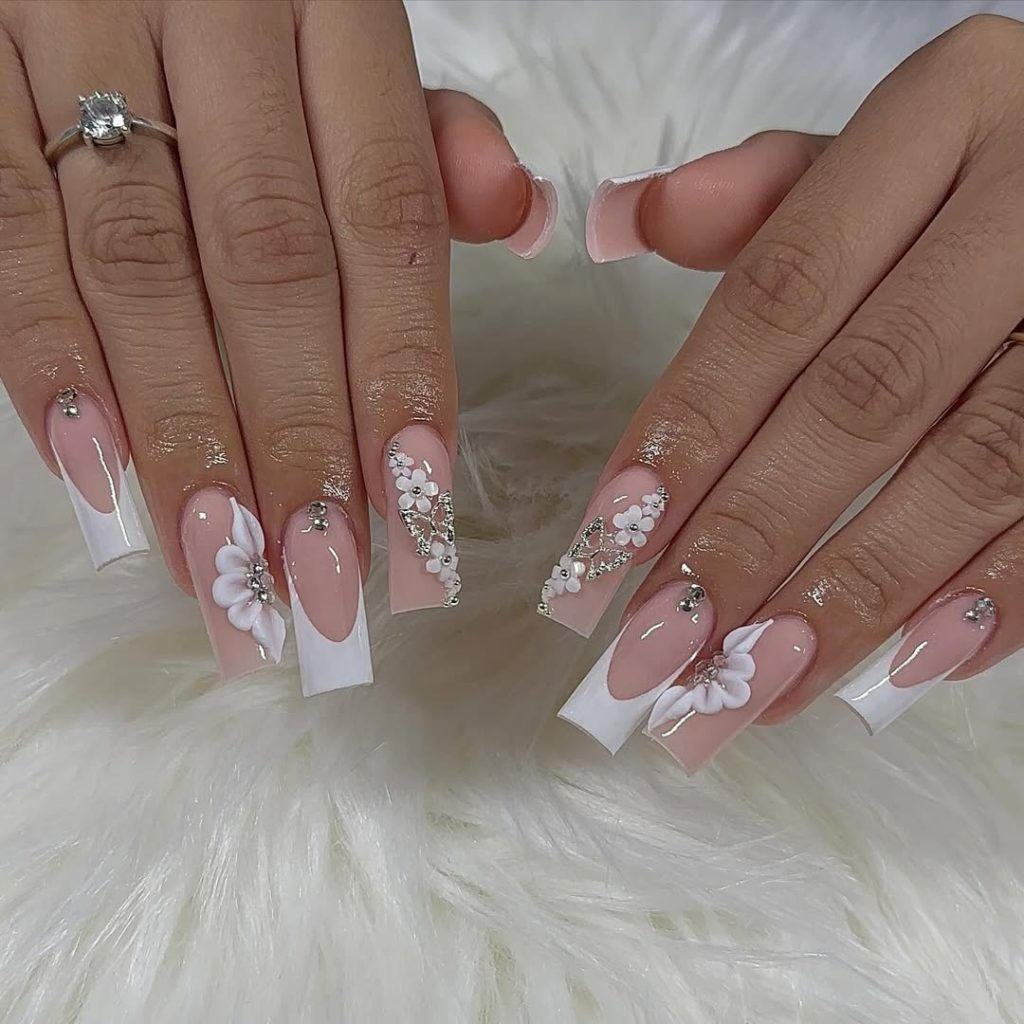
1. Floral Fantasy: White Nails with 3D Blooms and Bows
Credit: @14nailz
These enchanting nails are the perfect blend of elegance and whimsy! The crisp white French tips are adorned with delicate 3D flowers, sparkling rhinestones, pearls, and adorable bows for a fairy-tale vibe.
The clear and nude base keeps it balanced while letting the embellishments shine.
Styling Suggestions
These nails pair beautifully with bridalwear, lace gloves, pearl accessories, or any formal outfit with delicate details. Also stunning with satin or sheer fabrics.
When to Wear It
Perfect for weddings (bride or guest), proms, quinceañeras, or ultra-glam photoshoots. If you’re going for “main character” energy, this is it.
What You’ll Need
- French Tip White: Try Gelish “Arctic Freeze” or The GelBottle “Daisy”
- 3D Florals & Bows: Use sculpting gel, silicone molds, or pre-made charms
- Rhinestones & Pearls: Mix sizes and styles—AB crystals, silver studs, and mini flatback pearls
- Rhinestone Gel Adhesive: Like Mia Secret Gel Resin or Zule Nails Rhinestone Gel
Application Tips
Start with a nude-pink base. Paint or sculpt French tips in white, then cure. Apply charms with gel adhesive and flash cure as you place each element. Finish by sealing around (not over) the embellishments with a detail brush and top coat.
Simpler Alternative
Keep the French tip and add just one accent nail with a tiny 3D bow or flower charm. It keeps the vibe but makes it more practical for everyday wear.
Elevate the Look
Add shimmer to the base pink with a pearlescent gel or a fine glitter overlay. You could also place a single gemstone at the center of each flower for a luxe finish.
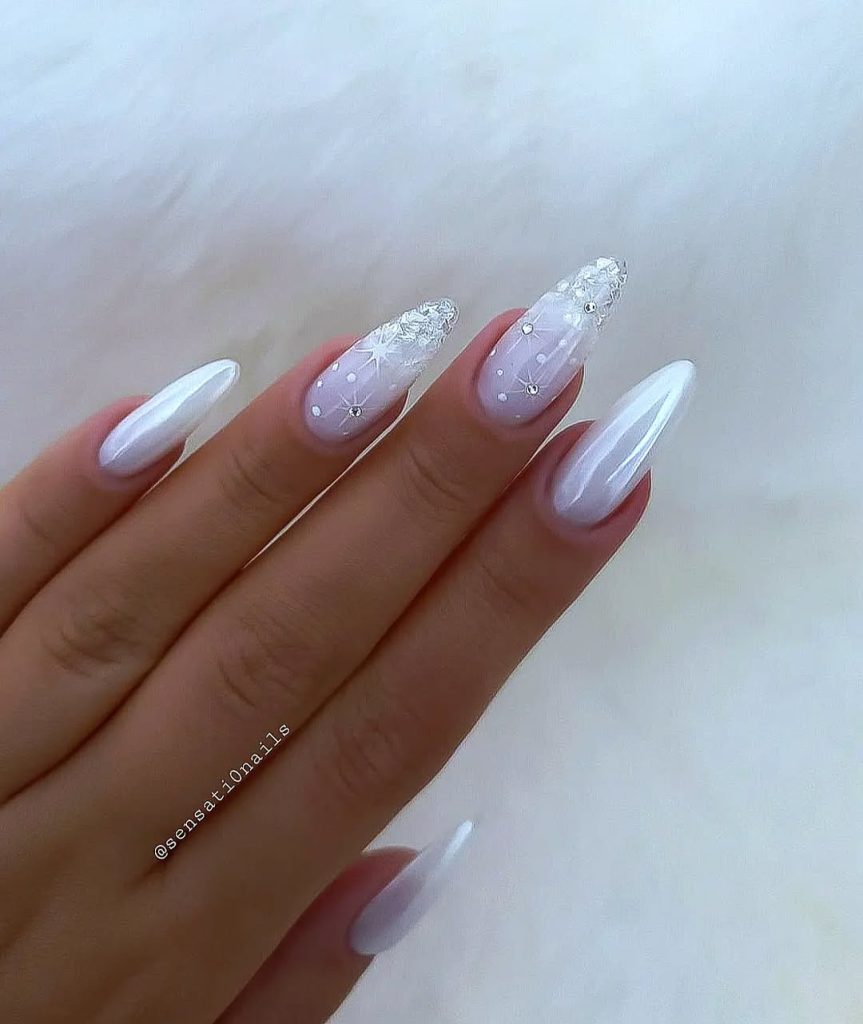
2. Pearl Glow: Minimalist Iridescent Nails
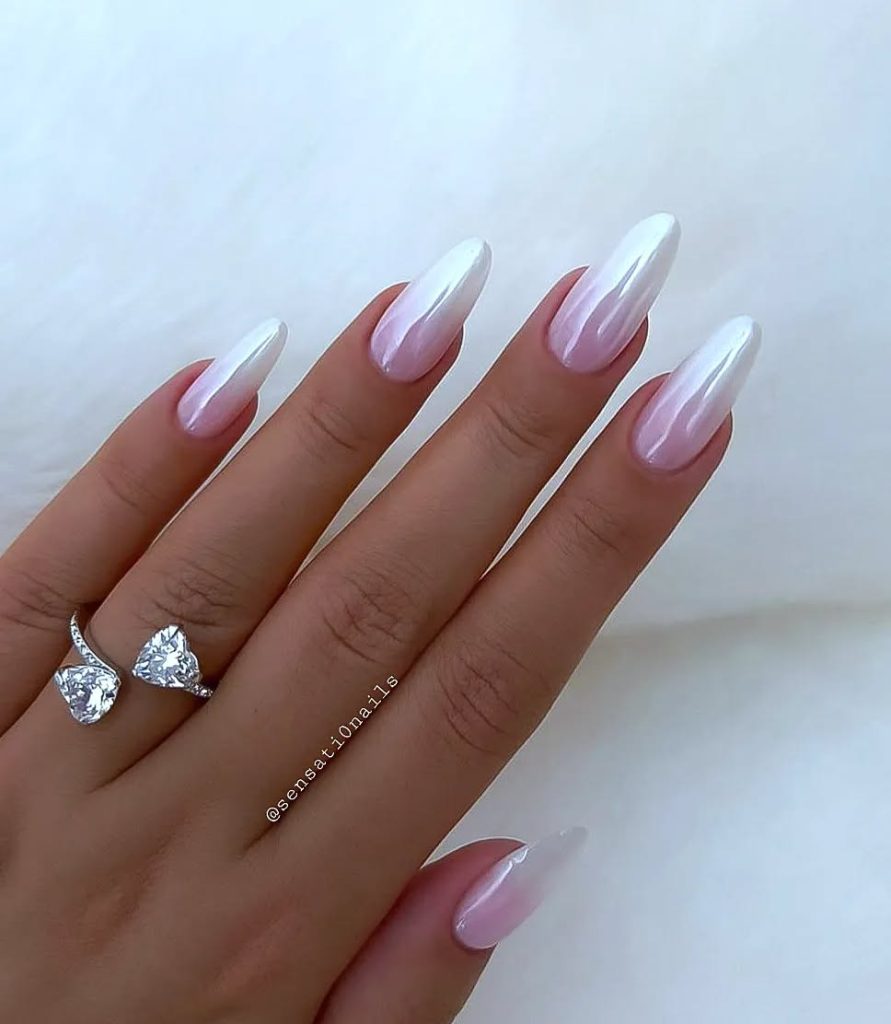
Credit: @sensati0nails
These stunning white nails exude effortless elegance with their soft pearl-like sheen and almond shape. The subtle ombré effect adds dimension, making them perfect for any occasion—from weddings to casual chic moments.
How to Wear It
Pairs effortlessly with silver jewelry, satin pieces, or soft monochrome outfits. Works especially well with bridal looks, vacation whites, or minimalist glam styling.
Best For
This set is a go-to for weddings (bride or guest), engagement parties, and elegant dinners. Also ideal if you’re into the clean aesthetic but want a luxe finish.
Products That Match the Look
- Base Layer: Start with a sheer pink or milky white like OPI “Funny Bunny” or The GelBottle “Marshmallow”
- Chrome Effect: Use a white pearl chrome powder—look for Born Pretty “Mirror Pearl” or Daily Charme “Aurora Chrome”
- Top Coat: Use a no-wipe top coat before applying the chrome, then seal with a second layer
Technique Breakdown
Apply your base color and cure fully. Rub chrome powder over the no-wipe top coat using an eyeshadow applicator or silicone tool. Once the powder is evenly buffed, apply a sealing top coat and cure again for long-lasting shine.
Easier At-Home Option
If you’re skipping chrome powders, go for a polish like Essie “Glow and Arrow” or Zoya “Genesis”—they give a pearl shimmer without the extra steps.
Ways to Upgrade
Add a mini crystal near the cuticle on one or two fingers, or use a subtle iridescent foil under the chrome for more dimension.
3. Sweet Swirls: French Tips with Heart Details

Credit: @heluviee
These adorable nails combine classic French tips with playful charm! Featuring dainty white swirls and tiny hearts on a nude base, this design is perfect for a romantic date or simply brightening your day.
The almond shape keeps it soft and elegant, while the minimal details add just the right amount of fun.
When to Wear It
Perfect for Valentine’s season, bridal showers, engagement photos, or just when you’re feeling soft and romantic. It’s cute without being over-the-top.
Pairing Tips
Looks gorgeous with cozy neutrals, dainty jewelry, or even minimalist outfits in beige, blush, or cream. Great for pairing with pearl or gold details.
Tools & Products You’ll Need
- Milky Nude Base: Try OPI “Bare My Soul” or The GelBottle “Nude BIAB”
- White Gel Liner: Essential for creating those crisp swirls and French tips
- Dotting Tool or Detail Brush: For the mini hearts and thin curves
- Top Coat: Use a glossy top coat to keep everything clean and glassy
Application Tips
Start with a sheer nude base. Use a fine liner brush to paint the French tips and wave accents on the sides. For the hearts, a dotting tool can help with symmetry—two dots and a small pull-down flick can create the shape easily.
Beginner-Friendly Option
Skip the swirls and just add one heart detail over a simple French tip. You’ll still get the flirty vibe with half the effort.
Want to Elevate It?
Outline the swirls with a fine glitter line, or add a matte top coat for a soft, frosted finish that still keeps the design delicate and modern.
4. Floral French: Elegant Nails with 3D Blooms
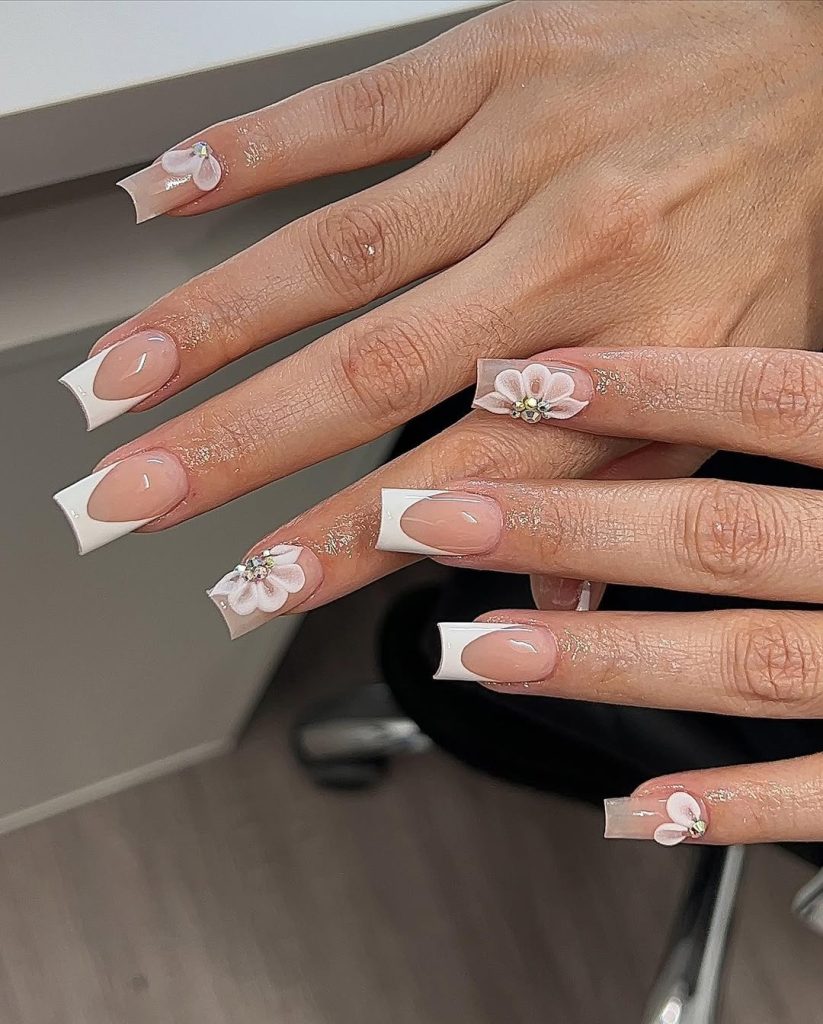
Credit: @nailsbycurls
These French tips are blooming with charm! A crisp white design is elevated with delicate 3D flowers and rhinestone centers, creating a soft, romantic vibe. The nude base adds a modern touch, while subtle glitter accents bring a dash of sparkle.
Where to Wear This Look
Perfect for weddings, bridal showers, or spring/summer events where you want something elegant with a hint of charm. It also works beautifully for prom or engagement shoots.
What You’ll Need to Recreate It
- Base Nude: Try OPI “Bubble Bath” or The GelBottle “Dolly”
- Bright White Tip: Use Gelish “Arctic Freeze” or Beetles Gel “White Snow”
- 3D Flower Petals: Sculpt using builder gel or use pre-made acrylic flower charms
- Crystal Centers: Flatback rhinestones or pearl studs for a delicate sparkle
- Fine Glitter Gel or Foil: Optional, for added shimmer at the base or cuticle
Technique Breakdown
Start with a classic French base. For the 3D flowers, use a petal mold or sculpt them with a dotting tool and thick white builder gel. Cure after placing each petal. Add a rhinestone in the center and seal gently around the design to hold it in place.
Easy Alternative
Use flower nail stickers or decals and apply a crystal in the middle to fake the 3D effect. It’s a quicker option with less product layering.
Ways to Add More Dimension
Dust a bit of chrome or shimmer pigment over the flower before curing, or add a glossy drop of clear gel to the petal tips to mimic dew-like texture.
5. Glam Garden: Luxe French Nails with 3D Florals
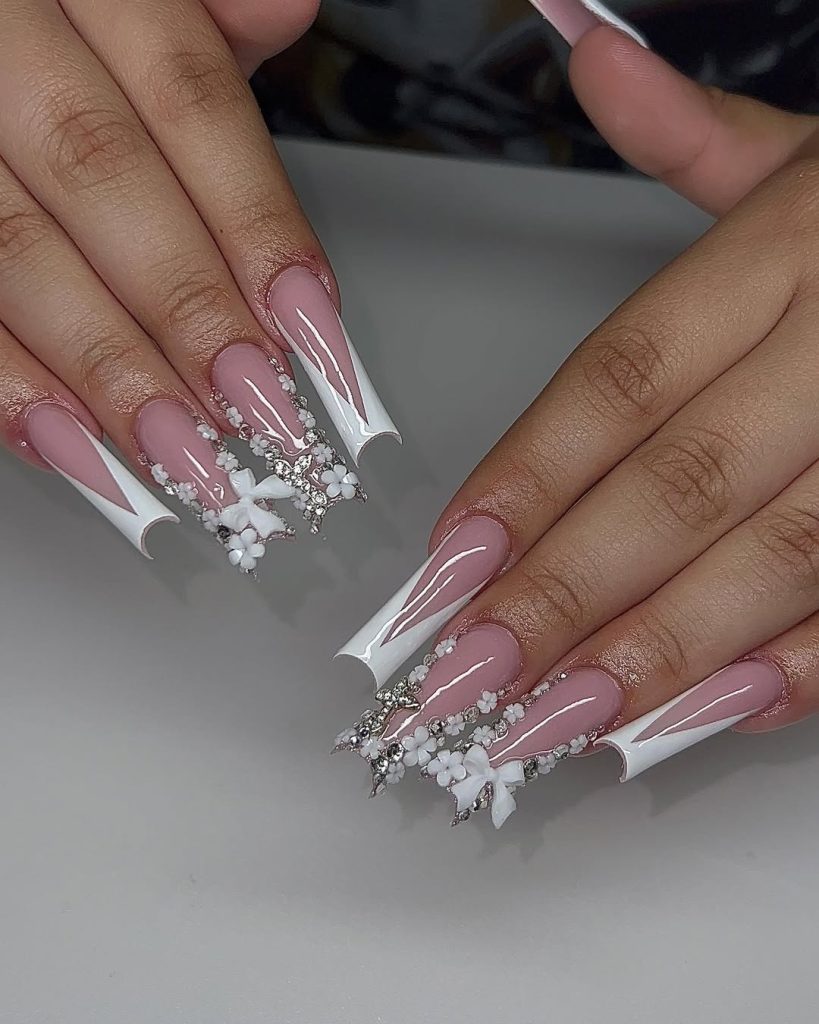
Credit: @14nailz
These nails are a show-stopping blend of sophistication and glamour! Featuring bold V-shaped French tips, dazzling rhinestones, and intricate 3D floral accents.
When to Wear This Look
Ideal for high-glam occasions like weddings, formal galas, engagement parties, or even pageants. It’s bold, elegant, and absolutely not for blending in.
Color & Product Picks
- White Gel: Use Gelish “Arctic Freeze” or The GelBottle “Daisy” for sharp, opaque tips
- Nude Base: Try OPI “Put It In Neutral” or Luxio “Coy” for a seamless blend
- 3D Florals & Bows: Sculpt with builder gel or use pre-made charms from brands like Mia Secret
- Rhinestones: Mix AB crystals and microbeads for texture—Swarovski or Daily Charme work beautifully
Application Guide
Shape and apply your nude base first. Use a detail brush to paint the V-cut French tips, curing each one. Place your 3D flowers and rhinestones with gem gel, curing as you go. Use a thin brush to seal edges and keep embellishments secure without dulling the shine.
Pro Tip
Create balance by keeping at least two nails per hand simpler (no 3D)—it helps highlight the bling without overwhelming the full set.
How to Simplify It
Stick with the V-French tip and add rhinestones only on the ring finger. This keeps the drama but cuts down on application time and bulk.
Ideas to Elevate It Further
Outline the white tips with a silver chrome gel for a more defined edge, or add pearl accents between the florals for a bridal couture finish.
6. Personalized Elegance: Floral French Tips with a Twist
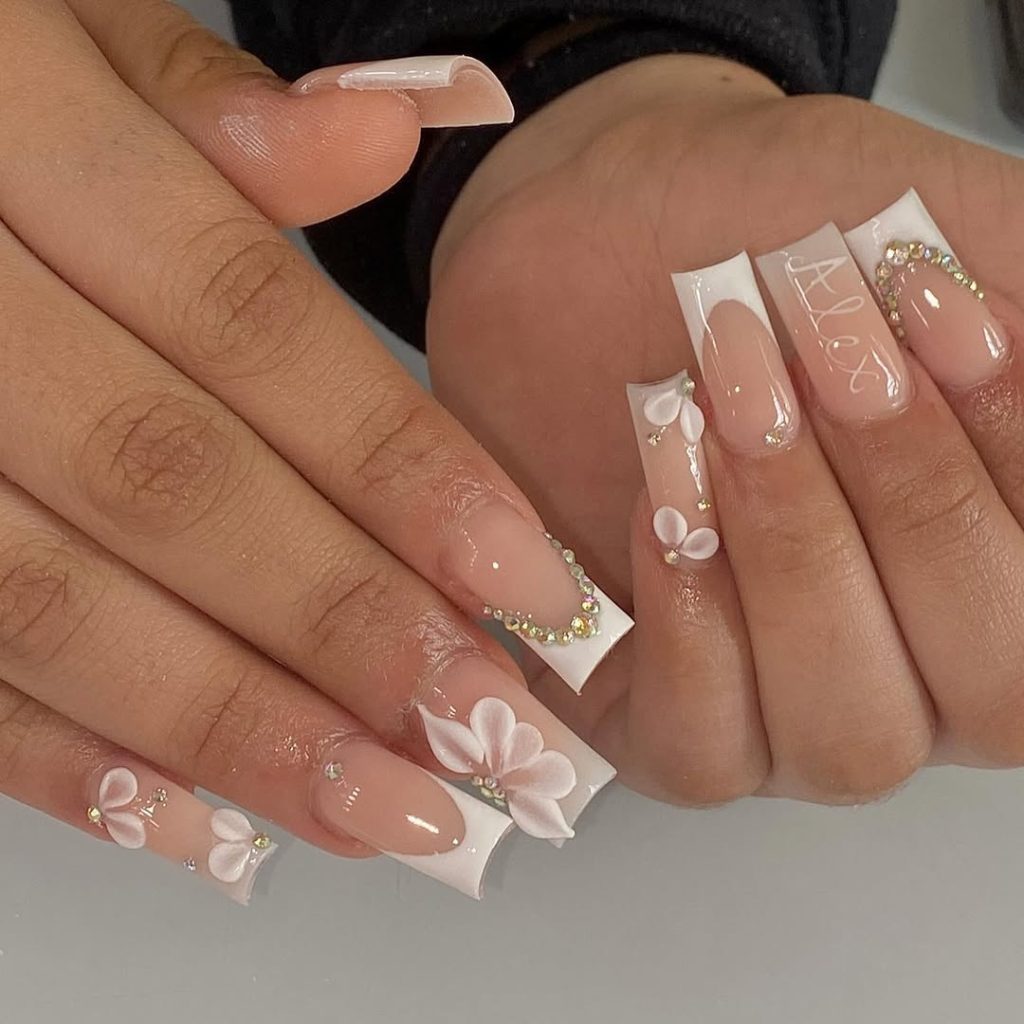
Credit: @nailedbydulcee
These stunning French tips are elevated with delicate 3D flowers, sparkling rhinestones, and even a personalized name detail for a unique touch.
The glossy nude base adds sophistication, while the crisp white tips keep it timeless.
Perfect for These Occasions
Great choice for bridal showers, quinceañeras, birthdays, or any custom-glam event where you want your nails to feel extra personal—especially with the name detail included.
Tools & Materials to Recreate It
- White Tip Gel: Use Gel-X “Milky White” or The GelBottle “Daisy”
- Base Nude: OPI “Bare My Soul” or NotPolish “Nude Panther”
- 3D Flowers: Created with builder gel or acrylic using a petal mold or 3D brush
- Crystals: AB rhinestones in mixed sizes, plus microbeads for filler
- Fine Brush or Nail Art Pen: For writing names or custom words
- Rhinestone Gel or Builder Gel: For long-lasting charm placement
Design Execution Tips
Begin with a structured nude base, then shape the white French tips using a flat brush or reverse French technique. Place your floral petals with 3D gel or acrylic, cure layer by layer. Apply crystals along curved cuticle edges for symmetry. For text, use a liner brush and white gel paint with a very light touch.
Beginner-Friendly Modification
Instead of 3D elements, go with pressed flower decals or flat floral stickers. Skip the hand-lettering and use pre-printed transfer foils for names or initials.
Ideas to Make It Pop More
Add a hint of shimmer beneath the floral placements, or outline the letters with a micro glitter liner for a sparkling monogram effect. Swapping one floral for a pearl cluster also adds dimension without crowding the design.
7. Floral Elegance: French Tips with 3D Blooms
Credit: @acrylicsby.ana
These stunning white French tips are transformed into a floral masterpiece! With delicate 3D blossoms, sparkling rhinestones, and intricate branch-like details, this design radiates romance and sophistication.
Ideal For These Occasions
This design is a go-to for bridal nails, baby showers, formal galas, or anyone looking for a soft-glam statement with elegance and a bit of extra sparkle.
Design Materials & Tools
- White Gel Polish: Use high-opacity shades like Gelish “Arctic Freeze” or Madam Glam “Perfect White”
- Nude Base: OPI “Love Is in the Bare” or The GelBottle “Dolly”
- 3D Floral Accents: Sculpt with acrylic or builder gel using a petal brush or pre-made charm sets
- Rhinestones & Glitter: Mix AB crystals with silver foil or glitter gel for filler detailing
- Detail Brush & Dotting Tool: For placing the florals and delicate accents precisely
Application Tips
Shape the base and apply a neutral nude tone. For the French tips, use a guide or paint freehand with a flat brush. Sculpt 3D florals on cured layers and flash-cure between each petal for control. Apply rhinestones with gem gel and cure thoroughly.
Quick Variation for Beginners
Use floral nail stickers or decals instead of sculpted blooms, and add a single crystal near the cuticle on accent nails to keep it more manageable but still polished.
Upgrade Ideas
Outline the smile line with micro glitter or add a pearl top coat for a soft satin finish. You can also switch the rhinestones for pearl studs to give it a more vintage, bridal feel.
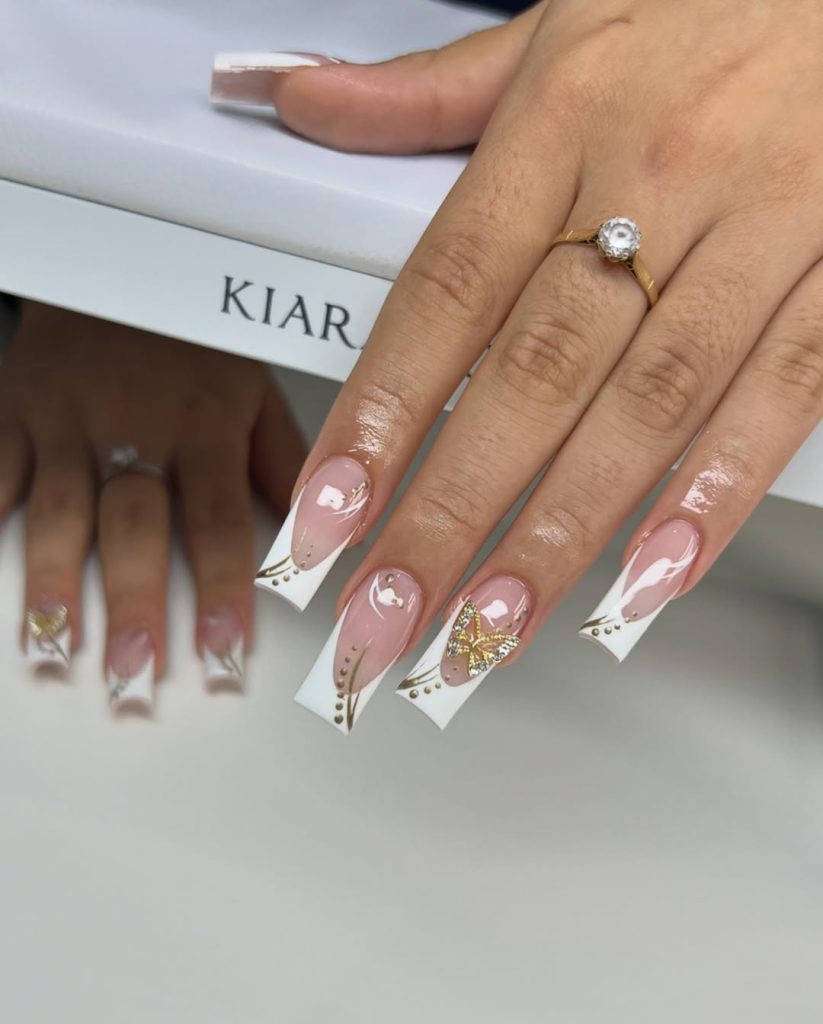
8. Golden Wings: Glamorous French Tips with Butterfly Accents
Credit: @glambykkia
These French tips are a blend of elegance and whimsy! The crisp white design is elevated with delicate gold details and a stunning 3D butterfly centerpiece. Rhinestone accents and soft swirls add a touch of sparkle and sophistication.
When to Try This Look
Perfect for a formal event, engagement dinner, bridal shoot, or any occasion where you want a refined, standout manicure that still feels classic with a modern twist.
Products to Use
- White Tip Gel: The GelBottle “Daisy” or NotPolish “Milky White”
- Nude Base: OPI “Bare My Soul” or Luxio “Coy”
- Gold Foil or Liner Gel: Try Born Pretty Metallic Gold Gel Liner for crisp detailing
- Butterfly Charm: Look for gold flatback nail charms—Daily Charme has great options
- Top Coat: A high-gloss no-wipe top coat will keep those gold accents sharp and sealed
Application Tips
Use a fine liner brush to paint the gold swirls and dot accents after the French tip cures. Apply your butterfly charm using gem gel or builder gel, then flash cure it in place. Seal around the charm (not over) to hold it without dulling the shine.
Easy Modification
Skip the charm and just keep the gold detailing for a sleeker, everyday wearable look. You can also use gold stickers if you’re not confident with freehand lines.
Extra Design Ideas
Add a thin gold outline around the French tip edge for a more luxurious finish, or layer a sheer shimmer polish over the nude base for extra glow without cluttering the design.
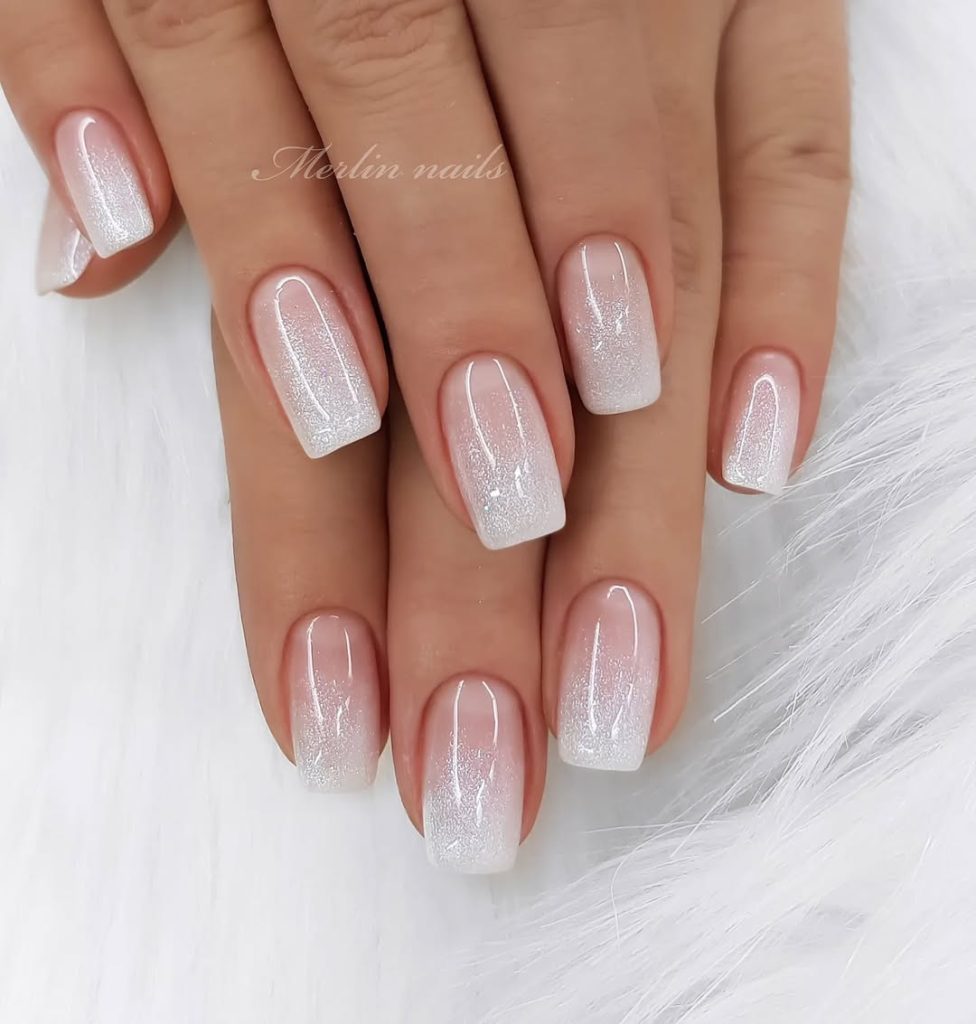
9. Frosted Glow: Subtle Glitter Ombré Nails
Credit: @merlin_nails
These soft glitter ombré nails are the perfect balance of subtle and stunning! Starting with a sheer pink base that fades into a delicate frosted white sparkle, this look is effortlessly elegant.
Best Times to Wear It
Perfect for winter weddings, holiday parties, or anytime you want a clean, frosty look that still feels soft and subtle. Also works beautifully as a bridal nail or everyday glam option.
How to Recreate the Look
Start with a sheer nude or milky pink base. Use a sponge to dab on a thin layer of white polish or gel near the tip, fading it upward. Once blended, add a layer of fine shimmer or glitter top coat before sealing everything with a high-gloss top coat.
Recommended Products
- Base: OPI “Bubble Bath” or The GelBottle “Nude BIAB”
- White Fade: Essie “Blanc” (thinned) or Gelish “Arctic Freeze”
- Shimmer Layer: Kiara Sky “DiamondFX” or Holo Taco “Solar Unicorn Skin”
- Top Coat: Use a no-wipe gel top coat for maximum shine and clarity
Beginner Shortcut
Try pre-made ombré nail wraps or dip powders for an even fade without needing to master the sponge technique.
How to Dress It Up
Add a single rhinestone at the cuticle on one or two nails, or a tiny snowflake charm on top for a wintery upgrade. A matte top coat can also transform it into a soft, velvety look.
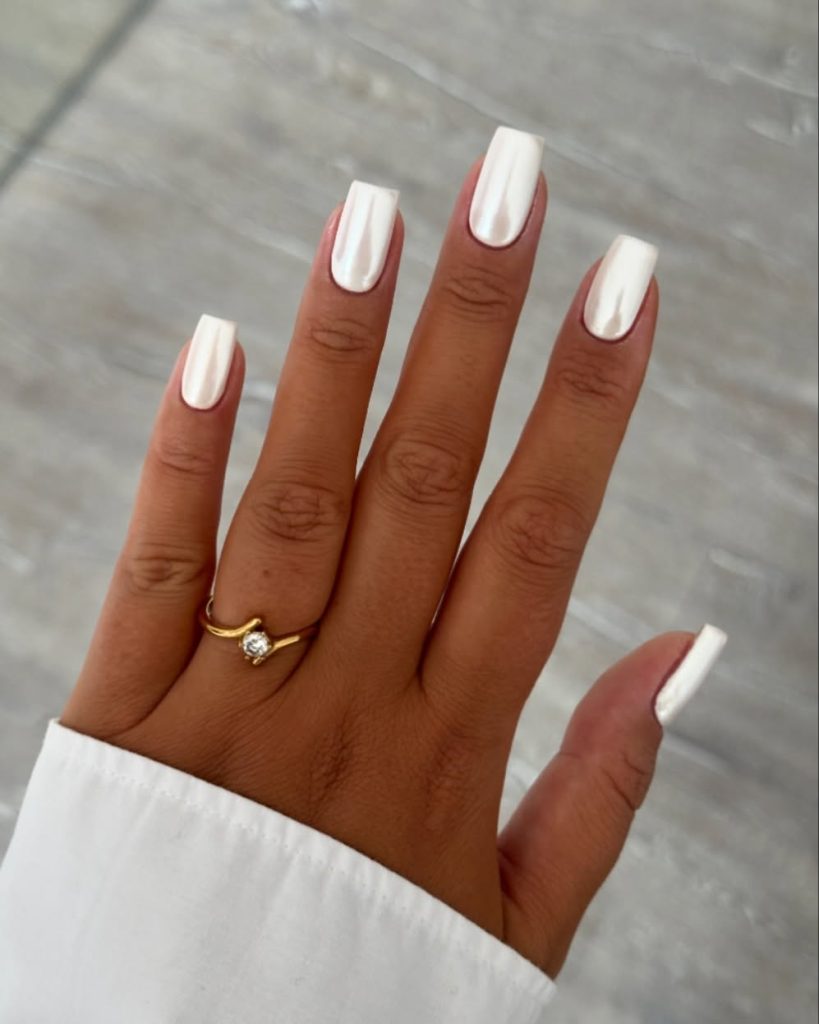
10. Classic Shine: Glossy White Perfection
Credit: @beautyspace_charlotte
These sleek, glossy white nails are simplicity at its finest! The creamy, high-shine finish adds elegance and versatility, making them perfect for any occasion—from casual outings to formal events.
When to Wear This Look
Perfect for summer trips, job interviews, or any outfit that calls for minimalism with a crisp finish. It works across seasons and outfits—from linen shirts to tailored blazers.
How to Get the Look
Use two thin coats of an opaque white gel polish, curing fully between each layer. Follow with a no-wipe top coat to lock in the shine. For regular polish, finish with a quick-dry high-gloss top coat.
Suggested Polishes
- OPI “Alpine Snow” (for classic bright white)
- The GelBottle “White BIAB” (builder + polish)
- Essie “Blanc” (for non-gel users)
- Bonus: Add a layer of Pearl Chrome Powder for that subtle sheen effect seen here
Pro Application Tip
Buff the nail surface first to avoid streaks, and float the top coat (lightly drag it over the color) to avoid disturbing the white base—this keeps the finish flawless and glassy.
Ways to Switch It Up
Add a matte top coat for a soft chalky look, or place a single metallic stud at the cuticle of one nail for a minimal design twist.
11. Icy Allure: White Chrome Nails with Snowy Details
Credit: @sensati0nails
These dazzling nails are pure winter wonderland vibes! Featuring a sleek, pearl-chrome finish, paired with intricate snowflake designs and rhinestone accents, they’re perfect for holiday events or frosty fashion moments.
Occasions That Suit It
This design is ideal for winter weddings, holiday events, New Year’s Eve, or even a snowy-themed photoshoot. It’s also a beautiful option for brides who want a magical, snowflake-inspired twist.
How to Recreate the Look
Start with a soft pink or milky base. Apply a white pearl chrome powder over a cured no-wipe top coat to get that mirror-glazed finish. For the accent nails, layer builder gel to create subtle snowflake textures, then add micro rhinestones and silver studs for sparkle.
Product Suggestions
- Pearl Chrome: Use Daily Charme Aurora Chrome or Born Pretty Pearl Powder
- 3D Gel or Sculpting Gel: Mia Secret Clear 3D Gel works great for raised details
- Base Polish: Try OPI “Funny Bunny” or Madam Glam “Perfect White”
- Top Coat: Use a high-gloss no-wipe gel top coat for that glassy finish
Pro Application Tip
Cure each design element in stages to avoid slipping—especially when working with embellishments or gel textures. Use a detail brush for snowflake lines and a wax pencil for perfect rhinestone placement.
Simple Alternative
Skip the sculpted snowflakes and use winter-themed nail decals. You can still apply chrome and rhinestones for an elegant frosted look with less effort.
How to Take It Further
Add tiny foil flakes or icy blue shimmer at the base of the accent nails for a frozen-glow effect. You could even outline one snowflake with silver glitter gel for more dimension.
12. Glitter Glam: White Nails with Sparkly Accents
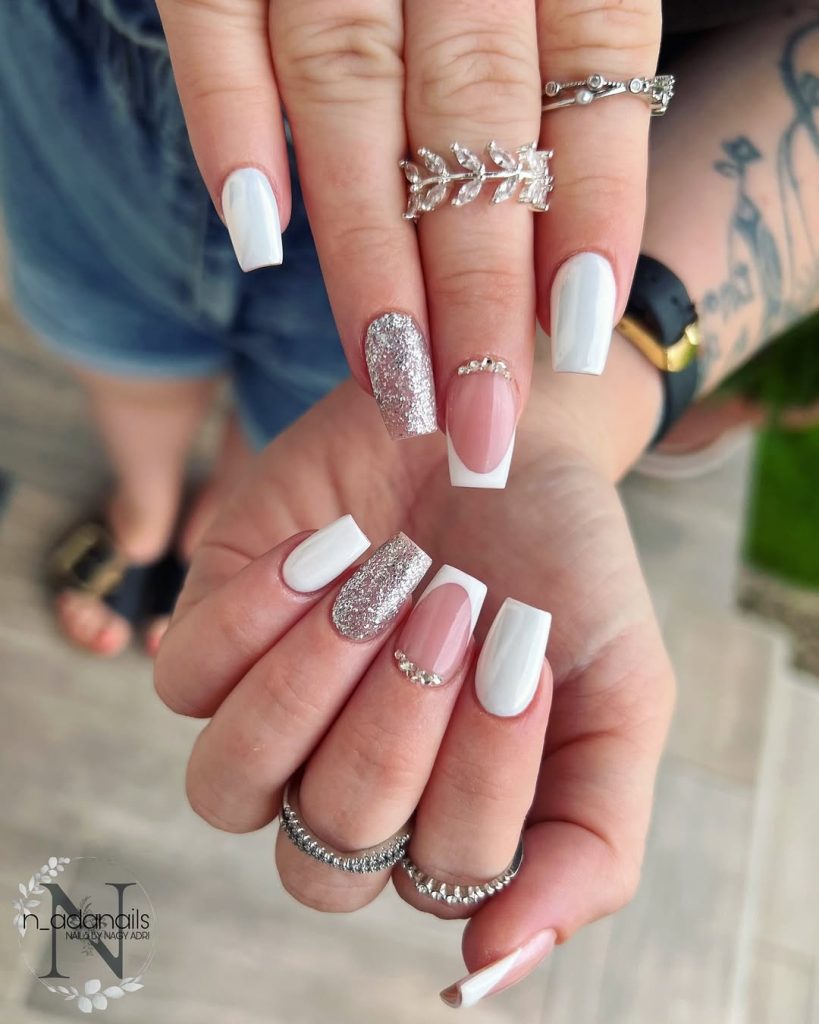
Credit: @n_adanails
These chic white nails are all about effortless glamour! Featuring classic French tips, glossy white polish, and a bold glitter accent nail, they’re topped off with delicate rhinestones for a touch of sparkle.
Where This Design Shines
Perfect for bridal events, engagement parties, or any dressy occasion where you want something classic but not too understated. Also great for winter holidays thanks to the icy sparkle.
What You’ll Need to Recreate It
- Solid White Polish: Try The GelBottle “Daisy” or Luxio “Polar”
- Silver Glitter Gel: Use Kiara Sky “Diamond FX” or Madam Glam “Dancing Queen”
- French Tip Base: A sheer nude like OPI “Bubble Bath” or Gelish “Simple Sheer”
- Rhinestones: Go for clear AB crystals in mixed sizes for subtle variation
- Adhesive Gel: Use a strong rhinestone gel like Zule Crystal Adhesive for long wear
Technique Tips
Start with your base color and cure. Apply glitter only on one or two accent nails to keep things balanced. Use a thin brush or French tip guide to get a crisp white tip on the negative space nail. Place rhinestones in a neat arc at the cuticle and flash cure as you go.
Ways to Modify It
If you’re not into glitter, swap the accent for chrome powder or a soft shimmer polish. You can also skip rhinestones and add a fine silver foil stripe instead for a sleek edge.
Elevate the Look
Outline the French tips with silver glitter gel for an extra pop, or add a light ombré fade under the glitter nail for a bit more depth.
13. Snowflake Chic: Winter Nails with Cozy Textures
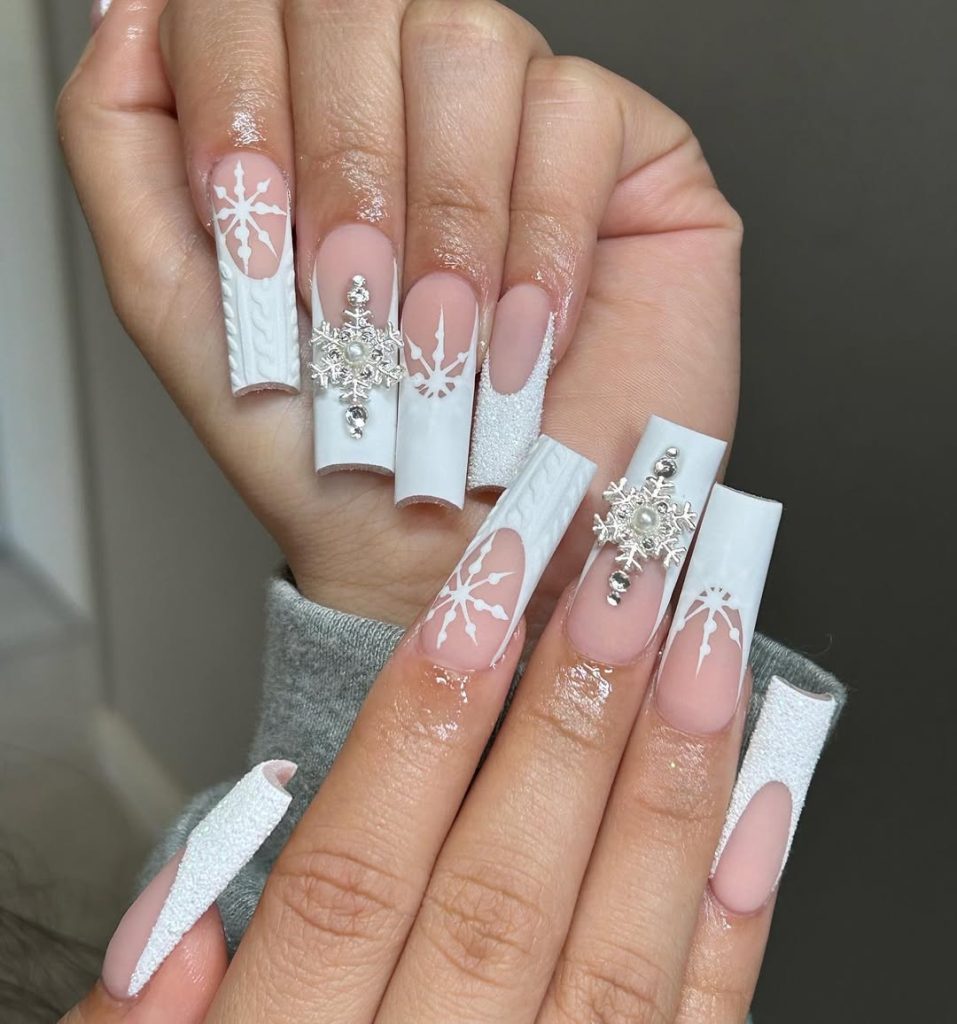
Credit: @maris.nailssss
Step into a winter wonderland with these stunning nails! Featuring crisp white snowflakes, textured sweater details, frosty sugar-finish tips, and 3D snowflake embellishments, they’re perfect for cozy, festive vibes.
Great for These Moments
This design is ideal for December events, holiday parties, winter weddings, or cozy seasonal photoshoots. It’s festive without being cheesy, and still super polished.
Materials You’ll Want
- White Gel Paint: Try Gelish “Arctic Freeze” or Madam Glam “Perfect White”
- 3D Snowflake Charms: Look for flatbacks with crystals or raised resin styles
- Matte Top Coat: For the sugar-frosted and sweater-knit textures
- Acrylic Powder or Glitter Dust: Tap onto uncured white polish to create the sugar effect
- Builder Gel or 3D Gel: For the raised cable-knit details
Application Breakdown
Use a liner brush to paint your snowflakes directly over a cured nude base and flash cure as you go. For the cable knit effect, layer lines and dots of white gel, cure each step, and finish with matte top coat. Add charms with a thick rhinestone gel or builder gel for strong hold.
Beginner-Friendly Adjustments
Skip the textured knit effect and opt for matte white polish instead. You can use a stamping plate for snowflake designs or stick-on decals for precision without freehand stress.
Design Add-Ons
Add tiny silver beads around the snowflakes for a more dimensional, jewel-like finish. Or dust a fine shimmer powder over the entire nail for a snow-globe glow.
14. Swirl Sophistication: Minimalist French Nails with a Twist

Credit: @kxo.beauty
These white swirl nails are the perfect modern upgrade to a classic French manicure! Featuring elegant wave designs on a nude base with subtle rhinestone accents, this look is chic and versatile.
What You’ll Need to Recreate It
- White Gel Paint: Use Madam Glam “Perfect White” or Gelish “Arctic Freeze” for smooth, opaque swirls
- Base Color: Try a sheer nude or neutral pink like OPI “Put It In Neutral” or The GelBottle “Dolly”
- Rhinestones: Go for small AB crystals or champagne-toned stones for a soft sparkle
- Detail Brush: A long, thin liner brush helps achieve the clean curve lines
- Top Coat: Use a high-gloss no-wipe gel to keep everything sealed and shiny
Design Execution Tips
Start with your base and fully cure. Use the liner brush to paint one or two flowing white curves per nail—keep the hand light and wrist relaxed to avoid jagged lines. Cure, then place a single rhinestone on each nail with gem gel or builder gel. Finish with top coat, floating it over the rhinestones to lock them in without dulling the shine.
Simpler Variation
If swirls feel intimidating, you can replace them with diagonal white tips or a single curve on each nail. It still gives that flowing look but cuts down the detail work.
Ways to Elevate It
Add micro-glitter along the white lines for a shimmer trail effect, or use a pale chrome base underneath for a dimensional glow. A matte version of this design also looks surprisingly modern and chic.
15. Golden Minimalism: Sleek White Nails with Metallic Accents
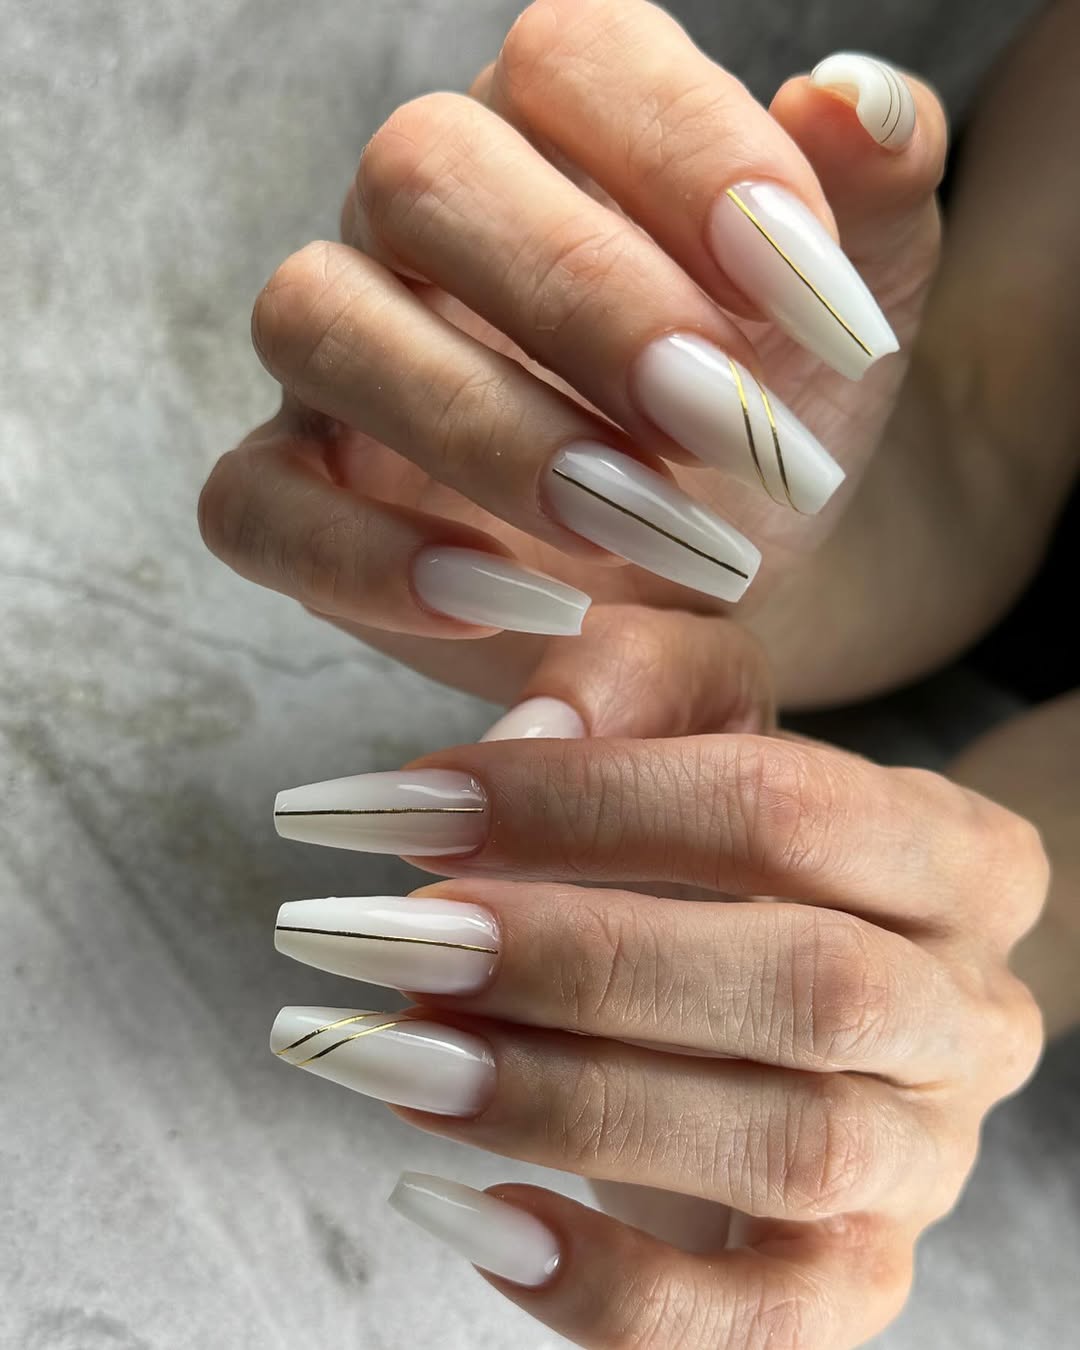
Credit: @crazy_nails_____msk
These white nails are pure sophistication! A milky white base is elevated with ultra-thin gold lines, creating a minimalist yet luxurious look. The coffin shape adds elegance, while the metallic details provide a subtle pop of glam.
Perfect for These Occasions
Great for business events, weddings, or everyday wear if you’re into elevated neutrals. This look walks the line between modern and timeless.
What You’ll Need
- White Sheer Base: Try OPI “Funny Bunny” or The GelBottle “Marshmallow” for that milky soft-white base
- Striping Tape or Gel Liner: Use ultra-thin gold tape, or a fine liner brush with gold metallic gel like Born Pretty “Gold Leaf”
- Top Coat: Opt for a no-wipe, high-gloss gel top coat to lock in the lines and prevent lifting if using striping tape
How to Apply It Cleanly
Apply your sheer white base and cure fully. Place striping tape gently and press down with a silicone tool to avoid air bubbles. For gel liner, steady your hand and pull from edge to edge in one smooth motion. Cure, then seal everything with a generous layer of top coat.
Simple Upgrade Ideas
Swap one of the gold lines for a tiny metallic dot at the cuticle, or add a matte top coat for a softer contrast against the shine of the metallic detail.
Beginner Tip
If straight lines are intimidating, go for pre-cut metallic decals—they’re easy to apply and give the same effect with minimal effort.
16. Blooming Elegance: Floral French Tips with a Bow Accent
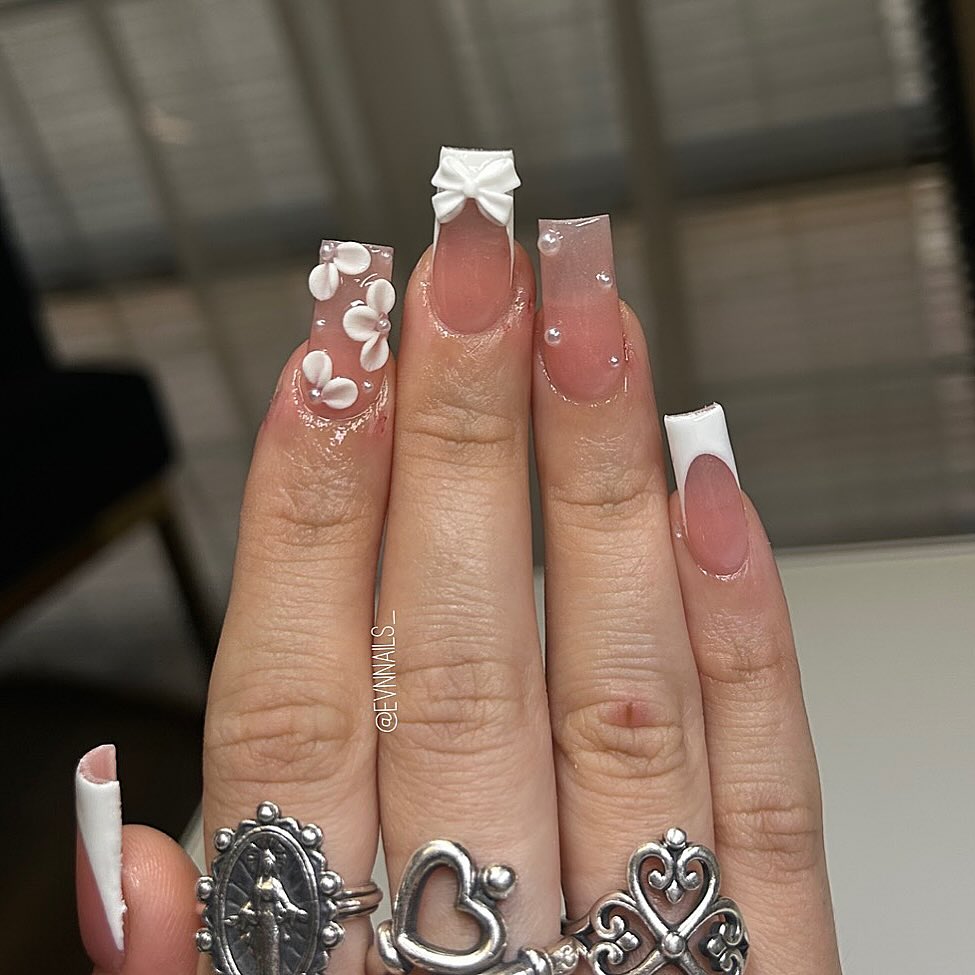
Credit: @evnnails_
These nails are a dreamy combination of classic and playful! Featuring crisp white French tips, delicate 3D floral details, and a charming bow centerpiece, they’re perfect for special occasions or a feminine everyday look.
What You’ll Need for This Look
- Builder Gel or 3D Sculpting Gel: For creating the bow and flower details. Moyra 3D Gel or Akzentz Gel Play 3D are great picks.
- Pearls & Mini Beads: Use flat-back nail pearls or caviar beads for clean, non-bulky placement.
- Classic White Gel Polish: Try Gelish “Arctic Freeze” or Madam Glam “Perfect White” for the French tips.
- Dotting Tool & Silicone Brush: Handy for shaping and pressing the 3D elements.
Application Tricks
Cure the base first, then apply the white French tips using a detail brush or French tip stickers for a guide. For the 3D art, apply small beads of gel, shape with a silicone tool, then flash cure in place. Finish with top coat around the embellishments to avoid dulling the texture.
Ways to Personalize It
Swap the bow for a mini charm or add soft pink petals for a bridal vibe. For something more delicate, do micro florals instead of sculpted ones and replace pearls with crystals.
Low-Effort Variation
Not into full 3D? Use floral stickers or decals and seal with a glossy top coat. You’ll keep the romantic vibe with half the work.
17. Sweater Weather Glam: 3D Bows and Cozy Knit Nails

Credit: @setsbysenia
These almond-shaped nails combine winter coziness with chic elegance! Featuring textured white knit patterns, glossy nude bases, and 3D bow accents, this look is equal parts cute and glamorous. Perfect for colder seasons or a whimsical statement year-round.
What You’ll Want to Have on Hand
- White Sculpting Gel or 3D Gel: Perfect for creating that cable-knit texture and raised bows
- Detail Liner Brush: Essential for drawing knit lines cleanly—try a size 0 or 00
- Dotting Tool or Silicone Tool: Helps shape the bow loops without flattening them
- Matte Top Coat: Use over the knit sections before drawing on the texture for that cozy, sweater-like finish
- Glossy Top Coat: Keep the base shiny for contrast against the matte accents
Application Notes
Apply your nude or sheer base and fully cure. For the textured tips, first draw your French tip shape and flash cure. Then layer small vertical and diagonal lines using 3D gel or thick builder gel, curing between layers to build up dimension. For the bows, sculpt in sections—start with one loop, cure, then add the next for better structure and control.
Modifications That Still Look Chic
You can simplify the look by keeping the sweater texture on just one or two accent nails and replacing the 3D bows with flat charms or even a hand-painted bow silhouette.
Ideas to Elevate It
Add a dusting of white acrylic powder over the uncured 3D gel to give the knit a “fluffy” finish. Or swap white for soft beige or ivory if you want a warmer, more neutral version.
Bonus Tip
For extra hold on bows or chunky 3D accents, use a thicker builder gel or rhinestone glue—and always cure from multiple angles to make sure the underside is set too.
18. Timeless Elegance: Modern French V-Tips
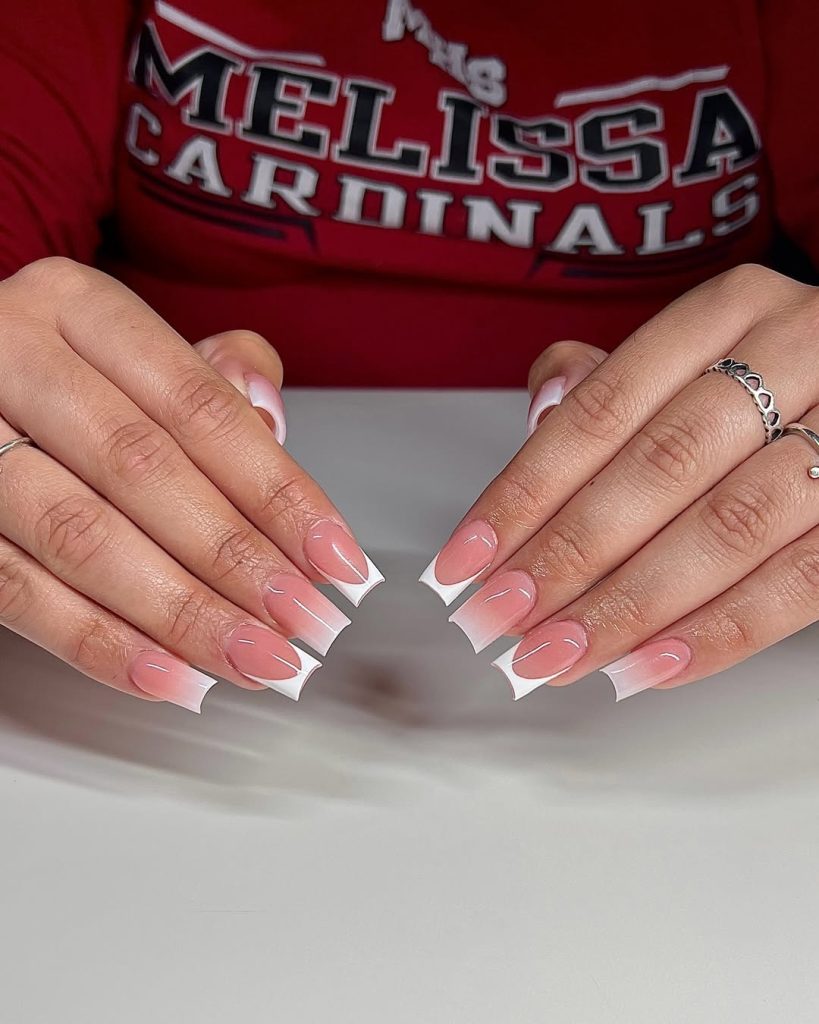
Credit: @nailzbymarlene_
French tips get a sleek upgrade with these sharp V-shaped designs! The crisp white tips contrast perfectly with the soft pink nude base, creating a clean, sophisticated vibe. These square-shaped nails are ideal for anyone who loves classic beauty with a contemporary edge.
Polish Pairing Tips
To get that crisp contrast, choose a cool-toned sheer pink or nude base. Try O.P.I “Bubble Bath” or Madam Glam “Builder Light Pink”—they give that soft flush without overpowering the bold white lines.
Application Tip: That Sharp Line
For this deep V-French look, using French tip guides or a fine liner brush is key. Start with the first curve, flash cure it, then mirror it on the other side to keep the symmetry clean. Don’t rush—this style lives or dies by its precision.
Pro Finish Suggestion
Top it off with a high-gloss top coat like Kokoist Ultra Glossy or The GelBottle Extreme Shine to really make that white pop and give the design a glassy finish.
Want to Mix It Up?
Swap the white tips for metallic silver or soft chrome if you’re feeling bold. Or double-line the French with a micro glitter border for something a little dressier.
Simplify for DIY
If you’re not confident with freehand lines, try stamping plates with angled French designs—they’re a total game-changer and way more forgiving than brushwork.
19. Bow-Tied Glam: Laced-Up Elegance
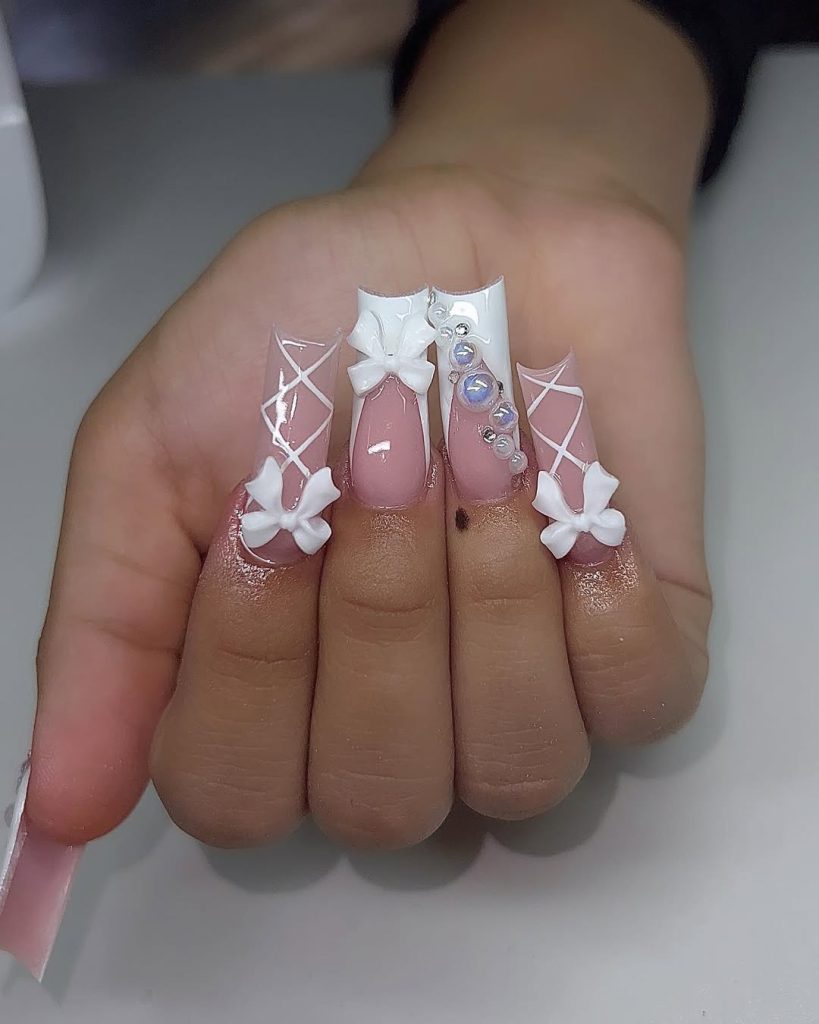
Credit: @14nailz
These ultra-chic nails are pure art! Featuring intricate white lace detailing, adorable 3D bows, and shimmering rhinestone accents, this design screams luxury. The glossy pink base adds a soft touch, letting the bold embellishments shine.
Design Tip: Bow Placement Matters
For a 3D look that doesn’t feel bulky, place the bows lower on the nail bed to avoid crowding the tip and keep it wearable. Use lightweight acrylic molds or silicone bow charms and secure them with builder gel for extra hold.
How to Nail the Lattice Look
Use a super fine liner brush and a thick white gel paint (like Gelixer Art Gel White) to draw the crisscross pattern. Flash cure each layer to avoid smudging. For symmetry, start with the center X and work your way out.
Crystal Application Advice
When working with a vertical crystal row like this, opt for a mix of round and teardrop rhinestones. Use a crystal gel adhesive (like Zillabeau Crystal Fix) and a silicone tip tool to press them in before curing—this keeps everything neat and flat.
Beginner-Friendly Mod
Not ready for 3D bows? Try stamping a bow pattern or using flat decals instead. Still super cute, but much easier to apply and less prone to catching on things.
Polish Picks
For the base color, go with a soft milky nude like Madam Glam “Cotton Candy” or The GelBottle “Dolly”—you want something sheer enough to contrast but still soft and romantic.
20. Personalized Elegance: Bows & Initials Perfection
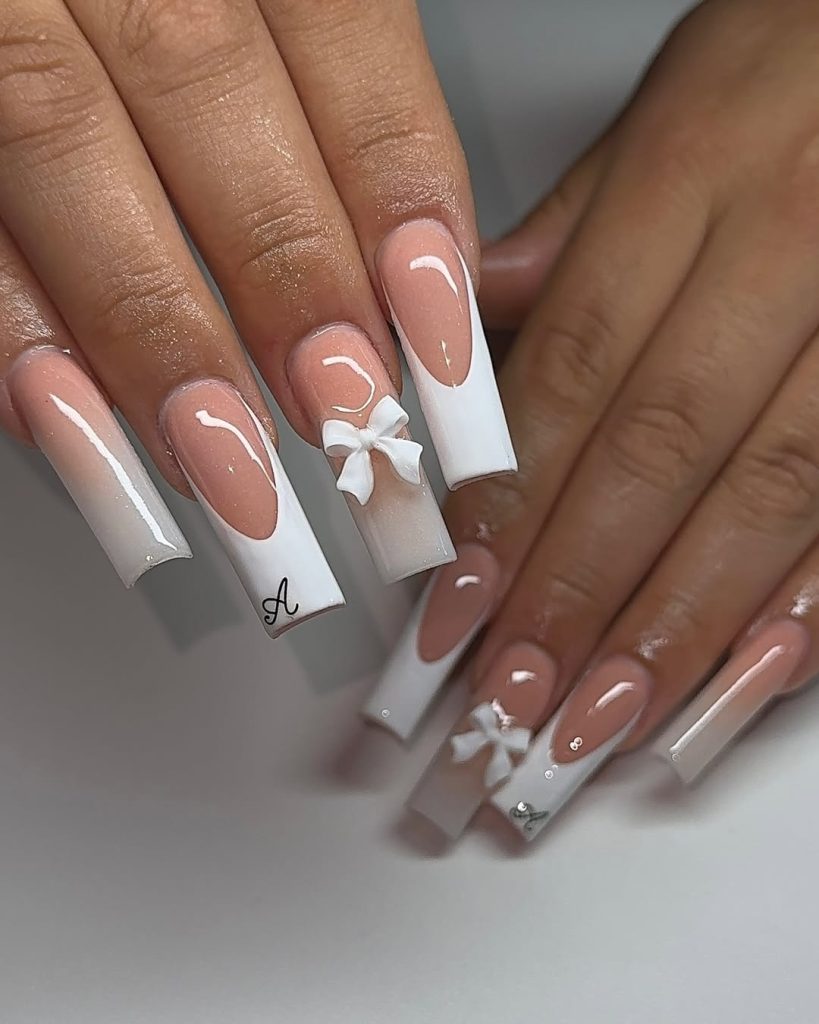
Credit: @nailsbyyackii
These sophisticated ombré nails blend natural pink and crisp white tips flawlessly. Accented with 3D bows, rhinestones, and a chic personalized initial, they’re both classy and unique.
Personalized Touch
To recreate the letter detail, use a fine-tipped nail art pen or stamping plate for precision. If you’re not confident freehanding, a custom decal or sticker works just as well—just seal it in with a non-wipe top coat to avoid peeling.
Creating the Ombré Fade
This smooth nude-to-white gradient looks best when applied with a sponge or airbrush. Blend the nude and white using a latex-free makeup sponge, dabbing gently and building up layers. Finish with a milky sheer polish like Essie “Sheer Luck” to soften the blend.
Bow Application Hack
Use a thick builder gel to secure larger charms like this matte white bow. Flash cure each one before moving on to the next so nothing shifts, and add a thin coat of top gel around the base to lock it in.
Stone Placement Tips
Keep rhinestone details minimal and close to the free edge if you’re adding a bow—it helps avoid visual clutter. Opt for micro crystals in silver or iridescent tones for that understated sparkle.
Make It Bridal
Swap the letter for a tiny pearl or the wedding date in Roman numerals. These subtle tweaks can make this the perfect bridal nail without changing the whole look.
Why White Nails Deserve the Spotlight
Let’s face it—white nails aren’t just a trend; they’re a lifestyle. From their clean and polished look to their ability to match every outfit, they’re my go-to for any season. Plus, they scream sophistication without trying too hard. Whether you’re heading to a wedding, a cozy winter gathering, or just want to treat yourself, these designs are guaranteed to make you feel like the best version of yourself.
What’s Your Favorite White Nail Design?
I’d love to hear about your favorite styles or if you’ve tried any of these ideas! Which design speaks to your personality? Let me know in the comments on Pinterest—or better yet, tag me in your photos! Let’s share the nail love.

For more Nail ideas CLICK HERE!
Or check my Pinterest board about Trendy White Nail Ideas!