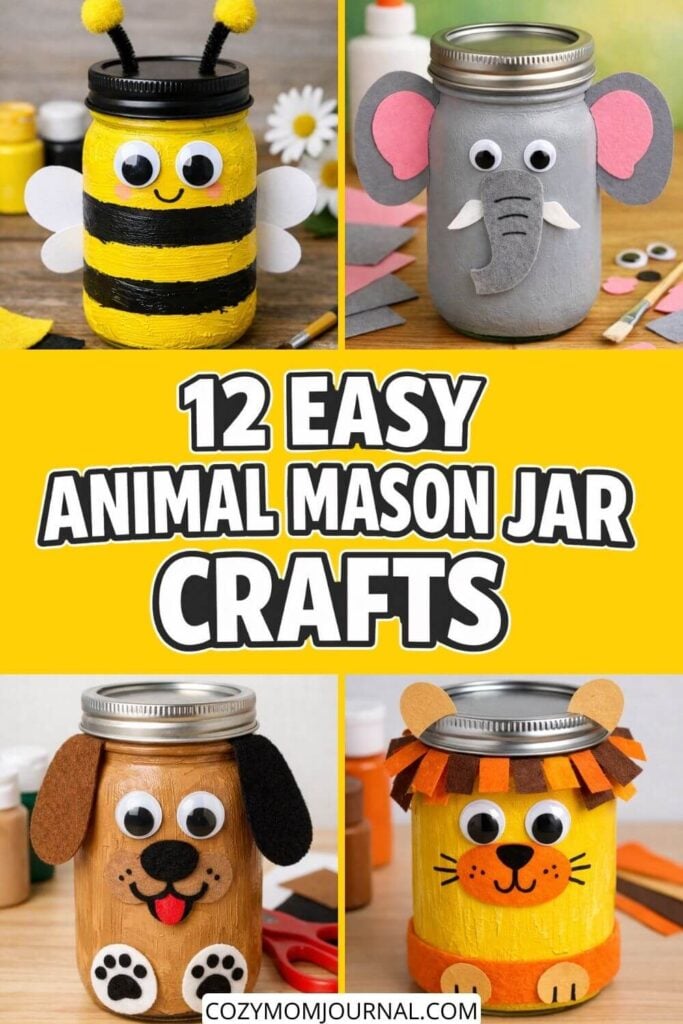
Animal mason jar crafts were one of those creative ideas that completely saved me on a rainy afternoon when I needed something fun, simple, and not too messy to do with kids. You know that moment when everyone is bored, the weather is terrible, and you just want one activity that actually works? That’s exactly how my love for these crafts started.
I’ve always believed that crafting with kids doesn’t have to be complicated to be meaningful. In fact, the best memories usually come from the simplest projects. A plain mason jar, a few scraps of paper, some paint, and suddenly the kitchen table turns into a tiny creative studio filled with laughter, paint smudges, and proud little faces holding up their finished animals.
What I love most about animal mason jar crafts is how forgiving they are. Brush strokes don’t need to be perfect. Shapes can be uneven. Colors don’t have to stay inside the lines. And somehow, that’s exactly what makes each jar special. Every fox, frog, or panda ends up with its own personality, just like the kids who make them.
If you’re short on space, time, or patience (I’ve been there), these crafts are a lifesaver. They don’t require fancy tools, they work beautifully in small apartments, and most of the supplies are things you probably already have at home. Plus, when you’re done, you don’t just have a craft — you have a usable little jar for pencils, toys, or tiny treasures.
In this post, I’m sharing my favorite animal mason jar crafts that are truly kid-friendly, easy to follow, and tested in real-life crafting chaos. These are the kinds of projects that actually get finished, not abandoned halfway through.
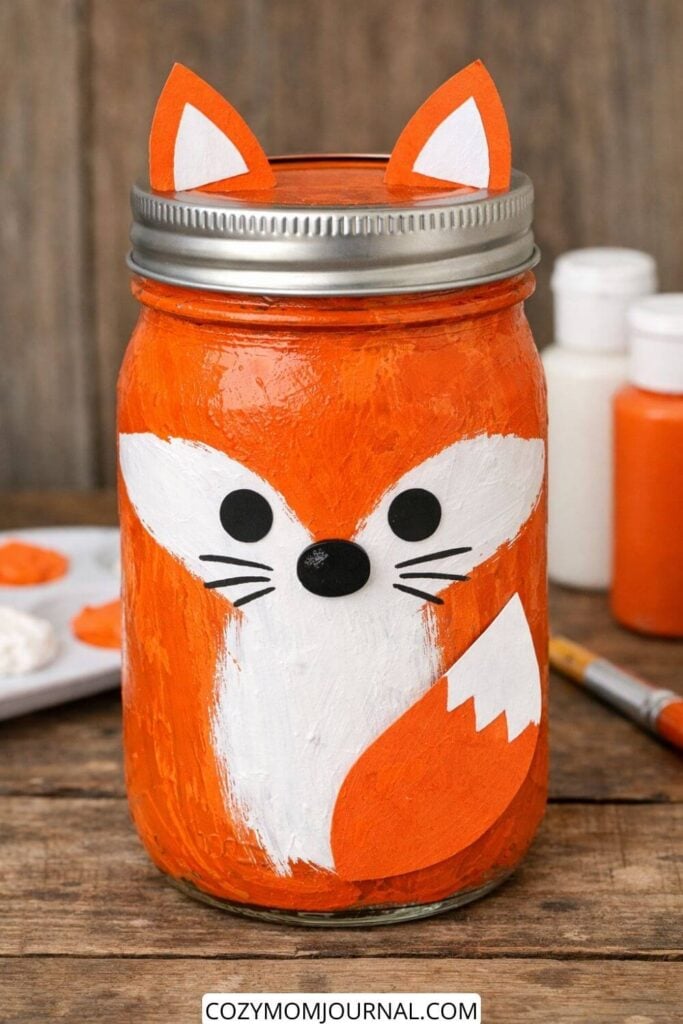
Fox Mason Jar
Materials You’ll Need
(All simple, easy-to-find supplies)
- 1 mason jar (any size)
- Acrylic paint:
- Orange
- White
- Black
- Paintbrushes (1 medium, 1 small)
- Scrap paper or cardstock (orange + white)
- Glue (school glue or craft glue)
- Black marker or small paintbrush for details
- Scissors
- Paper towel or newspaper (to protect the table)
Step-by-Step Instructions
Step 1: Paint the Jar Orange
- Paint the entire outside of the mason jar orange.
- Let it dry completely.
- If needed, add a second coat so the color looks nice and bright.
Tip for kids: It doesn’t have to be perfect – brush strokes make it cute!
Step 2: Paint the Fox Face & Belly
- On the front of the jar, paint a simple white shape:
- A big upside-down teardrop or heart shape for the fox face
- Extend it down a little for the belly
- Let it dry.
Step 3: Add the Face
- Use black paint or a black marker to add:
- Two simple round eyes
- One small oval nose
- Three short lines on each side for whiskers
Keep everything big and simple so kids can do it easily.
Step 4: Make the Ears (Paper Scraps)
- Cut 2 big triangles from orange paper.
- Cut 2 smaller triangles from white paper.
- Glue the white triangles onto the orange ones.
- Glue the ears onto the jar lid or just under the lid.
Adults can pre-cut ears for younger kids.
Step 5: Add a Tail (Optional but Fun!)
- Cut a simple leaf or teardrop shape from orange paper.
- Cut a small zig-zag piece from white paper for the tail tip.
- Glue it to the side of the jar.
Step 6: Let It Dry & Enjoy!
- A cute room decoration
- Let everything dry fully.
- Use the jar as:
- A pen holder
- A candy jar
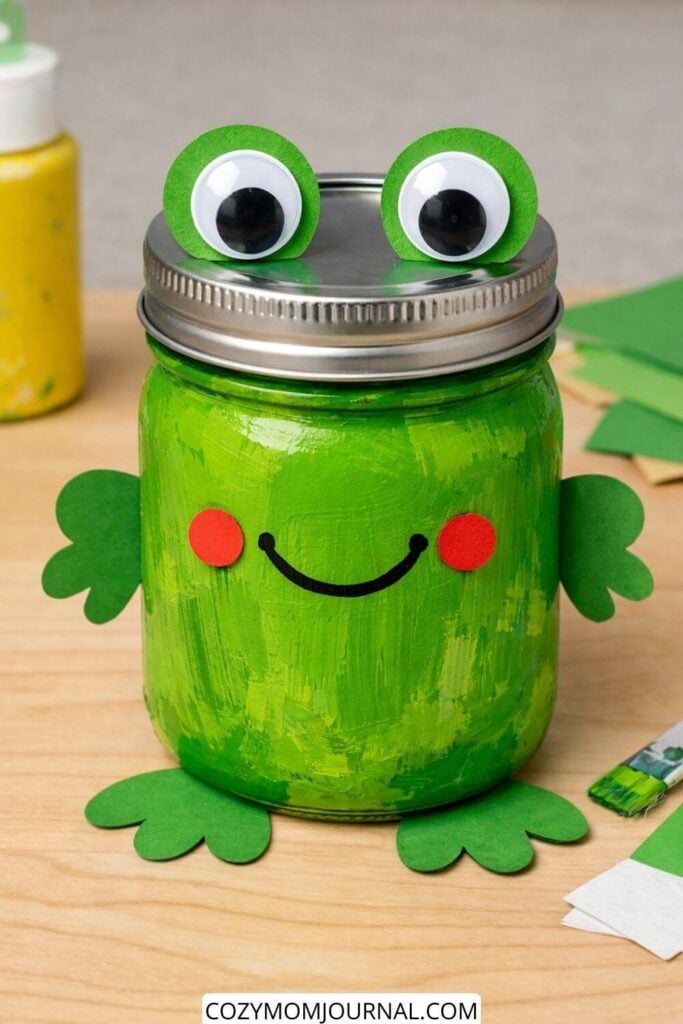
Frog Mason Jar
Materials You’ll Need
- 1 clean mason jar (with lid)
- Green acrylic paint
- Paintbrush (medium size)
- Green paper or craft foam (for arms, legs, eyes)
- 2 googly eyes (or paper circles)
- Black acrylic paint or black marker (for the smile)
- Red paper or paint (for cheeks – optional)
- Glue (craft glue or hot glue used by an adult)
- Scissors
- Paper towel or newspaper (to protect the table)
How to Make the Frog Jar
Step 1: Paint the Jar
- Turn the mason jar upside down.
- Paint the outside with green acrylic paint.
- Let it dry completely.
If needed, add a second coat and let it dry again.
Step 2: Make the Frog Eyes
- Cut two small green circles from paper or foam.
- Glue one googly eye onto each circle.
- Glue the finished eyes onto the top of the jar lid.
Step 3: Add the Face
- Use black paint or a marker to draw a simple curved smile.
- Cut two small red circles from paper (or paint them) and glue them on as cheeks.
This step is optional but makes the frog extra cute.
Step 4: Create Arms and Legs
- Cut simple frog hand and foot shapes from green paper or foam.
Keep the shapes very basic so kids can help. - Glue the arms to the sides of the jar.
- Glue the feet to the bottom front of the jar.
Step 5: Let Everything Dry
- Allow the glue to dry fully before moving or using the jar.
Tips for Crafting With Kids
- The jar can be used as a pencil holder, candy jar, or decoration.
- Let kids paint freely; brush strokes make it look fun and handmade.
- Pre-cut shapes for younger children.
- Use craft glue instead of hot glue when possible.
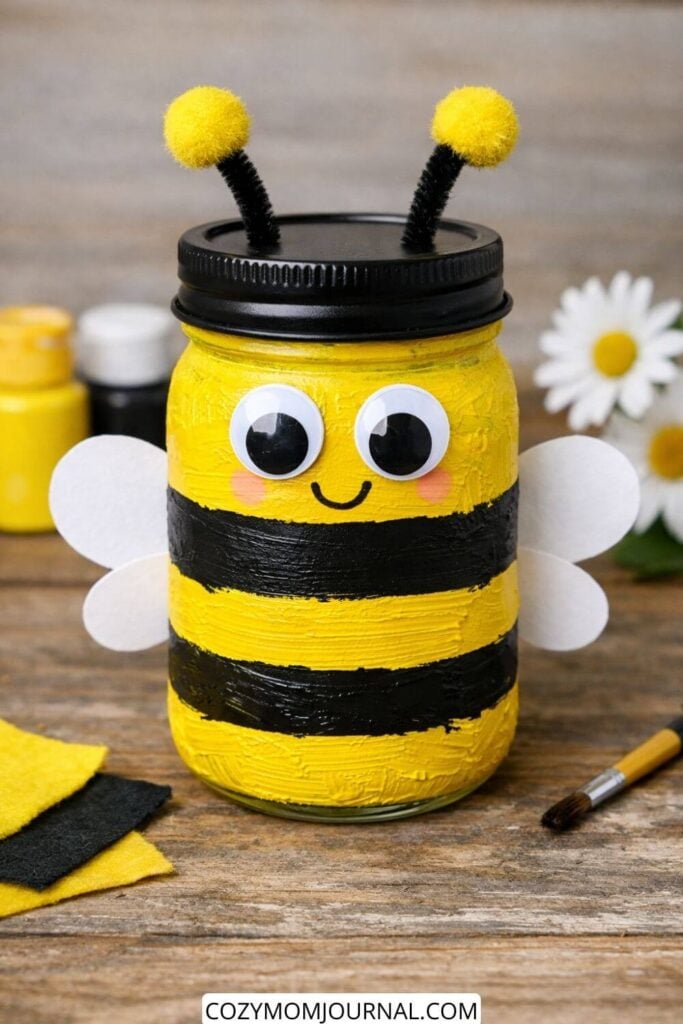
Bee Mason Jar
Materials You Need
- 1 clean mason jar (with lid)
- Acrylic paint: yellow, black, white, pink (pink optional)
- Paintbrush
- 2 googly eyes
- Scrap paper or cardstock (white)
- Black marker or thin brush
- Glue (school glue or hot glue with adult help)
- Scissors
- 2 black pipe cleaners
- 2 small yellow pom-poms (for antennae tips)
How to Make the Bee
Step 1: Paint the Jar
- Paint the entire outside of the mason jar yellow.
- Let it dry, then add black horizontal stripes.
- You can freehand the stripes to keep it simple and playful.
- Let everything dry completely.
Step 2: Paint the Lid (Optional)
- Paint the jar lid black and let it dry.
- This step is optional but makes the bee look more finished.
Step 3: Add the Face
- Glue two googly eyes near the top front of the jar.
- Draw a small smiling mouth with a black marker or thin brush.
- Add two small pink circles for cheeks using paint or a cotton swab.
Step 4: Make the Wings
- Cut two simple oval wing shapes from white paper.
- Glue one wing on each side of the jar.
- Keep the shapes basic so kids can easily cut them.
Step 5: Make the Antennae
- Bend two black pipe cleaners slightly.
- Glue or poke them into the lid (adult help if needed).
- Glue a yellow pom-pom on the tip of each pipe cleaner.
Step 6: Final Touches
- Let all glue dry completely.
- Your mason jar bee can be used as a decoration, pencil holder, or small storage jar.
Kid-Friendly Tips
- Let kids paint the stripes freely, uneven lines make it cuter.
- Use washable acrylic paint if possible.
- Pre-cut wings for younger children.
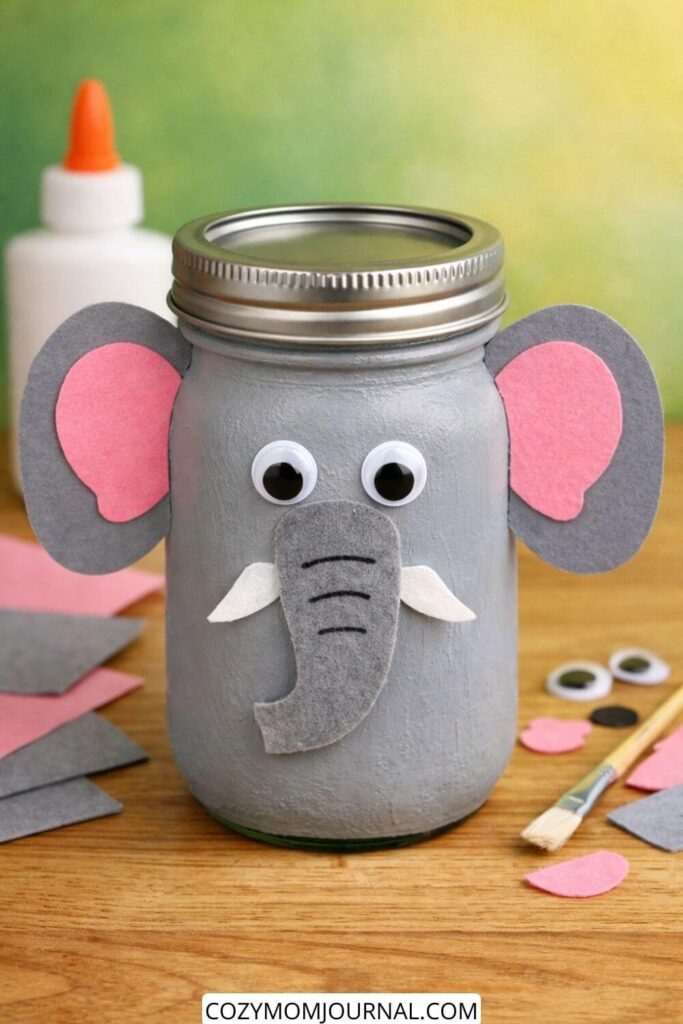
Elephant Mason Jar
Materials Needed
- 1 clean mason jar (with lid)
- Gray acrylic paint
- Paintbrush
- Gray and pink craft foam or felt (or thick paper)
- 2 googly eyes
- White craft foam or felt (for tusks)
- Pencil
- Scissors (child-safe if kids are helping)
- Glue (school glue or craft glue)
- Optional: black marker or thin brush for details
How to Make the Elephant
Step 1: Paint the Jar
Paint the outside of the mason jar with gray acrylic paint.
Apply 1–2 coats, letting it dry between layers.
Let the jar dry completely before decorating.
Step 2: Make the Ears
Draw two large ear shapes on gray foam or felt.
Cut two smaller pink shapes for the inner ears.
Glue the pink pieces onto the gray ears.
Set aside to dry.
Step 3: Make the Trunk
Draw a long, rounded trunk shape on gray foam or felt.
Cut it out.
If you like, draw a few short curved lines on the trunk with a black marker or paint to add simple detail.
Step 4: Make the Tusks
Cut two small curved shapes from white foam or felt.
Keep them simple and small so they’re easy for kids to glue on.
Step 5: Assemble the Face
Glue the googly eyes onto the front of the jar.
Glue the trunk below the eyes.
Attach the tusks on each side of the trunk.
Finally, glue the ears onto the sides of the jar.
Step 6: Let It Dry
Allow everything to dry completely before handling.
Kid-Friendly Tips
- Kids can personalize their elephant with different ear shapes or expressions.
- Pre-cut the shapes for younger children.
- Paper can be used instead of foam or felt if needed.
- School glue works fine, just allow extra drying time.
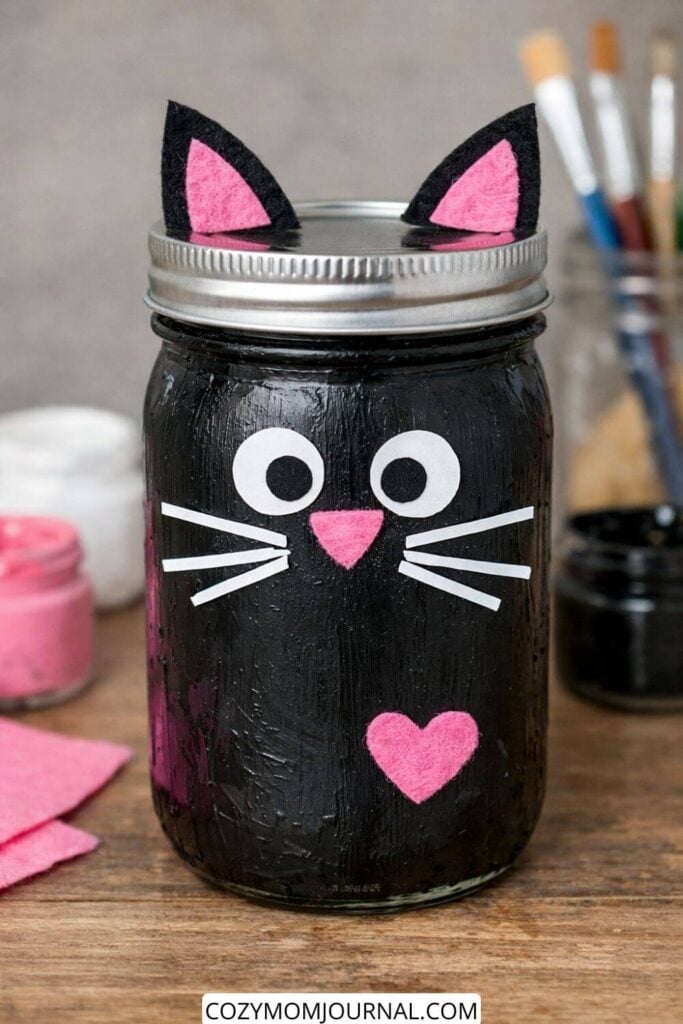
Black Cat Mason Jar
Materials You Need
- Mason jar (any size, clean and dry)
- Black acrylic paint
- White acrylic paint (optional, for details)
- Pink acrylic paint or pink felt/paper
- White paper or white craft foam
- Black paper or black craft foam
- Scrap felt or paper (black and pink for ears)
- Glue (craft glue or hot glue for adults)
- Paintbrush
- Scissors
- Pencil
Optional:
- Black marker (for pupils if you prefer drawing instead of cutting)
How to Make the Mason Jar Cat
Step 1: Paint the Jar
Paint the outside of the mason jar with black acrylic paint.
Let it dry completely. Add a second coat if needed so the glass does not show through.
Step 2: Make the Cat Face
From white paper or foam, cut:
- Two medium circles for the eyes
From black paper or foam, cut:
- Two small circles for the pupils
Glue the pupils onto the white eye circles, then glue the eyes onto the front of the jar.
Step 3: Add the Nose and Whiskers
Cut a small triangle or heart shape from pink paper or felt for the nose and glue it under the eyes.
For whiskers:
- Cut thin white paper strips
- Glue three on each side of the nose
Step 4: Create the Ears
From black felt or paper, cut two triangle shapes.
From pink felt or paper, cut two smaller triangles.
Glue the pink triangles onto the black ones, then glue the ears to the metal lid of the jar.
Step 5: Optional Decoration
You can add a small pink heart on the front of the jar using paint or felt, just like in the example. This step is optional and can be skipped for younger kids.
Tips for Crafting With Kids
- Use regular craft glue if hot glue is not safe
- Let kids paint freely; brush strokes make it look handmade and cute
- Pre-cut smaller pieces (eyes, whiskers) for younger children
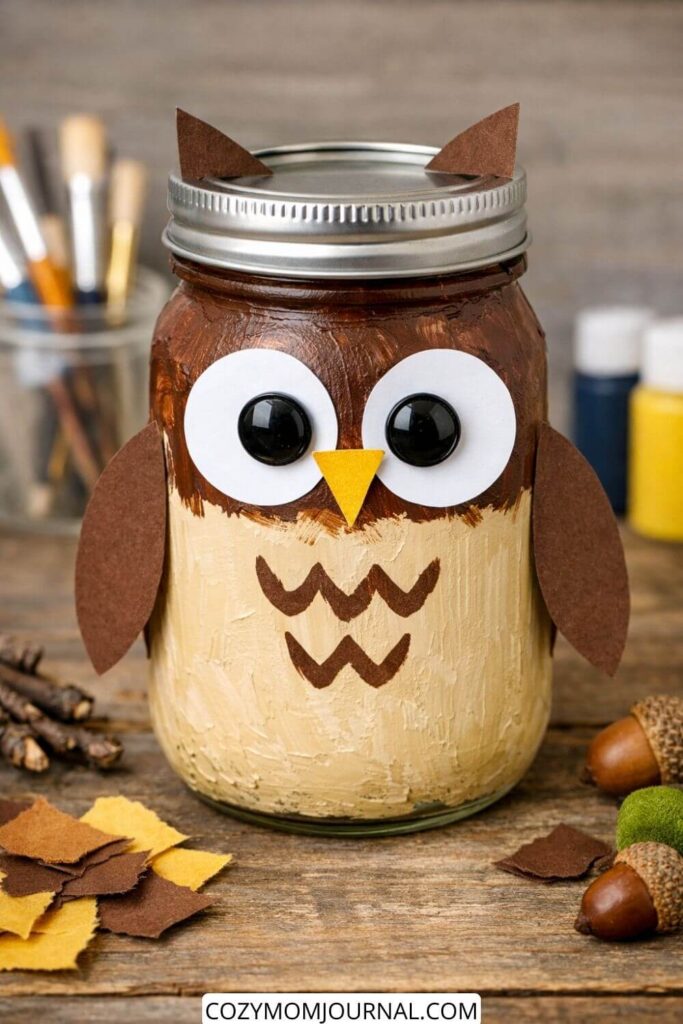
Owl Mason Jar
Materials You Need
- 1 clean mason jar with lid
- Acrylic paint
- Brown (top part / head)
- Light beige or cream (body)
- Paintbrush (medium size)
- White paper or white cardstock (for eyes)
- Black buttons or black paper (for pupils)
- Yellow paper or felt (for beak)
- Brown paper, felt, or fabric scraps (for wings and ears)
- Glue (school glue or craft glue)
- Pencil
- Scissors
- Optional: black paint marker or thin brush (for simple chest pattern)
How to Make the Owl
Step 1: Paint the Jar
- Paint the top half of the jar brown.
- Paint the bottom half light beige or cream.
- Let it dry completely.
- Add a second coat if needed.
Step 2: Make the Eyes
- Cut two large white circles from paper.
- Glue a black button in the center of each circle.
- You can also use black paper circles or paint them on.
- Glue the eyes to the front of the jar.
Step 3: Add the Beak
- Cut a small triangle from yellow paper or felt.
- Glue it between and slightly below the eyes.
Step 4: Create the Wings
- Cut two simple oval or teardrop shapes from brown paper or felt.
- Glue one wing to each side of the jar.
Step 5: Make the Owl Ears
- Cut two small triangles from brown paper or felt.
- Glue them under the lid edge so they look like little ears.
Step 6: Add Simple Details
- Paint or draw a few zigzag or “V” shapes on the body for feathers.
- Keep the pattern simple so kids can easily copy it.
Step 7: Let It Dry
- Allow everything to dry fully before handling.
Tips for Kids
- The jar can be used as a lantern, pencil holder, or decoration.
- Pre-cut shapes for younger children.
- Let kids choose their own colors.
- Buttons can be replaced with paper circles for safety.
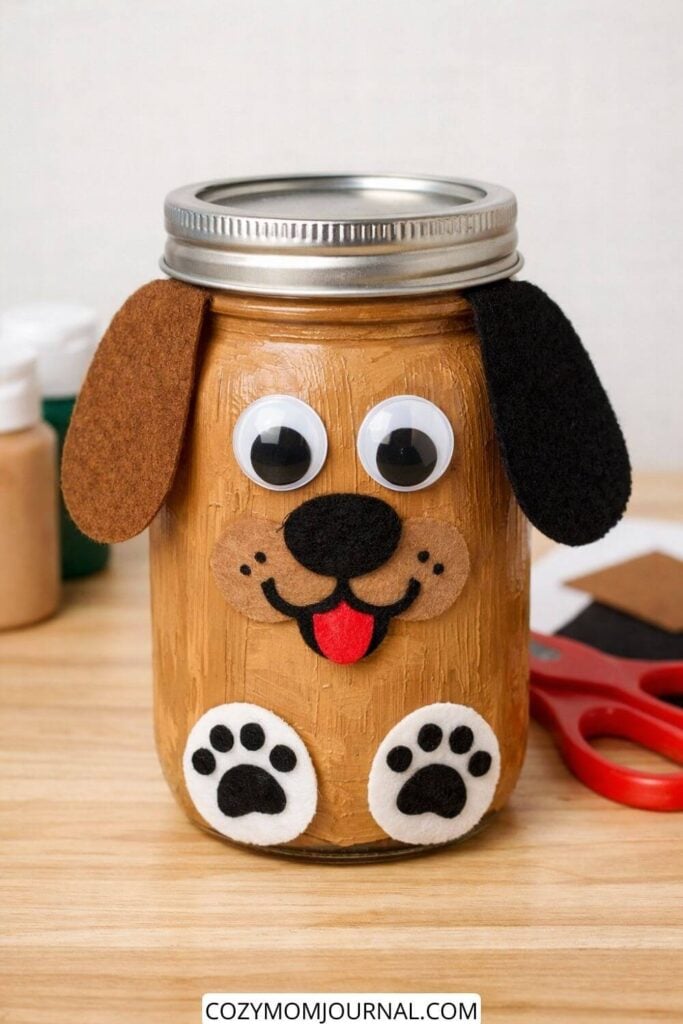
Dog Mason Jar
Materials you need
- 1 clean mason jar with lid
- Acrylic paint (light brown or any dog color you like)
- Paintbrush or sponge brush
- Scrap felt or paper (brown, black, white, red)
- 2 googly eyes
- Scissors
- Glue (craft glue or hot glue with adult help)
- Pencil or marker
- Optional: black button for the nose, twine or ribbon for decoration
How to make the mason jar dog
Step 1: Paint the jar
Paint the outside of the mason jar with acrylic paint. One coat is usually enough, but you can add a second coat if needed. Let it dry completely.
Step 2: Cut the dog’s ears
From brown felt or paper, cut two long floppy ear shapes. They don’t need to be perfect, simple shapes work best for kids.
Step 3: Add the eyes
Glue the googly eyes near the top front of the jar. Let them set for a minute so they don’t slide.
Step 4: Make the nose and cheeks
Cut a small oval from black felt for the nose. You can also glue on a black button instead, like I did, but painting or cutting it from paper works just as well.
Cut two small rounded shapes from light brown felt for the cheeks and glue them under the eyes.
Step 5: Create the mouth
Draw a simple smile with a marker, or cut a curved mouth from black felt. Add a small red felt tongue if you want a happy puppy look.
Step 6: Attach the ears
Glue the ears to the sides of the jar, slightly under the lid so they hang down.
Step 7: Make the paws
Cut two white ovals for paws and smaller black ovals or circles for paw pads. Glue them near the bottom front of the jar.
Step 8: Finish it up
Screw the lid back on. You can tie a ribbon or twine around the lid for extra decoration if you like.
Tips for crafting with kids
- Let kids choose their own dog colors for extra fun
- Use sponge brushes to make painting easier and less messy
- Pre-cut small pieces (nose, paws) for younger children
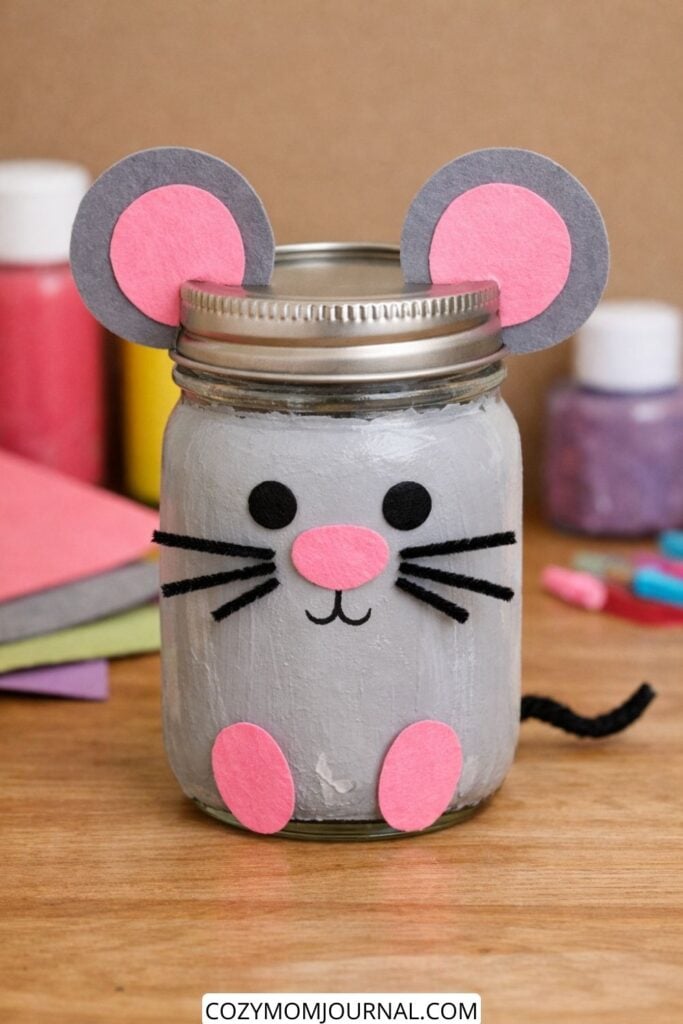
Mouse Mason Jar
Materials You Need
- Mason jar (any size, clean and dry)
- Gray acrylic paint
- Pink acrylic paint (or pink paper/foam)
- Black acrylic paint or black marker
- Scrap paper, felt, or foam sheets (gray and pink)
- Pipe cleaners (black or gray)
- Glue (craft glue or hot glue with adult help)
- Scissors
- Paintbrush
- Optional: pencil for tracing shapes
How to Make the Mouse
Step 1: Paint the Jar
Paint the outside of the mason jar gray using acrylic paint.
Let it dry completely. If needed, add a second coat and let it dry again.
Step 2: Make the Ears
Cut:
- 2 large gray circles
- 2 smaller pink circles
Glue the pink circles onto the gray ones to form the ears.
Glue the ears to the lid or top edge of the jar.
Step 3: Add the Face
- Cut a small pink oval for the nose and glue it to the front.
- Paint or draw two small black dots for the eyes.
- Draw a simple curved mouth with black paint or marker.
- Cut short pieces of pipe cleaner and glue them on as whiskers.
Step 4: Make the Feet
Cut two small pink ovals from paper or foam.
Glue them near the bottom front of the jar as feet.
Step 5: Add the Tail
Take one pipe cleaner, slightly curl it, and glue it to the back of the jar as the tail.
Tips for Kids
- Let kids personalize the mouse with different colors or expressions.
- Pre-cut the shapes for younger children.
- Use craft glue instead of hot glue if kids are working independently.
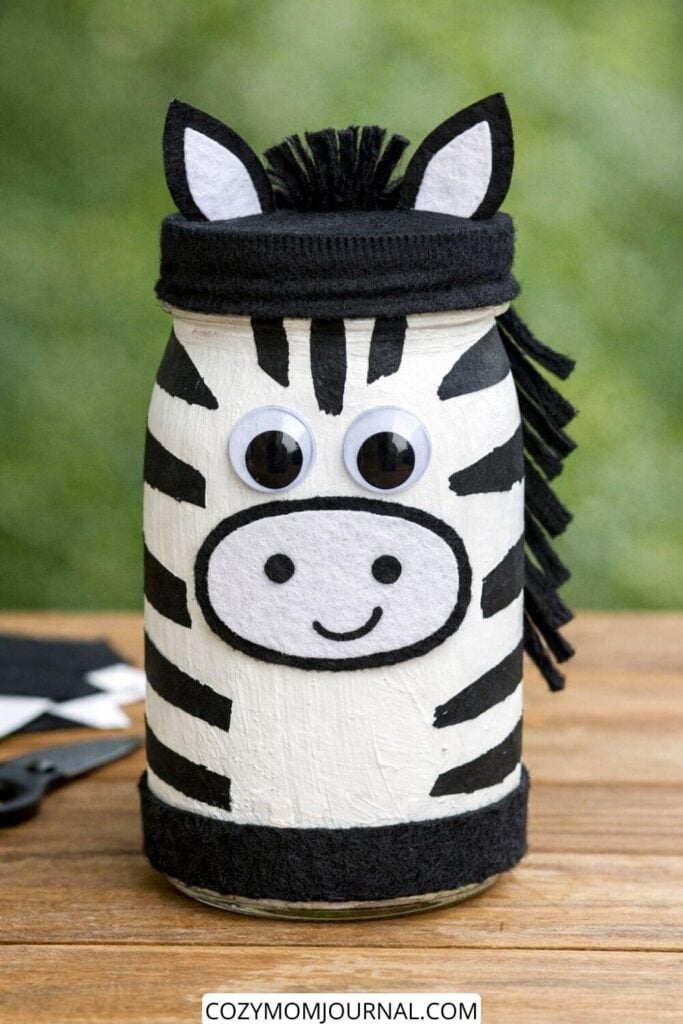
Zebra Mason Jar
Materials You Need
- 1 clean mason jar (regular size)
- White acrylic paint
- Black acrylic paint
- Paintbrush (medium size)
- Black felt or black paper (for stripes, mane, ears, base)
- White felt or white paper (for inner ears and snout)
- 2 googly eyes
- Black marker or thin paintbrush
- Black yarn or felt strips (for the mane)
- Scissors
- Glue (craft glue or hot glue – adult help if hot glue is used)
How to Make the Zebra Jar
Step 1: Paint the Jar
Paint the entire outside of the mason jar white.
Let it dry completely. If needed, add a second coat and let it dry again.
Step 2: Add the Zebra Stripes
Using black acrylic paint, paint simple uneven stripes around the jar.
They don’t have to be perfect – messy stripes look cute and are easier for kids.
Let the paint dry fully.
Step 3: Make the Face
Cut an oval shape from white felt or paper for the snout.
Draw two small black dots for the nostrils and a simple smile with a marker.
Glue the snout onto the front of the jar.
Glue the googly eyes above the snout.
Step 4: Create the Ears
Cut two ear shapes from black felt and two smaller ones from white felt.
Glue the white pieces onto the black ones.
Attach the ears to the jar lid or just under the lid.
Step 5: Add the Mane
Cut short pieces of black yarn or thin felt strips.
Glue them along the back of the jar, starting near the lid and going downward.
Step 6: Finish the Jar
Cut a strip of black felt and glue it around the bottom of the jar for a neat base.
If you like, you can also add a black felt strip around the lid.
Let everything dry before using or displaying.
Tips for Kids
- Prepare pre-cut shapes in advance for preschoolers
- Use glue sticks or liquid craft glue instead of hot glue for younger children
- Let kids paint the stripes freely – no rules needed
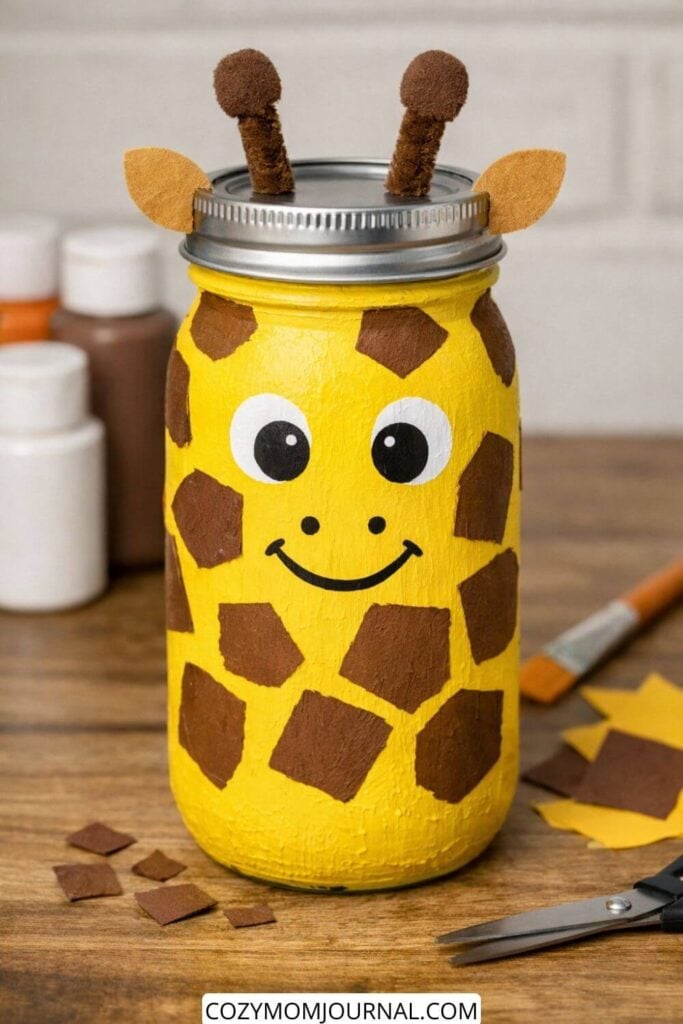
Giraffe Mason Jar
Materials you need
- 1 clean mason jar with lid
- Yellow acrylic paint
- Brown acrylic paint
- White and black acrylic paint (for the face)
- Paintbrush (medium size is enough)
- Brown paper scraps or brown felt (for spots and ears)
- Glue (school glue or craft glue)
- 2 small pom-poms or rolled paper balls (for horns)
- 2 short pipe cleaners or twisted paper strips (for horns)
- Scissors
- Pencil (optional, for sketching)
How to make the giraffe jar
Step 1: Paint the jar
Paint the outside of the mason jar yellow.
Let it dry, then add a second coat if needed.
Step 2: Add the giraffe spots
Cut simple uneven shapes from brown paper scraps or felt.
Glue them randomly onto the jar.
You can also paint the spots directly with brown paint if you prefer.
Step 3: Paint the face
On the front of the jar, paint two white circles for the eyes.
Add black dots inside for pupils.
Use black paint to add a simple smiling mouth and small nostrils.
Step 4: Make the ears
Cut two simple leaf-shaped ears from brown or yellow paper.
Glue them to the sides of the jar lid.
Step 5: Make the horns
Twist two short pipe cleaners or paper strips.
Glue a small pom-pom or paper ball on top of each one.
Glue the horns to the top of the lid between the ears.
Step 6: Finish and dry
Let everything dry completely.
Screw the lid back onto the jar.
Tips for kids
- No need to make everything perfect, uneven spots look more realistic
- Pre-cut the small pieces for younger children
- Use washable acrylic paint for easy cleanup
This giraffe jar can be used as a pencil holder, toy storage, or a fun decoration for a kids’ room.
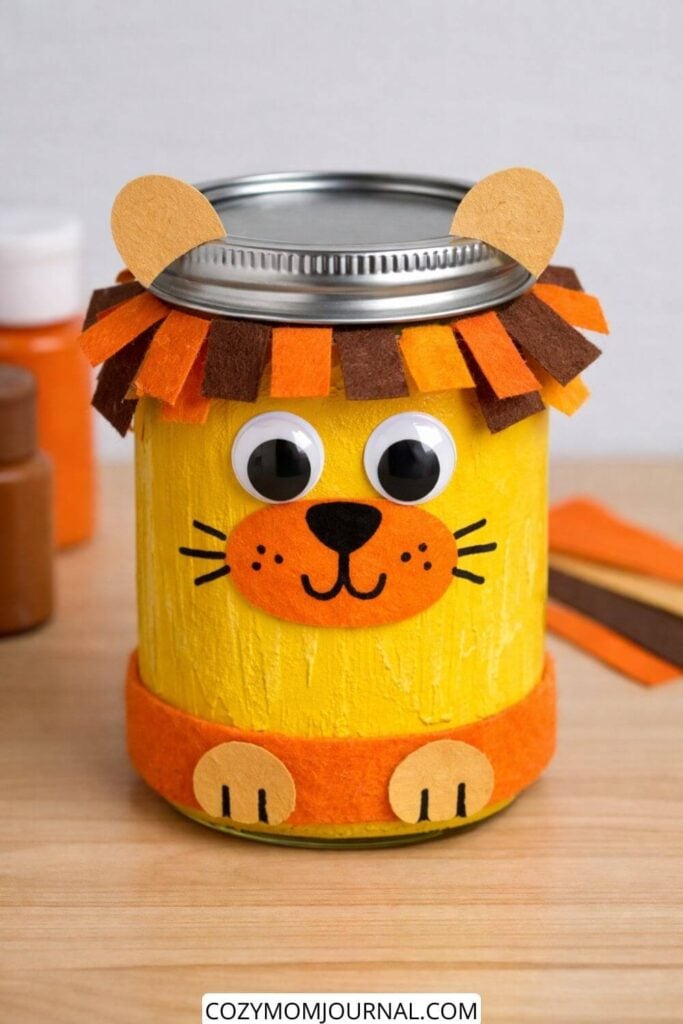
Lion Mason Jar
Materials you need
- 1 clean mason jar with lid
- Yellow acrylic paint
- Orange and brown acrylic paint (small amounts)
- Paintbrush or sponge brush
- Googly eyes (2 pieces)
- Orange felt or paper (for the nose and mane)
- Brown felt or paper (for the mane)
- Beige or light brown paper/felt (for ears and paws)
- Black marker or black paint
- Scissors
- Glue (craft glue or hot glue used by an adult)
How to make the lion
Step 1: Paint the jar
Paint the outside of the mason jar yellow. Let it dry completely. Add a second coat if needed.
Step 2: Make the mane
Cut short strips from orange and brown felt or paper. Glue them around the top edge of the jar, just under the lid, alternating colors. This creates a simple, fluffy mane.
Step 3: Add the ears
Cut two small semicircles from beige or light brown paper or felt. Glue them to the lid so they stick out slightly on each side.
Step 4: Create the face
Glue the googly eyes to the front of the jar.
Cut a small oval from orange felt or paper for the nose/muzzle area and glue it under the eyes.
Draw the nose, mouth, and whiskers with a black marker or black paint.
Step 5: Make the paws
Cut two small circles or half-circles from beige paper or felt. Draw simple lines for toes. Glue them near the bottom front of the jar.
Step 6: Finish and dry
Let everything dry completely before handling.
Tips for kids
- Use sponge brushes to make painting easier.
- Pre-cut the small shapes for younger children.
- Paper works perfectly if you don’t have felt.
This lion is simple, cheerful, and sturdy, making it great for crafting with kids or for classroom activities.
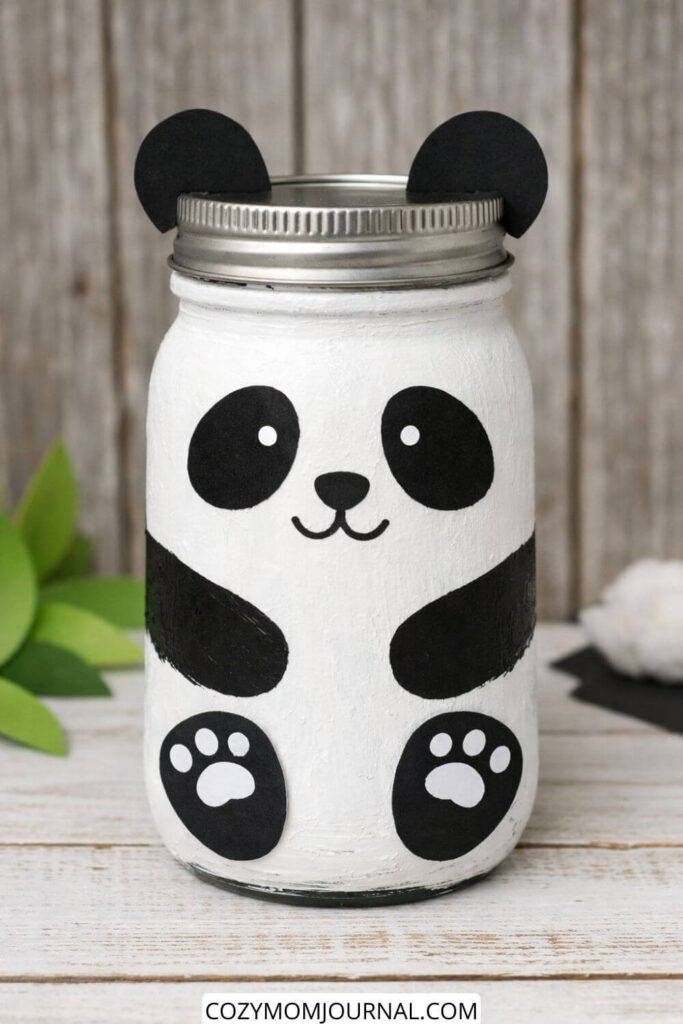
Panda Mason Jar
Materials You Need
- 1 clean mason jar with lid
- White acrylic paint
- Black acrylic paint
- Paintbrush (medium size)
- Black paper or black craft foam (for ears, eyes, and paws)
- White paper (for eye highlights and paw details)
- Scissors
- Glue (craft glue or glue stick)
- Black marker or thin paintbrush (for the mouth)
How to Make the Panda
Step 1: Paint the Jar
Paint the entire mason jar white.
Let it dry completely, then add a second coat if needed so the glass is not see-through.
Step 2: Make the Panda Face
Cut two large black oval shapes for the eyes.
Glue them to the front of the jar.
Add small white circles inside the eyes for highlights.
Paint or draw a small black oval nose in the center.
Draw a simple curved mouth under the nose with a black marker or thin brush.
Step 3: Add the Body Details
Paint or glue two black oval shapes on the sides of the jar for the panda arms.
Cut two black circles or ovals for the feet and glue them near the bottom of the jar.
Add small white ovals on the feet for paw details.
Step 4: Make the Ears
Cut two black semicircles from paper or foam.
Glue them to the sides of the jar lid or directly under the lid so they stick out like ears.
Step 5: Let It Dry
Allow everything to dry completely before touching or using the jar.
Tips for Kids
- Pre-cut the shapes for younger children
- Use glue dots instead of liquid glue for less mess
- You can skip painting arms and use paper shapes only to make it even easier
Optional Ideas
- Use the jar as a pencil holder or small toy container
- Add a name to the back with a marker
- Turn it into a lantern by placing a battery tea light inside
If you want, I can also write this as a printable step-by-step card or adapt it for a classroom craft setup.
A Few Extra Tips From My Craft Table
Before we wrap up, I want to share a few things I’ve learned after making way too many animal mason jar crafts with kids:
- Prep is everything. I often pre-cut smaller shapes when crafting with younger kids, and it makes the whole experience calmer and more enjoyable.
- Perfection is overrated. Some of our cutest jars came from “oops” moments.
- Let kids choose colors. A blue lion or pink frog is absolutely fine — creativity has no rules here.
- Cover the table, but don’t stress the mess. Paint washes off, memories stick around.
If you enjoy seasonal crafts as much as I do, you might also love my other kid-friendly DIY ideas. I often mix these jar animals into holiday crafting days too:
- For spooky fun, check out my favorite ideas in 22 DIY Halloween Crafts
- If you’re planning winter creativity, you’ll love: 20 Adorable DIY Christmas Crafts for Kids You’ll Love to Try
- And if you ever feel stuck because you’re missing supplies, this guide helps a lot: 20 Essential Tools for Easy Christmas Crafts at Home
I also share a lot of craft inspiration, step-by-step visuals, and behind-the-scenes moments on my Pinterest page, where you can save ideas, revisit them later, and even share your own finished projects.
Final Thoughts – Craft, Create, and Enjoy the Little Moments
At the end of the day, animal mason jar crafts aren’t really about jars or paint. They’re about slowing down, creating together, and turning ordinary afternoons into something memorable. I’ve seen shy kids light up when they finish their jar, and I’ve had some of my favorite conversations happen right over a paint-covered table.
If you try any of these crafts, I’d genuinely love to know. Which animal did your kids choose first? Did anything turn out completely different than planned (those are usually the best ones)?
Save your favorite ideas, share your creations on Pinterest, and don’t be afraid to make it your own. I promise — if I can do this in a small space with limited time and a lot of paint spills, you absolutely can too.
Happy crafting, and I can’t wait to see what you create next.