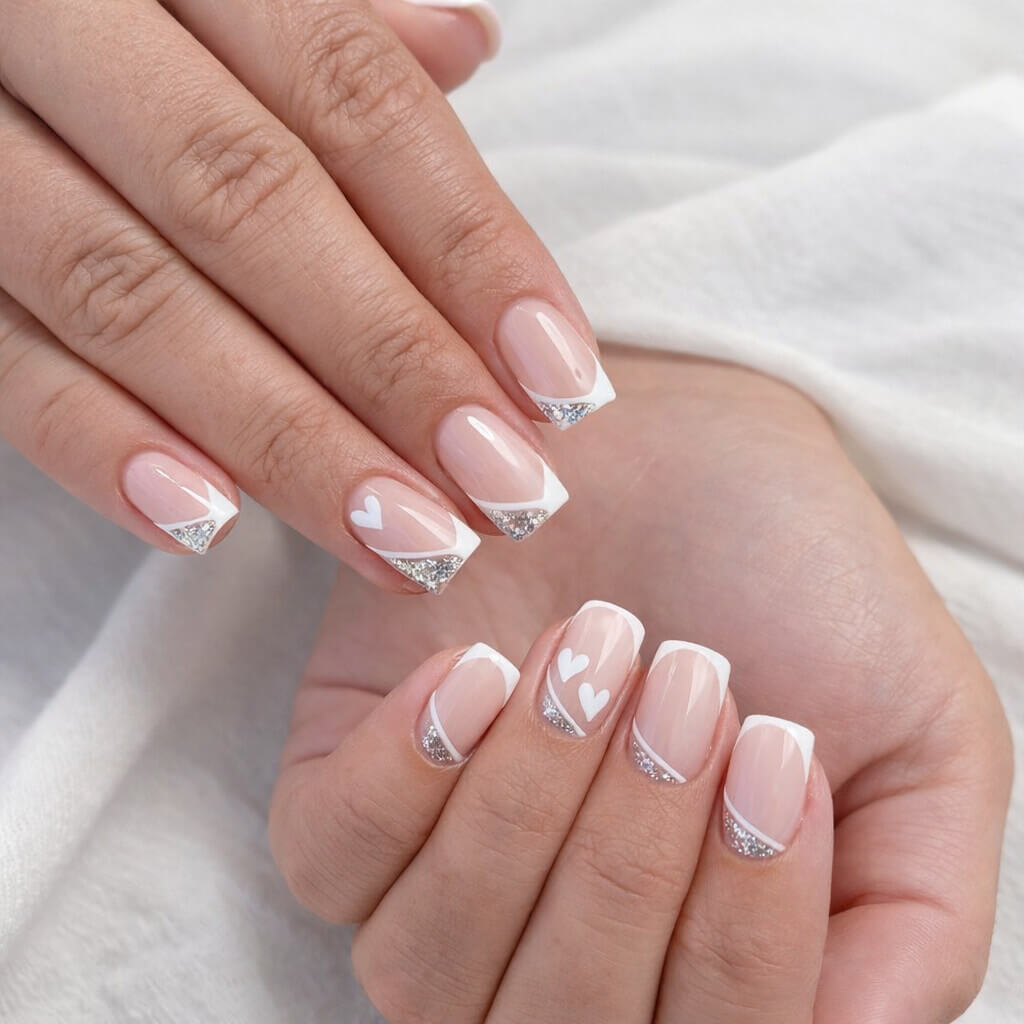
French nails were the very first manicure style I ever tried at home — and yes, it was messy, uneven, and definitely not Pinterest-worthy. But that’s exactly why I still love them so much. French nails look simple, but they quietly teach you control, patience, and confidence. And once you crack the technique, the possibilities are endless.
If you’ve ever thought “French nails look amazing, but I could never do that myself”, trust me — I’ve been there. I used to believe french nails were strictly salon territory. Perfect smile lines, flawless tips, zero mistakes… or so I thought. Turns out, that’s just not true.
What I love most about french nails is how adaptable they are. They can be classic, playful, romantic, edgy, minimal, bold — sometimes all at once. And the best part? You don’t need professional tools or years of practice to pull them off. You just need the right approach, a bit of patience, and designs that actually work in real life.
That’s exactly why I put this guide together. These are 17 french nails designs you can actually do, even if you’re working at your kitchen table with one good brush and a steady playlist in the background. I’ve tested these styles myself, fixed my own mistakes, and learned which details truly matter — and which ones you can stop stressing about.
So if you love french nails but want them to feel more you, more modern, and more achievable, you’re in the right place. Let’s get into it.
Nail Prep
Before jumping into any french design, good prep is what makes everything look clean and long-lasting. Since this will be a shared section in your blog post, here’s the full routine you can reference once.
- Remove old polish completely
Use an acetone or gentle nail polish remover and make sure there’s no residue left around the cuticles or edges. - Shape your nails
This look works best with a short square or soft square shape. File in one direction and keep the lengths as even as possible. - Gently push back cuticles
After a warm hand wash or cuticle remover, push them back carefully. Don’t cut unless absolutely necessary. - Buff lightly
Use a fine buffer to remove shine from the nail surface. This helps the polish grip better. - Clean & dehydrate
Wipe nails with alcohol or nail cleanser to remove dust and oils.
Once this is done, you’re ready for the design.
Classic Soft White French (Clean & Timeless)
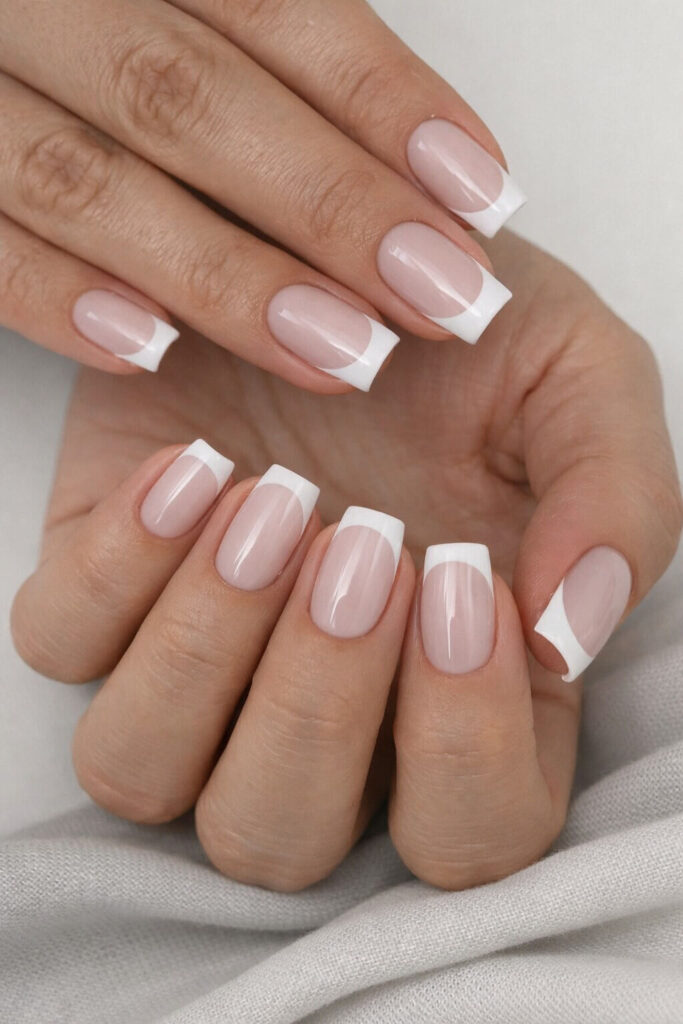
This design is the definition of effortless elegance: a soft pinky-nude base with crisp white tips. It looks polished, natural, and works for everyday wear, weddings, or minimal lovers. The good news? You can absolutely recreate this at home, even if you’re not a nail pro.
How to Create This French Nail Design
Step 1: Apply a Base Coat
Choose a strengthening or ridge-filling base coat. Apply a thin, even layer and let it dry completely. This step keeps the manicure smooth and helps prevent chipping.
Good options:
- Essie Here To Stay
- OPI Natural Nail Base Coat
- Sally Hansen Double Duty
Step 2: Nude Base Color
The base here is not opaque pink, but a soft, milky nude that lets the natural nail slightly show through.
Apply 1–2 thin coats, depending on coverage. Let each coat dry fully before moving on.
Color suggestions:
- Essie – Ballet Slippers
- OPI – Bubble Bath
- Zoya – Bela
- CND Vinylux – Romantique
Tip: If your nails have discoloration, two thin coats give a cleaner result than one thick one.
Step 3: Create the French Tips
This is the key moment. The tips are clean, bright white, and slightly curved to follow the natural smile line.
Three beginner-friendly methods (choose one):
- French tip guides or stickers
Place them slightly below the free edge, press firmly, and paint white above. - Thin nail art brush
Lightly draw the smile line first, then fill in the tip. - Cleanup brush trick
Paint the white tip freely, then dip a flat brush in remover and clean the edge for a crisp line.
Apply one thin coat first, then a second if needed for opacity.
White polish recommendations:
- Essie – Blanc
- OPI – Alpine Snow
- Zoya – Snow White
Let the white dry before removing stickers if you used them.
Step 4: Seal with Top Coat
Finish with a glossy top coat to smooth everything together and add shine.
Top coat favorites:
- Seche Vite Dry Fast Top Coat
- Essie Gel Setter
- OPI Top Coat
Wrap the free edge lightly to help prevent tip wear.
Helpful Tools for Home Application
- Fine nail file (180–240 grit)
- Buffer block
- French tip guides (optional but very helpful)
- Thin liner brush or flat cleanup brush
- Cotton pads + acetone
- Cuticle pusher
None of these need to be professional salon tools – affordable drugstore versions work perfectly.
Final Tips for a Salon-Clean Look
- Always work with thin layers
- Let each step dry before moving on
- Keep the white tips slightly thinner than you think – thick tips can look heavy
- If one nail isn’t perfect, remember: french nails are forgiving once sealed with top coat
This is a perfect “starter” french design: clean, timeless, and confidence-boosting.
Red Crystal French (Elegant With a Statement)
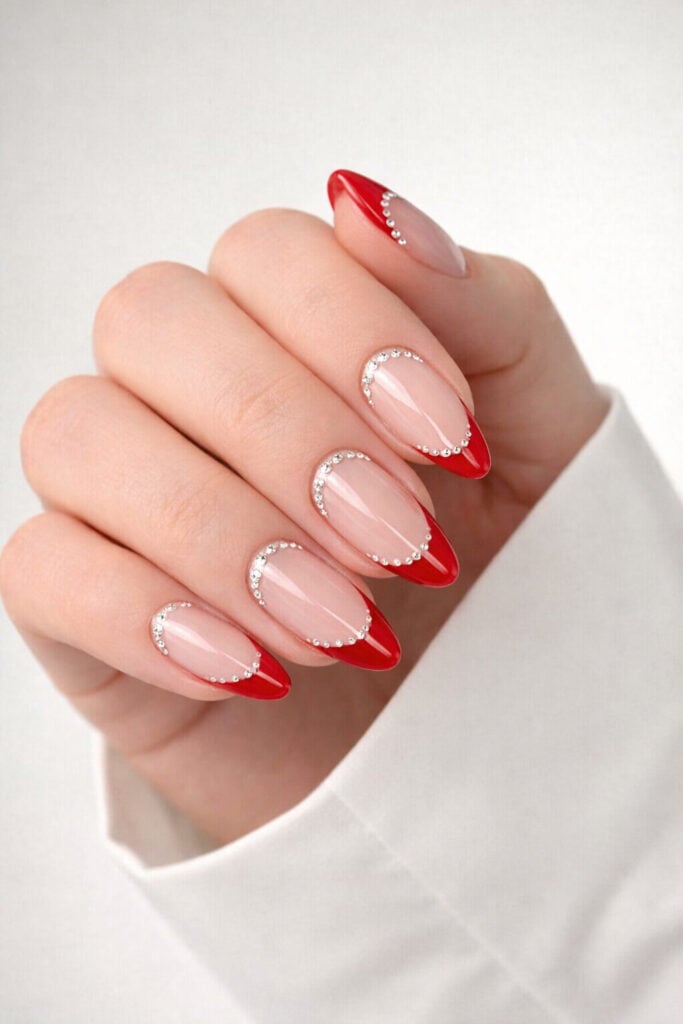
This french design takes the classic idea and turns it into something bold and glamorous. The almond shape, the deep red tips, and the subtle crystal outline make it look very “salon-level” – but it’s still doable at home if you go step by step and don’t rush. This one is perfect for special occasions, date nights, or when you want your nails to feel extra polished.
Since nail prep was already covered earlier in the article, we’ll jump straight into the design itself.
How to Create This Red Crystal French Nail Design
Step 1: Base Coat
Apply a thin layer of your base coat and let it dry completely. Because this look uses crystals, a smooth and well-adhered base is especially important.
If your nails tend to bend or peel, choose a strengthening base coat rather than a very thin one.
Step 2: Nude Base Color
Just like the previous design, the base should look clean, natural, and slightly sheer. You want the red tips and crystals to stand out, not compete with the base color.
Apply 1–2 thin coats and let them dry fully.
Good nude shades for this look:
- OPI – Bubble Bath
- Essie – Mademoiselle
- Zoya – Dot
- CND Vinylux – Satin Slippers
Tip: If your nude polish streaks, wait a full minute between coats – rushing causes unevenness.
Step 3: Shape the Red French Tips
This design works best on almond-shaped nails, because the red tips follow a soft, elongated curve.
Use a thin brush or the original polish brush (wiped slightly on the bottle neck) to create a curved red tip. Start from one side, gently pull the color across the tip, and meet the other side.
Apply one thin coat first, then a second for full opacity.
Red polish suggestions:
- OPI – Big Apple Red
- Essie – Forever Yummy
- Zoya – Sooki
- CND – Wildfire
Tip: Keep the red section slightly narrower than the free edge – this makes the nail look longer and more elegant.
Step 4: Place the Crystal Accents
This is what elevates the design.
Using a dotting tool or a toothpick, apply a very small amount of nail glue or thick top coat along the inner curve of the red tip (where the nude and red meet).
Carefully place tiny clear rhinestones along the curve. You don’t need many – subtle spacing looks more refined than a solid line.
What works best:
- Very small clear crystals (SS3–SS5 size)
- Nail glue or gem gel
- Wax pencil or damp toothpick for placement
Press each crystal gently into place and let it set.
Step 5: Seal Everything In
Apply a top coat carefully around the crystals, not over them. Flooding the gems with top coat can dull their shine.
If you want extra durability, apply a thin layer first, let it dry, then add another layer just around the edges of the crystals.
Top coat options:
- Essie Gel Setter
- OPI Top Coat
- Seche Vite (avoid brushing directly over gems)
Tools That Make This Design Easier
- Thin nail art brush
- Dotting tool or toothpick
- Small clear rhinestones
- Wax pencil (optional but helpful)
- Steady light source (this really helps with gem placement)
Final Tips for a Clean Result
- Do one hand at a time when placing crystals
- Less crystals = more elegant
- If a crystal shifts, wait a few seconds and gently nudge it back before sealing
- Red polish shows mistakes easily – clean edges with a small brush dipped in remover
This design is a great contrast to the classic french: same base idea, completely different mood.
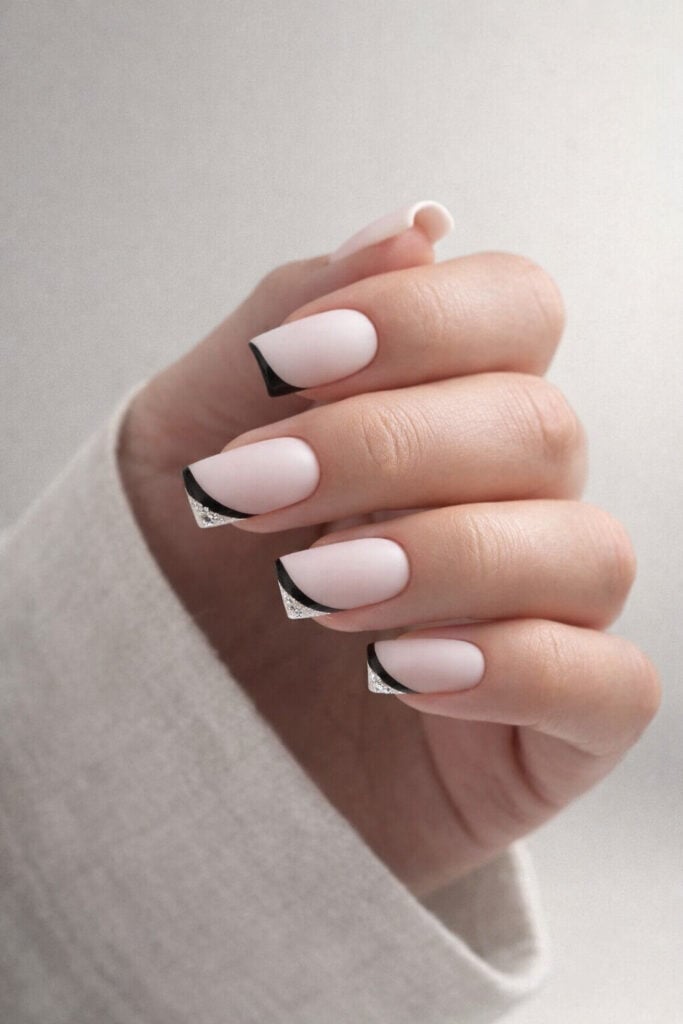
Black Wave French With Silver Accent
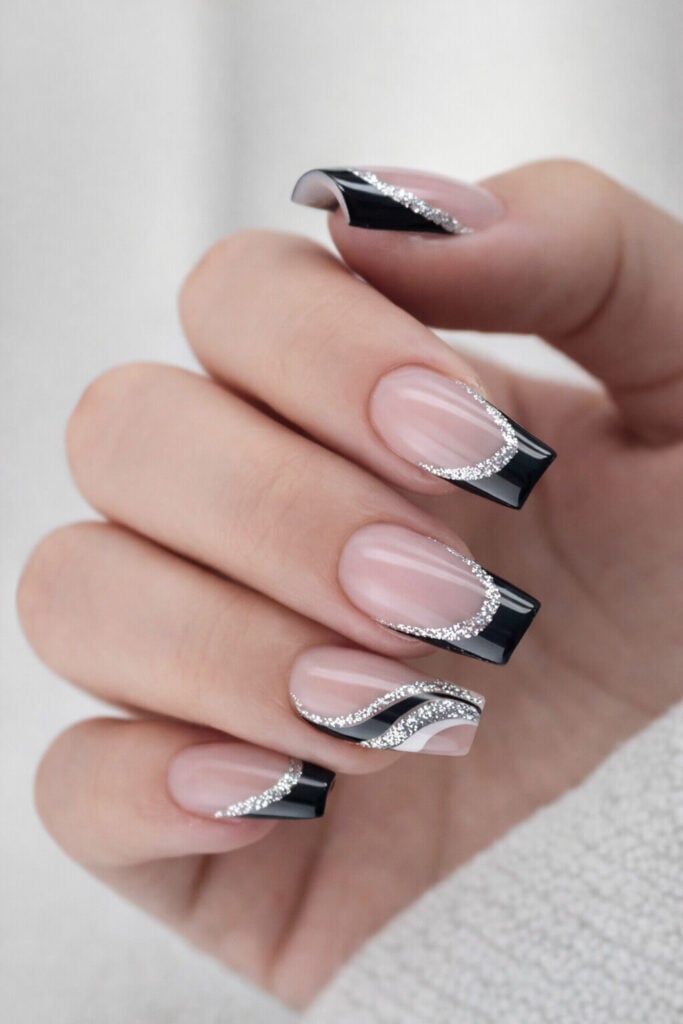
This french design feels very editorial and modern. The sharp black tips give structure, while the flowing silver line softens the look and adds movement. It’s a great option if you love classic colors but want something more artistic than a standard french.
This one looks detailed, but once you break it into layers, it’s surprisingly manageable at home.
How to Create This Black Wave French Nail Design
Step 1: Base Coat
Apply your base coat as usual and let it fully dry. Because this design has clean lines and contrast, a smooth base really matters here.
If you’re working with longer nails or extensions, make sure the surface is perfectly even before moving on.
Step 2: Nude Base Color
Choose a sheer or milky nude that blends naturally with your skin tone. The base should stay subtle so the black and silver details stand out clearly.
Apply 1–2 thin coats, letting each one dry completely.
Good base shades for this look:
- Essie – Mademoiselle
- OPI – Put It In Neutral
- Zoya – Leia
- CND Vinylux – Negligee
A slightly translucent finish works better here than a fully opaque nude.
Step 3: Create the Black French Tips
This design uses sharp, squared french tips, so take a moment to plan the shape before painting.
Using black polish, paint a clean french tip across the free edge. Keep the line straight and crisp rather than curved. Apply two thin coats for full opacity.
Black polish suggestions:
- Essie – Licorice
- OPI – Black Onyx
- Zoya – Raven
Tip: If straight lines are tricky, use french tip guides or striping tape and remove it carefully while the polish is still slightly wet.
Step 4: Add the Silver Curve Detail
This is the design’s focal point.
Using a thin nail art brush, draw a soft wave line starting near one side of the nail and flowing diagonally across the nail, overlapping the nude base and slightly touching the black tip.
You can use:
- Silver glitter polish
- Fine silver nail art liner
- Silver gel paint
Apply the line slowly in one smooth motion. If needed, clean up the edges with a small brush dipped in remover.
Silver accent options:
- Essie – Set In Stones (used very sparingly)
- OPI – Silver Canvas
- Nail art striping gel in silver
Each nail doesn’t have to be identical – slight variation makes the design feel more organic.
Step 5: Optional Double-Line Effect
On one or two accent nails, you can add a second thin silver or white wave parallel to the first. This adds depth without overwhelming the design.
Keep it subtle and lighter than the main silver line.
Step 6: Seal With Top Coat
Apply a glossy top coat to smooth out the layers and enhance contrast. Make sure to cap the free edge to protect the black tips from chipping.
If your silver detail feels slightly textured, two thin top coat layers will give a glassy finish.
Tools That Help With This Design
- Thin nail art brush (very important here)
- Striping tape or french tip guides
- Small cleanup brush
- High-pigment black polish
- Silver liner or glitter polish
Good lighting and a steady surface make a big difference with graphic designs like this.
Final Tips for a Clean, High-End Look
- Don’t rush the black tips – they set the tone for the whole design
- Keep the silver line fluid, not stiff
- If one wave goes wrong, remove just that nail and redo it – it’s worth it
- This design looks best on medium to long nails where the wave has space to flow
This french style is a great contrast to the previous two: bolder than classic, but still elegant and wearable.
Green & Blush Side French (Fresh, Playful, and Modern)
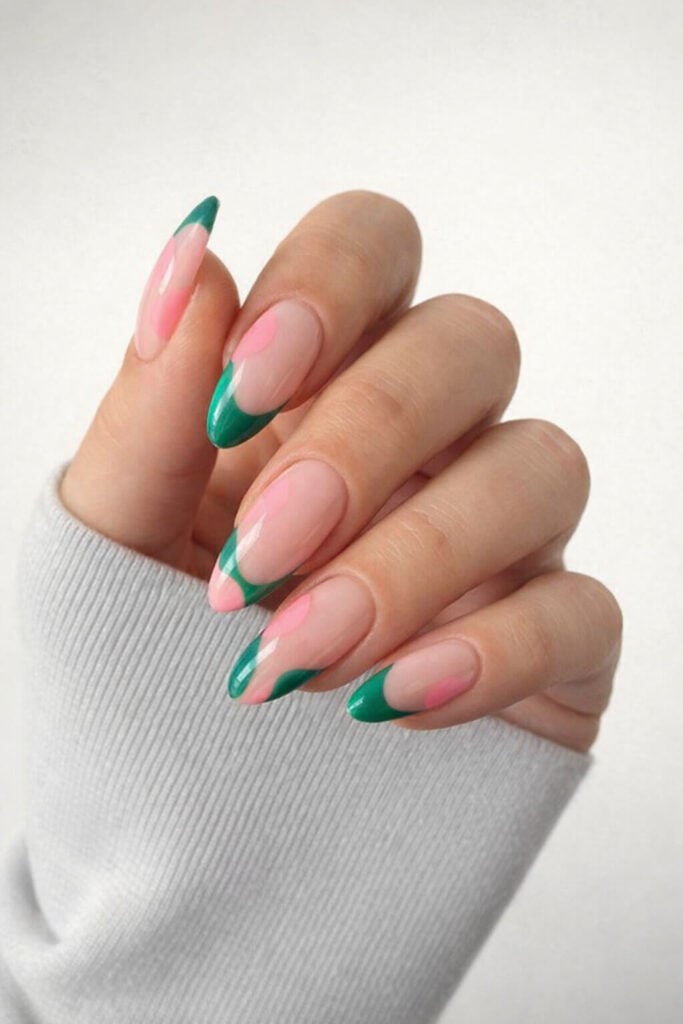
This french nail design feels light, creative, and very current. Instead of a classic tip, the color is placed diagonally along the side of the nail, which instantly makes the look more dynamic. The combination of soft blush pink and fresh green keeps it playful but still wearable for everyday.
This is a great option if you want something different without going too bold.
How to Create This Green & Blush Side French Nail Design
Step 1: Base Coat
Apply your base coat and let it dry completely. Side french designs rely on clean edges, so make sure your base layer is smooth and even.
Step 2: Nude Base Color
Go for a sheer or milky nude that blends naturally into your nail bed. This keeps the design airy and lets the colors pop without looking heavy.
Apply 1–2 thin coats, letting each coat dry fully.
Good nude base shades:
- Essie – Mademoiselle
- OPI – Put It In Neutral
- Zoya – Leia
- CND Vinylux – Negligee
Step 3: Paint the Green Side Tip
Using a thin brush, paint a diagonal green tip starting from one side of the free edge and tapering upward slightly toward the center of the nail.
The green should sit mostly on the edge, not across the whole tip.
Apply two thin coats for an even finish.
Green polish ideas:
- Essie – Off Tropic
- OPI – Stay Off the Lawn!!
- Zoya – Hunter
- CND – Palm Deco
Tip: Turn your hand slightly while painting – it helps control the angle and keeps the line smooth.
Step 4: Add the Blush Pink Accent
Once the green is dry, add a soft blush pink shape slightly inside the nail, overlapping or sitting close to the green.
This doesn’t need to be symmetrical or perfect – a slightly organic shape looks more modern and intentional.
Blush pink polish suggestions:
- Essie – Fiji
- OPI – Mod About You (very thin layer)
- Zoya – Dot (sheered out)
Use a thin brush and keep the pink lighter and smaller than the green for balance.
Step 5: Clean Up and Balance
Step back and look at the set as a whole. If one nail feels heavier than the others, lightly refine the edges with a cleanup brush dipped in remover.
Side french designs look best when they feel cohesive, not identical.
Step 6: Seal With Top Coat
Finish with a glossy top coat to unify the design and bring out the shine.
Make sure to cap the free edge lightly to prevent chipping, especially on the diagonal tip.
Tools That Help With This Design
- Thin nail art brush
- Small cleanup brush
- Two contrasting polish colors
- Good lighting for precision
This design doesn’t require stickers or guides – a freehand approach actually works better here.
Final Tips for a Fresh, Editorial Look
- Keep the base sheer and clean
- Don’t overthink symmetry
- Limit yourself to two accent colors to avoid clutter
- This design looks especially good on almond or oval nails
This french style is perfect for breaking up a series of more classic designs
Soft Heart French (Romantic & Minimal)
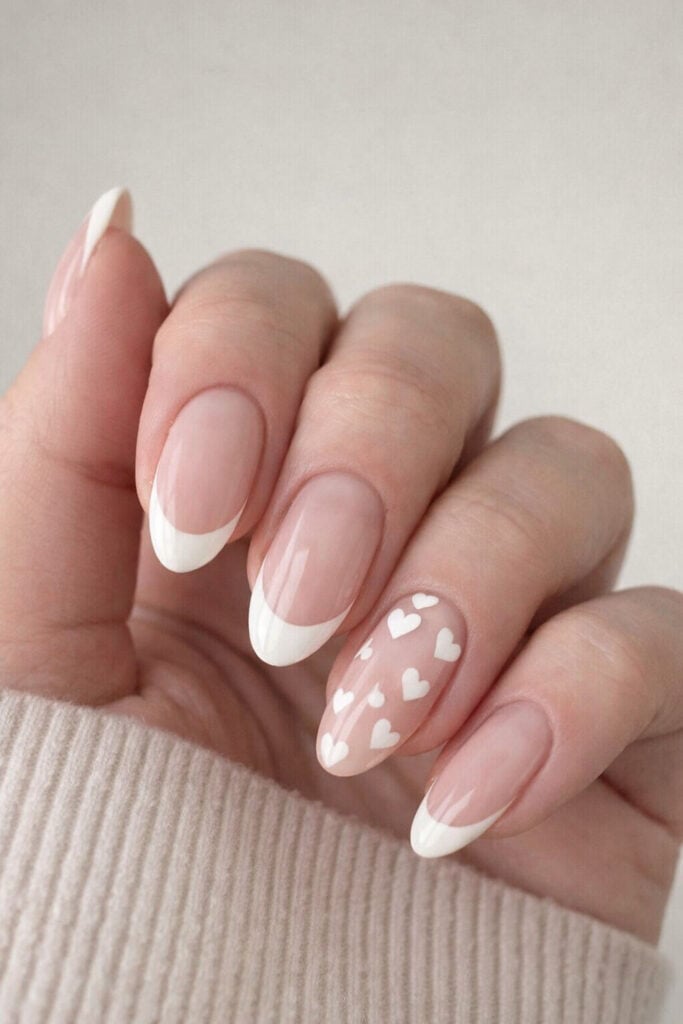
This design is delicate, sweet, and very wearable. At first glance it looks like a classic soft french, but the tiny white hearts add just enough detail to make it feel special. It’s perfect for Valentine’s Day, weddings, or anyone who loves subtle nail art without going over the top.
From this point on, we’ll skip repeating base and nude polish recommendations and focus only on what makes each design unique.
How to Create This Soft Heart French Nail Design
Step 1: Create the White French Tips
Paint a soft, curved white french tip on each nail. Keep the line thin and gentle – this design works best when the french isn’t too bold.
Two thin coats will give a clean, even finish.
Tip: A slightly higher smile line looks especially flattering on almond-shaped nails like these.
Step 2: Choose Your Accent Nail
Pick one nail (usually the ring finger) to feature the heart design. Keeping it to a single accent nail helps the look stay elegant and not too busy.
Step 3: Paint the White Hearts
Using a dotting tool or a toothpick, place two tiny dots next to each other, then gently drag them downward with a thin brush or needle to form a heart shape.
Repeat this across the accent nail in a scattered pattern. The hearts don’t need to be identical – slight variation makes them look more natural.
White polish works best here, the same one used for the french tips.
Tip: Practice one heart on paper first to get a feel for the motion.
Step 4: Let the Design Dry Completely
This step matters more than it sounds. Hearts are small and easy to smudge if rushed. Give the design a full minute or two before sealing.
Step 5: Seal With Top Coat
Apply a glossy top coat over all nails, including the accent nail. Use a light touch over the hearts so they don’t blur or drag.
If you want a smoother finish, apply two thin top coat layers instead of one thick one.
Tools That Help With This Design
- Dotting tool or toothpick
- Thin detailing brush or needle
- White polish with good opacity
- Steady surface for your hand
This is one of those designs where simple tools work just as well as professional ones.
Final Tips for a Soft, Clean Result
- Keep the hearts small and spaced out
- Avoid placing hearts too close to the cuticle
- One accent nail is enough – restraint is what makes this design classy
- This look pairs beautifully with cozy, neutral outfits
This french design adds a romantic pause in your article and balances out the bolder styles.
Gold-Lined Classic French (Soft Luxury)
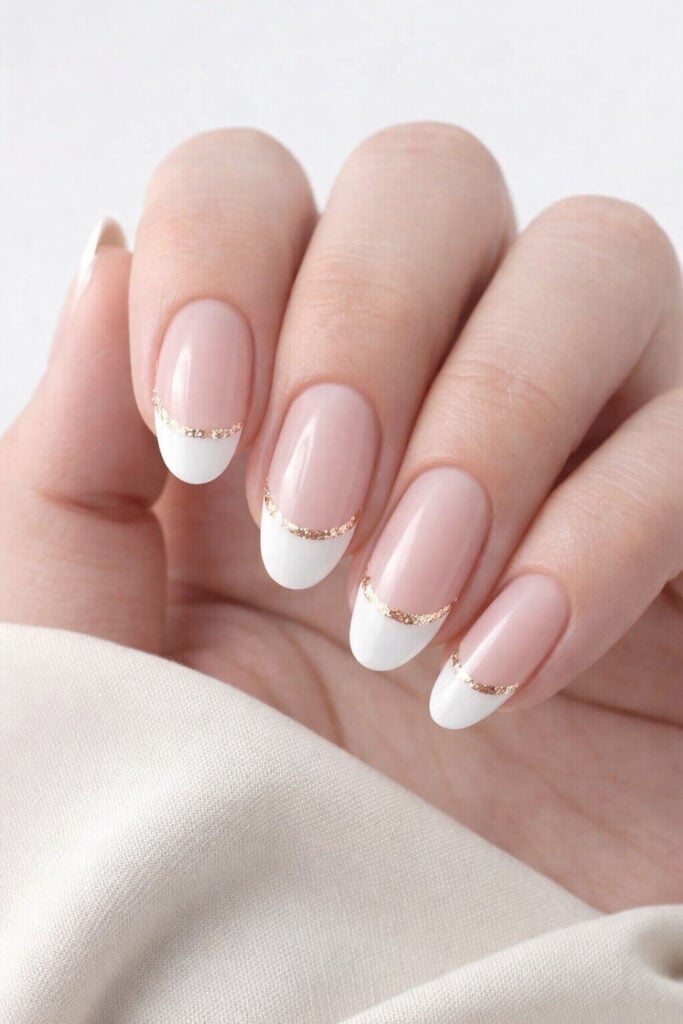
This french nail design is proof that tiny details can completely transform a classic look. The thin gold line placed between the nude base and the white tip adds just enough elegance to make the manicure feel refined and special, without losing its clean, timeless vibe. It’s perfect for weddings, formal events, or anyone who loves minimal luxury.
Since the base and nude shades are already covered earlier, we’ll focus only on the signature gold detail here.
How to Create This Gold-Lined French Nail Design
Step 1: Paint the White French Tips
Create a clean, softly curved white french tip on each nail. Keep the line neat and even, and avoid making it too thick – the gold accent works best when the white tip stays subtle.
Let the white polish dry fully before moving on.
Step 2: Add the Thin Gold Line
This is the defining step of the design.
Using a very thin nail art brush, draw a delicate gold line exactly where the nude base meets the white tip. Work slowly and use minimal pressure – the line should feel almost jewelry-like, not bold.
You can use:
- Fine gold glitter polish
- Metallic gold striping polish
- Gold gel liner
If your gold polish is very pigmented, wipe excess product off the brush before touching the nail.
Step 3: Refine the Line
If the gold line looks slightly uneven, lightly clean the edge with a tiny brush dipped in remover. Don’t aim for absolute perfection – a slightly organic line actually looks more high-end than a stiff one.
Step 4: Seal With Top Coat
Finish with a glossy top coat, making sure to gently seal over the gold line so it stays protected.
If the gold detail feels textured, two thin layers of top coat will give a smoother, glass-like finish.
Tools That Make This Easier
- Ultra-thin nail art brush
- Gold liner or glitter polish
- Small cleanup brush
- Good lighting for precision
This design is more about control than complexity.
Final Tips for a Soft, Elegant Finish
- Keep the gold line very thin – less is more
- Avoid chunky glitter; fine shimmer looks far more refined
- This design shines most on almond or oval nails
- Neutral outfits and soft fabrics make it look even more luxurious
This french design fits beautifully into the “elevated classic” section and pairs well with both simple and more decorative styles.
Black Heart French Tips (Playful Graphic Chic)
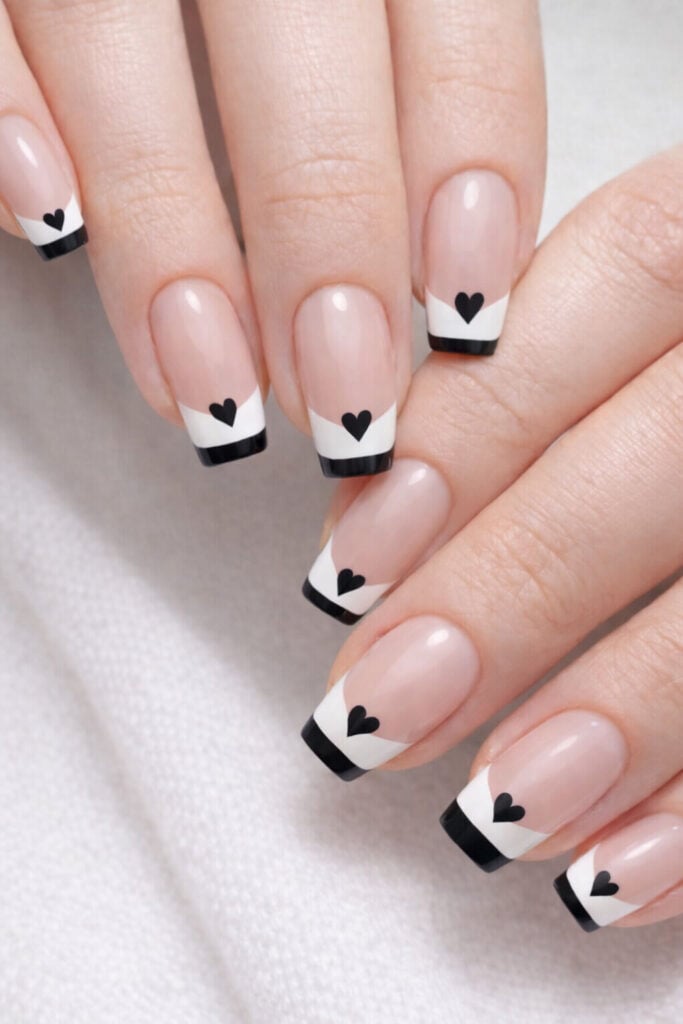
This french nail design feels bold, graphic, and slightly retro in the best way. The black-and-white contrast keeps it crisp, while the tiny black hearts add a fun, flirty twist. It’s eye-catching without being overdone, and surprisingly easy to recreate at home.
How to Create This Black Heart French Nail Design
Step 1: Paint the White French Base
Start by creating a clean white french tip on each nail. Unlike softer designs, this one benefits from a slightly straighter and more defined tip, especially on square or soft-square nails.
Let the white polish dry completely before adding any details.
Step 2: Add the Black Tip Edge
Using black polish and a thin brush, paint a narrow black strip along the very edge of the white tip. This creates the bold, graphic contrast that defines the look.
Keep this line thin and consistent across all nails.
Tip: Rest your painting hand on a flat surface to keep the line steady.
Step 3: Paint the Black Hearts
Using a dotting tool or toothpick, place two small black dots just above the center of the white tip. Gently drag them downward to form a heart shape.
Each heart should sit neatly between the nude base and the white tip, not too high and not too low.
Tip: Smaller hearts look cleaner and more modern than oversized ones.
Step 4: Check Balance and Spacing
Before sealing, look at all nails together. Make sure the hearts are placed at a similar height so the design feels cohesive, even if each heart isn’t identical.
Step 5: Seal With Top Coat
Apply a glossy top coat over the entire nail, using light strokes over the heart details to avoid dragging the black polish.
For extra durability on the tip, lightly cap the free edge.
Tools That Make This Easier
- Dotting tool or toothpick
- Thin nail art brush
- Black polish with strong pigmentation
- Small cleanup brush
This design doesn’t require advanced tools, just patience and a steady hand.
Final Tips for a Clean, Graphic Finish
- Let each layer dry fully before adding the next
- Keep the black edge line narrow to avoid a bulky look
- This design works best on short-to-medium square nails
- High contrast outfits make this manicure pop even more
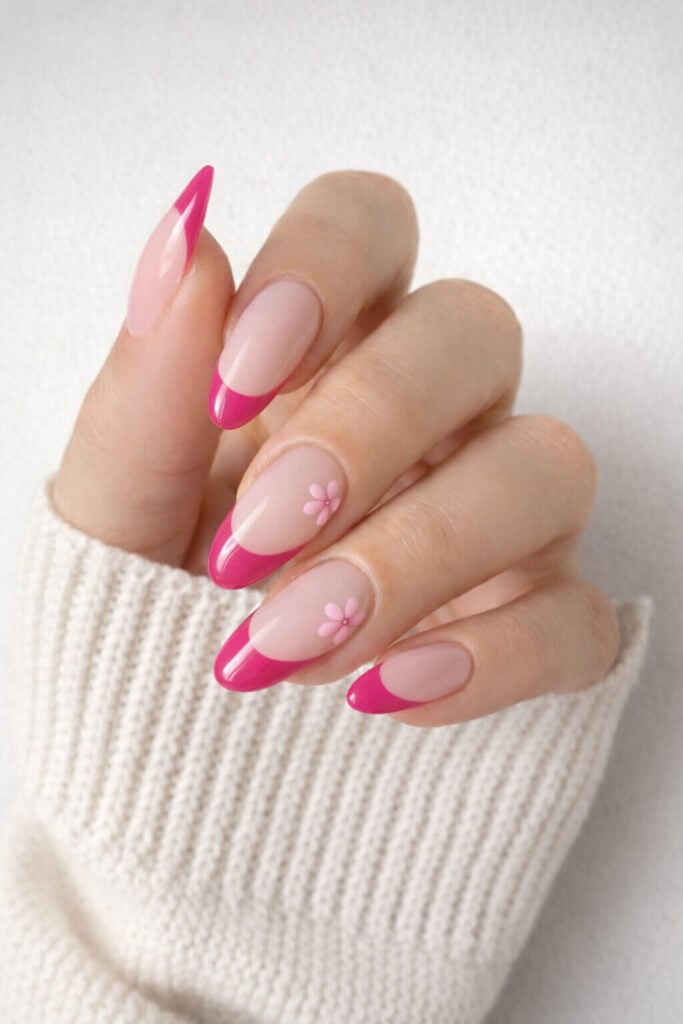
Hot Pink Micro French (Bold but Minimal)
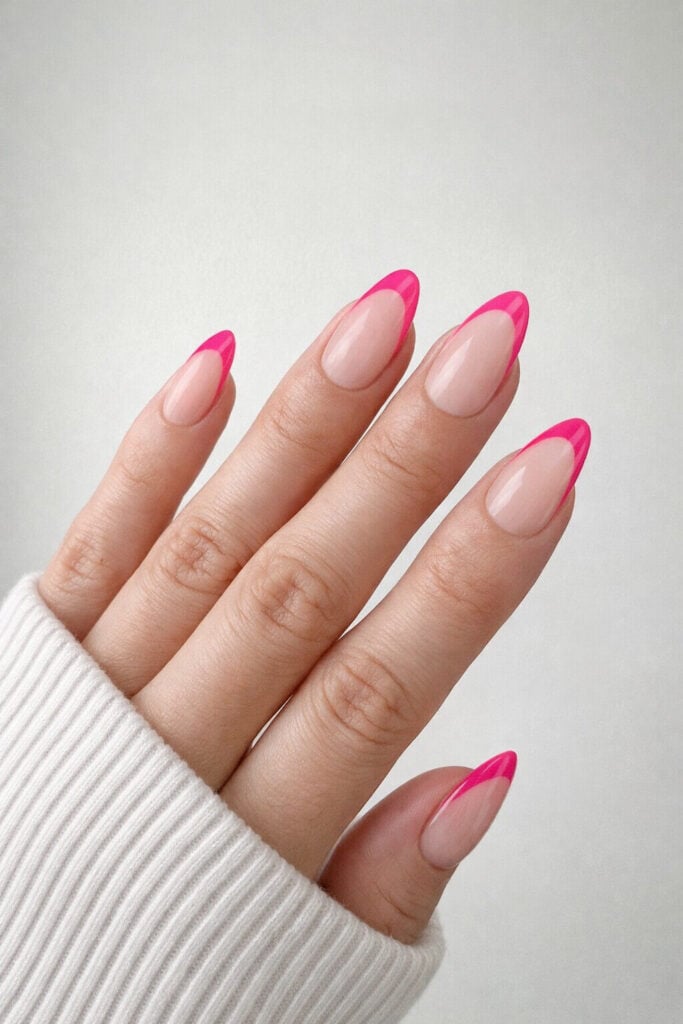
This french nail design is proof that you don’t need extra details to make a strong statement. The ultra-thin hot pink tip instantly modernizes the classic french, especially on almond-shaped nails. It feels fresh, confident, and very wearable — perfect if you love color but still want a clean, polished look.
This is also one of the easiest designs in the whole list to recreate at home.
How to Create This Hot Pink Micro French Nail Design
Step 1: Shape Matters Here
Before painting, make sure your nails are evenly shaped. This design looks best on almond or soft oval nails because the thin tip follows the natural curve and elongates the fingers.
If one nail is shaped differently, it will be more noticeable with such a minimal design.
Step 2: Paint the Micro French Tip
Using a thin nail art brush (or the polish brush wiped almost dry), paint a very narrow hot pink line along the free edge of the nail.
The key here is restraint — the tip should be slim, almost like a color outline rather than a full french.
Apply one thin coat first, then a second only if needed.
Hot pink polish ideas:
- Essie – Mod Square
- OPI – Strawberry Margarita
- Zoya – Ali
- CND – Backyard Nuptials
Tip: If your hand isn’t steady, turn the finger slightly instead of moving the brush too much.
Step 3: Keep the Curve Soft
Follow the natural smile line of your nail rather than forcing a dramatic curve. A gentle arc looks cleaner and more expensive with bright colors.
If the line gets too thick, clean it up immediately with a small brush dipped in remover.
Step 4: Seal With Top Coat
Finish with a glossy top coat to lock everything in and enhance the contrast between the nude base and the pink tip.
Lightly cap the free edge — this helps prevent the bright color from wearing down too quickly.
Tools That Help With This Design
- Thin nail art brush
- Highly pigmented pink polish
- Cleanup brush
- Good lighting (important for micro details)
No stickers or guides needed — freehand actually works better here.
Final Tips for a Clean, Modern Look
- Thinner is always better with micro french designs
- Bright colors look best when the base stays sheer and neutral
- This design is perfect for short to medium nails too
- If one nail feels off, redo just that tip — it’s quick and worth it
This pink micro french is a great energy shift: bold color, zero extras, maximum impact.
Double-Line Crystal French (Soft Glam Upgrade)
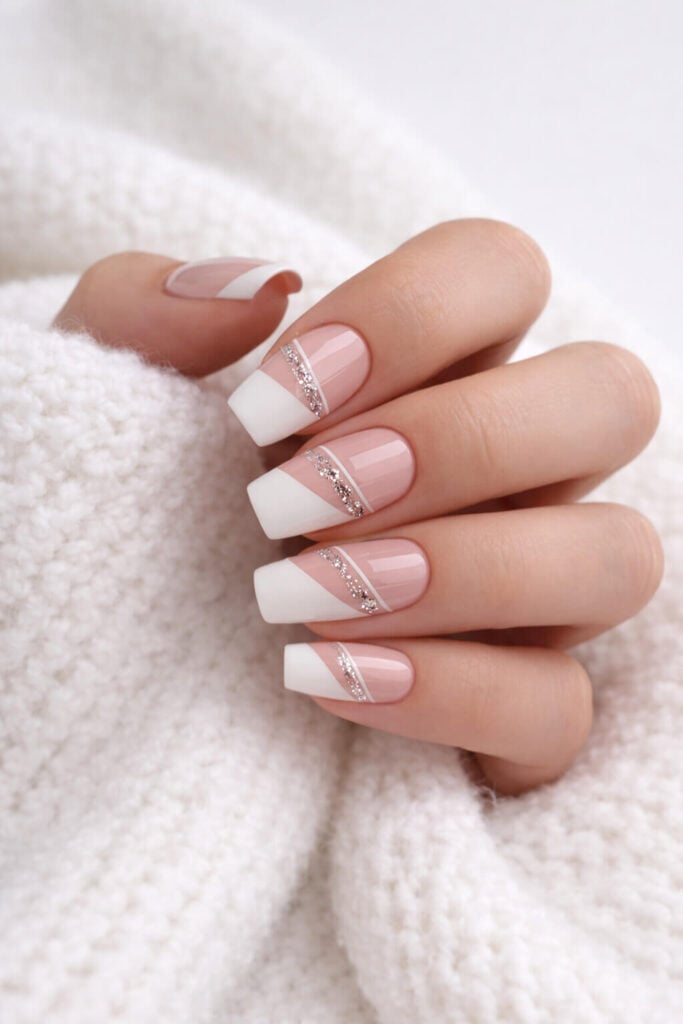
This french nail design is a beautiful step up from a classic white tip. The clean french base keeps it timeless, while the thin glitter line and tiny crystals add a soft, luxurious sparkle. It’s elegant without being flashy, and perfect if you want something special that still feels wearable.
This design looks intricate, but once you see it as layers, it becomes very doable at home.
How to Create This Double-Line Crystal French Nail Design
Step 1: Paint the White French Tips
Create a clean, straight or softly curved white french tip on each nail. Because this design has extra detail above the tip, keeping the white section neat and even is important.
Let the white polish dry fully before moving on.
Step 2: Add the Thin Glitter Line
Using a fine nail art brush, paint a very thin glitter line just above the white tip, following the same curve.
The line should be subtle — think shimmer, not chunky sparkle.
You can use:
- Fine silver glitter polish
- Glitter striping liner
- Loose fine glitter mixed with a clear top coat
Keep the line narrow so it enhances the french instead of overpowering it.
Step 3: Place the Crystal Accents
While the glitter line is still slightly tacky (or using a small amount of nail glue), place a few tiny clear crystals along the line.
Spacing matters more than quantity here. A few well-placed stones look far more elegant than a solid row.
Tip: Focus crystals near the center of the nail for a balanced look.
Step 4: Refine and Set
Gently press the crystals into place and give them a few seconds to set before sealing. If any crystal feels out of line, nudge it carefully with a toothpick.
Step 5: Seal With Top Coat
Apply top coat carefully around the crystals, not over them, to preserve their shine. For extra durability, you can apply a second thin layer around the edges once the first coat dries.
Tools That Help With This Design
- Thin nail art brush
- Fine silver glitter liner
- Small clear crystals
- Wax pencil or toothpick
- Nail glue or thick top coat
This design is more about precision than speed.
Final Tips for a Soft Glam Finish
- Keep glitter lines thin and controlled
- Choose very small crystals for a refined look
- Don’t overload every nail — consistency is key
- This design pairs beautifully with soft fabrics and neutral outfits
This french style adds a polished, glam note after the earlier gold-lined version.
Pastel Flower French (Soft, Cheerful & Spring-Ready)
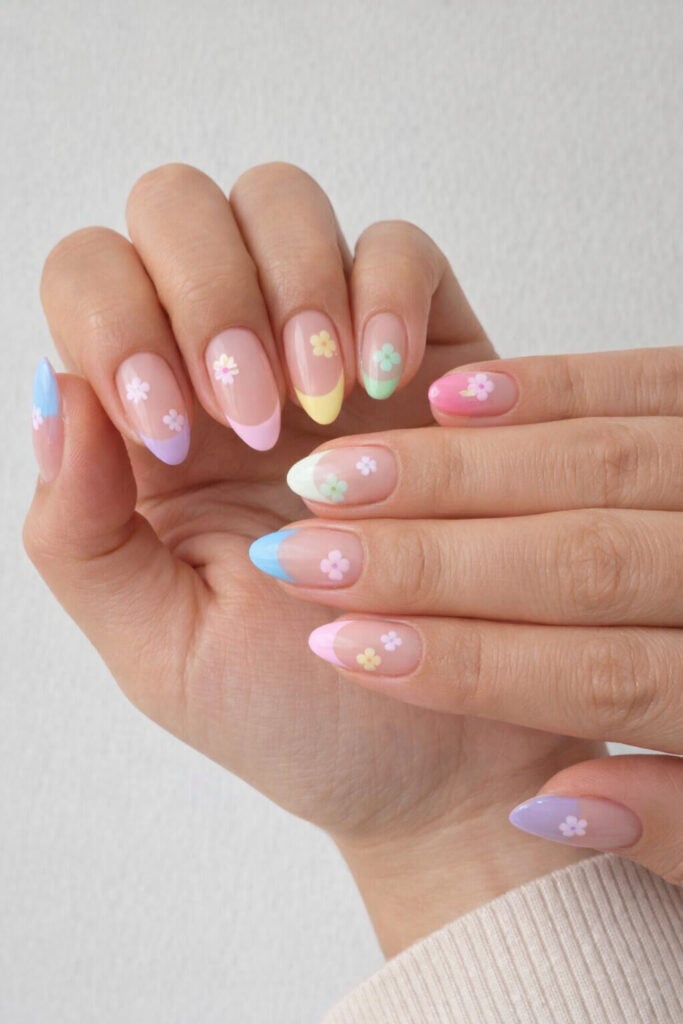
This french nail design feels lighthearted and creative without looking messy or overdone. Each nail has a soft pastel tip in a different shade, finished with tiny white flowers that give the whole look a fresh, almost nostalgic vibe. It’s playful, but still polished enough to wear beyond spring.
Even though it looks detailed, this design is very beginner-friendly if you take it step by step.
How to Create This Pastel Flower French Nail Design
Step 1: Paint the Pastel French Tips
Choose a few soft pastel shades and use one color per nail. The key is keeping the tones gentle and slightly muted so they work together as a set.
Paint a classic french tip shape on each nail, following the natural curve. Don’t worry about perfect symmetry — slight variation actually adds charm here.
Good color families for this look:
- Baby pink
- Lavender
- Mint green
- Soft yellow
- Powder blue
Let the tips dry fully before adding details.
Step 2: Create the Tiny Flowers
Using white polish and a dotting tool (or toothpick), place four or five tiny dots in a circular shape to form petals.
Once the dots are down, lightly place a very small pastel dot in the center of each flower. You can match the center to the tip color or keep it soft yellow for consistency.
One flower per nail is enough — spacing keeps the design airy and clean.
Tip: Smaller flowers always look more refined than large ones.
Step 3: Let the Design Set
Because this design has multiple dots, give it a little extra drying time. Smudging tiny flowers is easy if you rush this step.
Step 4: Seal With Top Coat
Apply a glossy top coat using light strokes so you don’t drag the flower details. One even layer is usually enough, but you can add a second thin layer for extra smoothness.
Tools That Help With This Design
- Dotting tool or toothpick
- A few pastel polishes
- White polish with good opacity
- Cleanup brush for small fixes
No advanced nail art tools needed — this is very DIY-friendly.
Final Tips for a Soft, Balanced Look
- Stick to pastel tones only — brights can overpower the design
- Keep flowers small and minimal
- One flower per nail feels intentional and modern
- This look works beautifully on almond and oval shapes
Rainbow Outline French (Clean, Colorful & Modern)
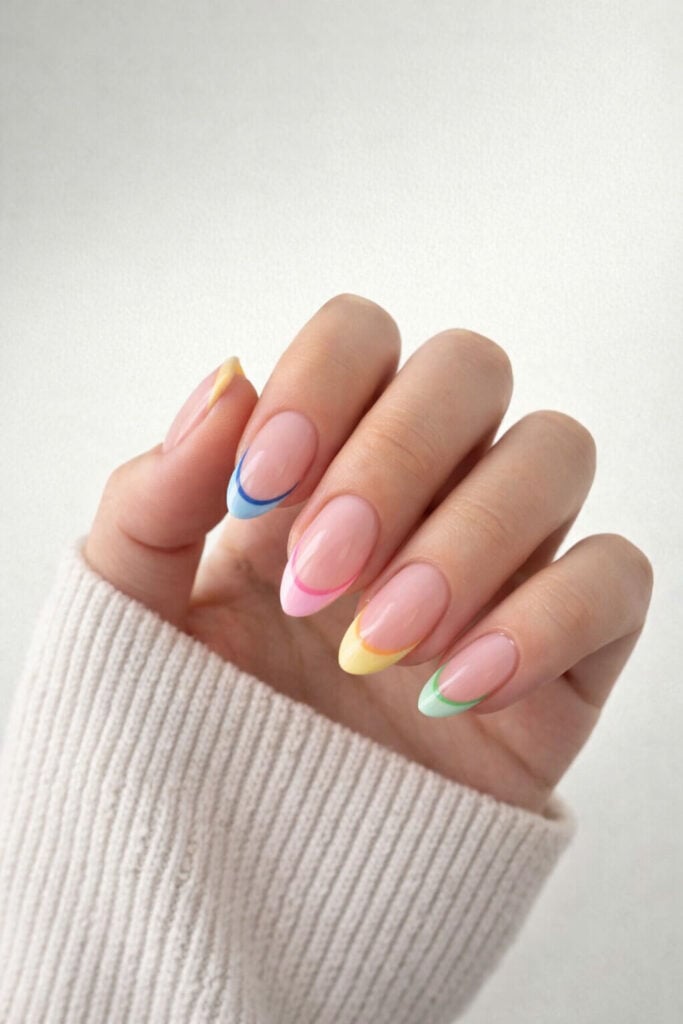
This french nail design is bright, playful, and surprisingly minimalist at the same time. Instead of filling in the tip with color, each nail features a thin, colorful outline that follows the natural smile line. The result is fresh and fun without feeling heavy or cluttered.
It’s a great choice if you want color, but still love a clean, airy manicure.
How to Create This Rainbow Outline French Nail Design
Step 1: Plan Your Color Order
Before painting, decide which color goes on which nail. Keeping a soft rainbow flow (for example: blue, pink, yellow, green) makes the set feel intentional rather than random.
Stick to pastel or slightly muted shades for the best result.
Step 2: Draw the Outline French
Using a thin nail art brush, draw a very fine curved line along the tip of each nail. Follow the natural smile line rather than creating a sharp or dramatic curve.
This line should be delicate — almost like a color sketch rather than a bold stripe.
Apply one controlled stroke, then let it dry. Add a second pass only if needed.
Step 3: Keep Each Nail Light
Resist the urge to thicken the line. The beauty of this design comes from how minimal it feels, even with multiple colors involved.
If one line becomes too thick, clean it up immediately with a small brush dipped in remover.
Step 4: Seal With Top Coat
Finish with a glossy top coat to smooth everything out and lock the thin lines in place.
Make sure to cap the free edge lightly so the outline lasts longer.
Tools That Help With This Design
- Ultra-thin nail art brush
- Pastel or soft rainbow polishes
- Cleanup brush
- Good lighting
This design is all about precision and light pressure.
Final Tips for a Fresh, Balanced Look
- Keep all lines equally thin across the set
- Softer colors feel more modern than neon
- This design works beautifully on short and long nails
- If one nail feels off, redo just that outline — it’s quick
Black Glitter French (Subtle Drama)
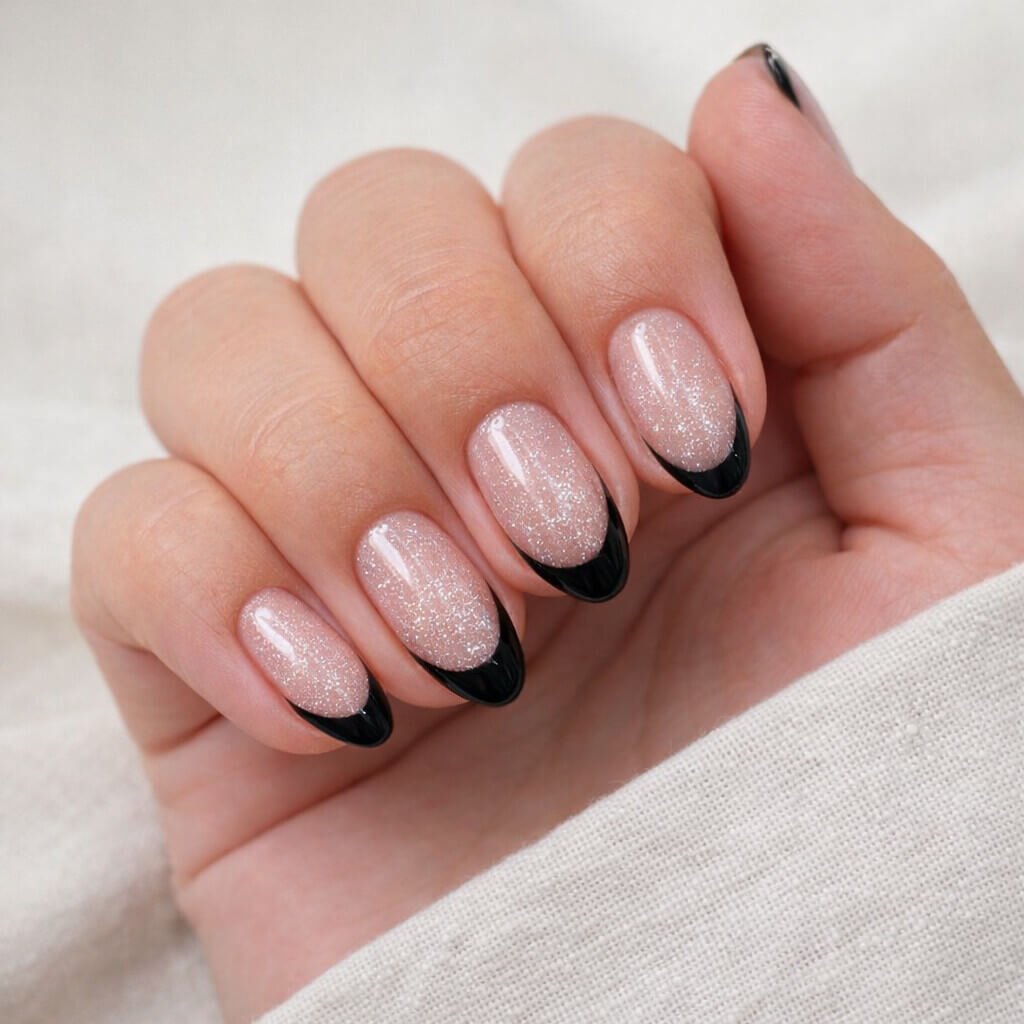
This french nail design strikes a beautiful balance between minimal and bold. The soft, shimmery nude base keeps it light and elegant, while the glossy black tips add contrast and drama. It’s perfect if you want something darker than a classic french but still refined and wearable.
This design feels especially suited for evenings, winter months, or when you want your nails to feel a little more elevated without going full glam.
How to Create This Black Glitter French Nail Design
Step 1: Apply the Shimmery Base
For this look, the base isn’t completely plain — it has a subtle shimmer that catches the light beautifully. Apply a thin, even layer and let it dry fully.
If your shimmer polish is sheer, one coat is usually enough. Two coats can start to overpower the black tips.
Step 2: Paint the Black French Tips
Using black polish, create a classic curved french tip. Keep the line clean and follow the natural shape of the nail.
Apply two thin coats for opacity, allowing each coat to dry fully.
Tip: The contrast works best when the black is glossy and the base stays soft and sparkly.
Step 3: Refine the Tip Shape
Before sealing, check the symmetry of each tip. Black polish shows imperfections easily, so this is the moment to clean edges with a small brush dipped in remover.
Step 4: Seal With Top Coat
Finish with a glossy top coat to bring out the shine of both the shimmer base and the black tips.
Make sure to cap the free edge gently — black tips tend to show wear faster without this step.
Tools That Help With This Design
- Black polish with strong pigmentation
- Fine cleanup brush
- Shimmery nude base polish
- Good lighting for precision
This design is simple, but clean execution makes all the difference.
Final Tips for a Polished, Evening-Ready Look
- Keep shimmer fine and subtle, not chunky
- Glossy top coat elevates the entire design
- This style works beautifully on short and medium nails
- Black tips look best when the base stays light
Pink Blossom French (Sweet but Grown-Up)
This french nail design feels soft, feminine, and cheerful without tipping into “too cute.” The glossy pink french tips keep it bold and modern, while the tiny flower accents add a gentle, handmade feel. It’s playful, but still polished enough to wear every day.
This one is a lovely middle ground between minimal french styles and more decorative nail art.
How to Create This Pink Blossom French Nail Design
Step 1: Paint the Pink French Tips
Create a classic curved french tip using a medium-to-bright pink shade. The color should be vibrant but not neon, so it still feels elegant against the nude base.
Apply one thin coat, let it set, then add a second coat for opacity.
Tip: Keep the tip slightly thinner at the sides and fuller in the center for a flattering almond shape.
Step 2: Choose Accent Nails for the Flowers
Select one or two nails (usually the middle and ring finger) for the floral detail. Leaving the other nails clean helps the design feel balanced and intentional.
Step 3: Create the Small Pink Flowers
Using a dotting tool or toothpick, place five tiny dots in a circular shape to form petals. Then add a very small dot in the center to finish the flower.
Keep the flowers small and delicate — they should feel like a soft detail, not the main focus.
Tip: If freehand flowers feel tricky, practice one on paper first to get the dot spacing right.
Step 4: Let the Art Dry Fully
Because the flowers sit on the nude base, any smudging will be very noticeable. Give them a little extra time to dry before sealing.
Step 5: Seal With Top Coat
Apply a glossy top coat over all nails using gentle strokes, especially over the flower accents. One smooth layer is usually enough to even everything out.
Tools That Help With This Design
- Dotting tool or toothpick
- Pink polish for tips
- Lighter pink for flowers
- Fine cleanup brush
Simple tools are more than enough here — control matters more than equipment.
Final Tips for a Soft, Feminine Finish
This design looks especially pretty with cozy, neutral outfits
Keep flowers minimal — one per nail is plenty
Avoid placing flowers too close to the cuticle
Glossy top coat makes pink shades look cleaner
Silver Heart Curve French (Elegant With a Romantic Twist)
This french nail design feels soft, refined, and quietly romantic. The classic white tip is paired with a thin silver glitter curve that follows the smile line, while tiny white hearts add a sweet accent without stealing the spotlight. It’s the kind of design that looks delicate up close and polished from a distance.
This one works beautifully for weddings, anniversaries, or any moment where you want something romantic but still very clean.
How to Create This Silver Heart Curve French Nail Design
Step 1: Paint the White French Tips
Create a clean white french tip on each nail. The tip should be smooth and slightly curved, not too thick — the silver detail needs space to breathe above it.
Let the white polish dry completely before adding any accents.
Step 2: Add the Silver Glitter Curve
Using a thin nail art brush, draw a delicate silver glitter line just above the white tip, following the same curve.
This line should feel light and airy, almost like jewelry for the nail rather than a bold stripe.
Keep the glitter fine and controlled — chunky sparkle would overpower the softness of this design.
Step 3: Add the Heart Accents
Choose one or two accent nails and place a small white heart just above the silver line.
You can create hearts the same way as before:
- Two tiny dots
- Gently pull them downward into a point
Keep the hearts small and centered so they feel intentional and balanced.
Step 4: Let Everything Set
Because this design combines polish and glitter, give it a little extra drying time before sealing. This helps prevent dragging or dulling the silver line.
Step 5: Seal With Top Coat
Apply a glossy top coat carefully over the entire nail. Use light pressure over the glitter and heart details to keep everything crisp.
If needed, a second thin layer will smooth out any texture from the glitter.
Tools That Help With This Design
- Thin nail art brush
- Fine silver glitter liner
- Dotting tool or toothpick
- Small cleanup brush
Precision matters more than speed here.
Final Tips for a Soft, Romantic Finish
- Keep silver lines thin and subtle
- Limit hearts to accent nails only
- Avoid placing hearts too close to the cuticle
- This design shines most on short to medium nails
This silver heart curve french is a beautiful bridge between classic elegance and playful romance.
Black & Silver Reverse French (Clean Lines, Modern Edge)
This french nail design feels sleek, architectural, and very intentional. Instead of the classic white tip, the focus shifts to a black reverse curve accented with a touch of silver glitter right at the edge. It’s minimalist, but with a sharp, modern attitude that makes it stand out instantly.
This one is perfect if you love neutral tones but want something that feels fashion-forward rather than traditional.
How to Create This Black & Silver Reverse French Nail Design
Step 1: Start With the Black Curve
Using a thin nail art brush, paint a curved black line near the tip of the nail, following the natural smile line — but slightly lower than a traditional french.
This creates the “reverse” effect and gives the design its graphic look.
Keep the line clean and smooth. One controlled stroke is better than going back and forth.
Step 2: Add the Silver Accent
Just beneath the black curve, add a thin silver glitter line or a small silver section at the very edge of the nail.
This detail should be subtle — it acts as a highlight, not the main feature.
You can use:
- Fine silver glitter polish
- Silver liner
- Very small glitter particles pressed into place
Let this layer set before moving on.
Step 3: Check Symmetry Across the Set
Because this design relies on clean geometry, take a moment to compare the curve placement on each nail. Minor adjustments here make a big difference in how polished the final result looks.
Step 4: Seal With Top Coat
Apply a glossy top coat to unify the layers and smooth out the transition between black and silver.
Lightly cap the free edge to keep the silver detail from wearing down.
Tools That Help With This Design
- Ultra-thin nail art brush
- Black polish with strong pigmentation
- Fine silver glitter or liner
- Cleanup brush
This design is more about precision than decoration.
Final Tips for a Sharp, Editorial Finish
- Keep lines crisp and intentional
- Avoid thick glitter — fine shimmer looks more refined
- This style shines on square or soft-square nails
- Neutral outfits make this manicure feel even more high-end
Sunset Wave French (Bold, Warm & Eye-Catching)
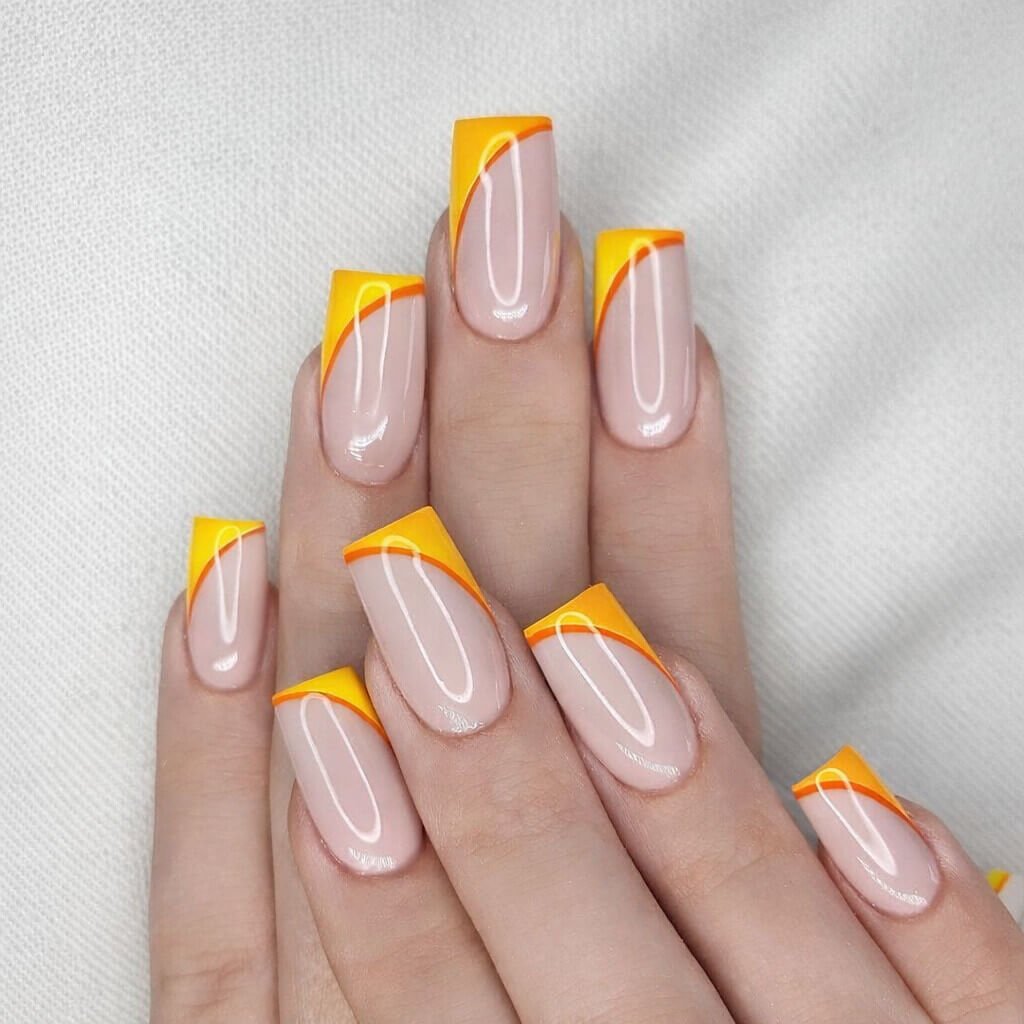
This french nail design feels energetic, summery, and very modern. The layered yellow and orange wave at the tip gives a sunset-inspired effect while the nude base keeps everything clean and balanced. It’s bold without being chaotic, and the curved color placement makes the nails look longer and more dynamic.
This is a great choice if you want a statement french that still feels polished.
How to Create This Sunset Wave French Nail Design
Step 1: Paint the Yellow Base Tip
Using a bright but warm yellow shade, paint a classic french tip on each nail. Keep the tip neat and evenly shaped — this layer acts as the foundation for the whole design.
Let it dry fully before adding the next color.
Step 2: Add the Orange Wave Accent
With a thin nail art brush, draw a soft orange curve slightly above or overlapping the yellow tip. The curve should feel fluid and natural, not sharp or geometric.
This creates the layered, sunset-style look.
Tip: Start thin — you can always build the wave thicker if needed.
Step 3: Keep the Waves Consistent
Each nail doesn’t have to be identical, but the curve direction and thickness should feel cohesive across the set. Step back and look at all nails together before sealing.
Step 4: Seal With Top Coat
Finish with a glossy top coat to bring out the vibrancy of the colors and smooth out the layered design.
Lightly cap the free edge to help the bright colors last longer.
Tools That Help With This Design
- Thin nail art brush
- Yellow and orange polishes
- Cleanup brush for edges
- Good lighting for color placement
This design benefits from steady brush control, but no advanced tools are required.
Final Tips for a Clean, Summery Finish
- Choose warm yellow and orange tones (not neon)
- Keep curves soft and flowing
- This design shines on square and coffin shapes
- Pair with neutral outfits to let the nails stand out
Cherry Tip French (Cute, Clean & Timeless)
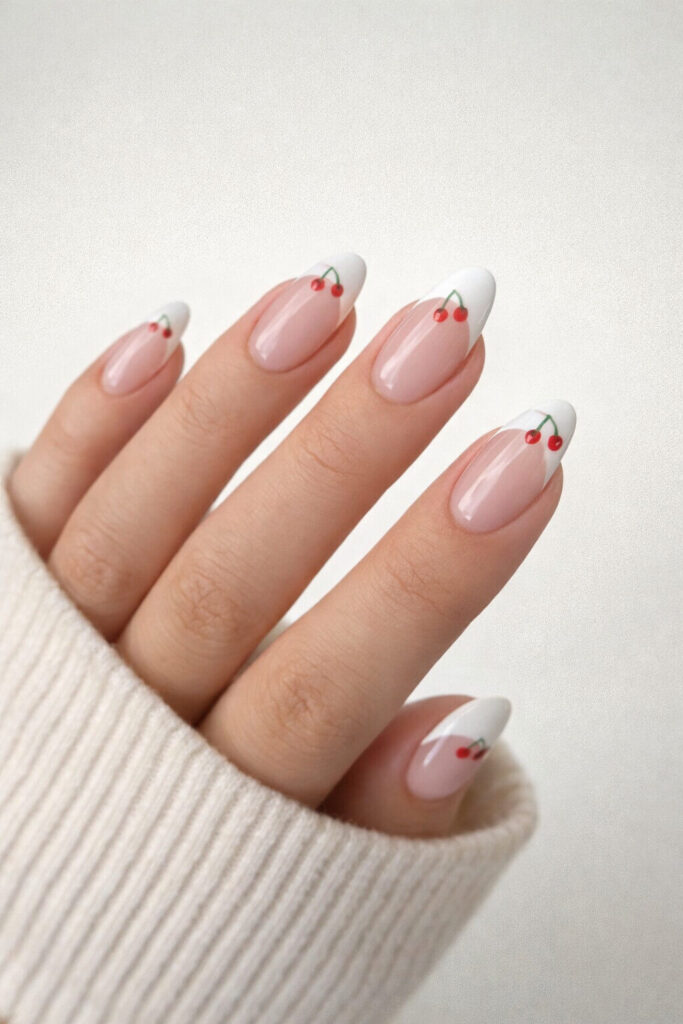
This french nail design is the perfect way to end the collection. It’s playful and charming, yet still clean and minimal. The classic white french tip keeps the look timeless, while the tiny cherry details add a fun, nostalgic touch that never feels overwhelming.
It’s one of those designs that always gets compliments because it feels fresh but familiar at the same time.
How to Create This Cherry Tip French Nail Design
Step 1: Paint the White French Tips
Create a clean, classic white french tip on each nail. Keep the tip soft and evenly curved — the cherry detail works best when the base is simple and polished.
Let the white polish dry completely before adding the art.
Step 2: Decide on Cherry Placement
Place one small cherry motif near the edge of the white tip on each nail. Keeping the cherries small and close to the tip helps them blend naturally into the french design.
You can angle them slightly inward for a softer look.
Step 3: Paint the Cherries
Using a dotting tool or toothpick:
- Add two tiny red dots close together for the cherries
- Draw a thin green line upward for the stem
- Add a tiny leaf if you want extra detail (optional)
Less is more here — tiny cherries look far more refined than larger ones.
Step 4: Let the Art Dry Fully
Because the details are small and layered, give them time to set before sealing. This prevents dragging and keeps the cherries crisp.
Step 5: Seal With Top Coat
Apply a glossy top coat over the entire nail using gentle strokes. One even layer is enough to smooth everything out and protect the artwork.
Tools That Help With This Design
- Dotting tool or toothpick
- Red and green polish
- Thin detailing brush
- Cleanup brush
This design proves you don’t need complex tools to create charming nail art.
Final Tips for a Sweet, Polished Finish
- Keep cherries tiny and consistent across nails
- Avoid overcrowding the tip with details
- Classic white french keeps the look timeless
- This design works beautifully year-round
Final Thoughts – French Nails Are Easier Than You Think
If there’s one thing I hope you take away from this guide, it’s this: french nails don’t have to be perfect to be beautiful. They just have to feel intentional. I’ve ruined tips, smudged hearts, placed crystals crookedly — and guess what? Most of the time, once the top coat went on, everything still looked polished.
French nails are forgiving. They grow with you. And the more you try them, the more confident you become — not just in your manicure, but in trusting your own eye.
And if pink keeps calling your name (same here), don’t miss
Pink Nails you’ll want to try this season — it’s full of ideas that pair beautifully with french nail bases.
Before you go, I’d genuinely love to know:
Which french nails design from this list would you try first?
Have you already recreated one of them?
If you do, save your favorite design on Pinterest and tag me — or leave a comment and tell me how it went. We’re all just nail-obsessed humans learning one brush stroke at a time.