Let me be honest with you: this little parrot drawing started as a quick sketch in the corner of my planner while waiting for my tea to steep. Five minutes later I was fully in “tropical bird mode,” sketching, refining, and eventually pulling out my iPad to recreate it in Procreate. What can I say? When inspiration squawks, I listen.
If you’re anything like me—someone who loves doodling cute things in journals, on post-its, or just for fun—this parrot drawing tutorial is going to be your next favorite creative escape. Whether you’re a total beginner or just want something cheerful and easy to draw, I’ve got you covered.

Why Drawing Parrots Is a Perfect Creative Break
Let’s face it, we all have days when we just want to draw something fun without overthinking shadows and anatomy. That’s where cartoon-style animal drawings like parrots come in:
- They’re colorful, so the end result always feels vibrant and rewarding.
- The shapes are simple and forgiving—great for beginners!
- You can use them in your bullet journal, sketchbook, or even turn them into cute stickers.
- And let’s be real… parrots are just plain adorable.
Whether you use digital tools like Procreate (like I did), or just a trusty pencil and your favorite notebook, this tutorial is designed to be flexible and easy to follow.
How to Draw a Parrot – Step-by-Step Instructions
You’ll find each step below clearly illustrated, with the new lines marked in red to guide you as you go. Take your time, grab your sketchbook or tablet, and let’s draw this cheerful little bird together!
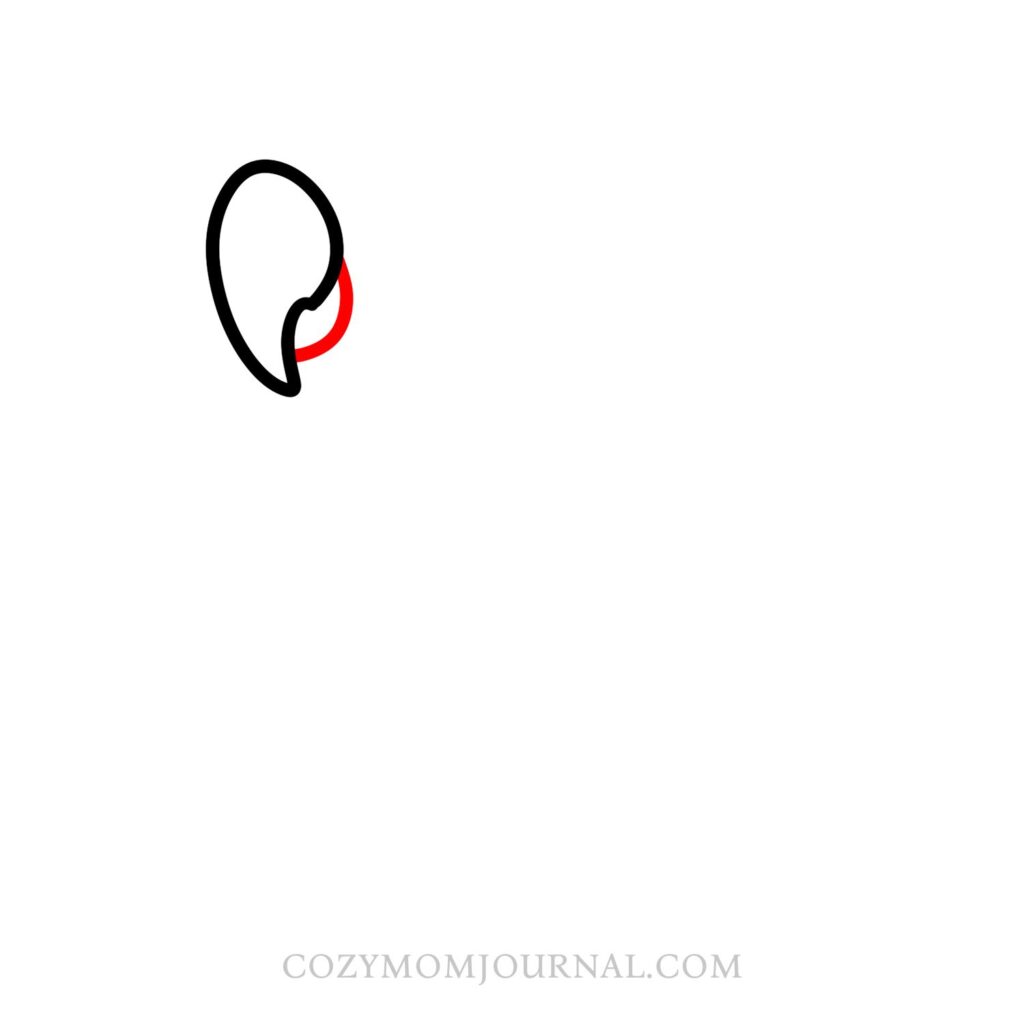
Step 1: Draw the Beak Outline

Let’s kick things off by drawing the parrot’s beak! 🐥
Sketch a large, curved shape that looks like an upside-down drop with a little dip on the right side. This will form the upper and lower part of the beak in one simple line.
Nice and easy — this little shape gives our bird its personality!
Step 2: Add the Lower Beak
Now let’s give our parrot a full beak! 🐦
Draw a curved line starting from the lower tip of the shape you made earlier, curving it inward to form the lower beak. Think of it like a little smile tucked under the top beak.
Great job—our bird is already starting to come to life!
Step 3: Sketch the Head and Wing Outline

Time to give our parrot some body! 🐦✨
Start by drawing a smooth curve from the top of the beak to shape the top of the head and back. Then add a big rounded teardrop shape for the wing, curving it back toward the tail area.
It might look a little abstract now, but trust the process—we’re building the parrot’s full form step by step!
Step 4: Connect the Neck

Let’s bring some structure to the parrot’s neck! 🪶
Draw a gentle curved line starting from just behind the beak and flowing down to meet the top of the wing. This creates the neck and chest line, helping your parrot look more complete and lifelike.
You’re doing great—just one smooth line makes a big difference!
Step 5: Draw the Belly Curve

Let’s round out the parrot’s body! 🐦💫
From the tip of the beak, draw a long curved line going down to create the belly and underside of the bird. Then add a short little curved line to close the gap where the belly meets the wing.
Now our parrot has a cozy, round shape—almost ready to perch!
Step 6: Draw the Parrot’s Feet

Time to give our bird some toes! 🐾
Add two clawed feet under the belly—each one made up of a curved leg line and three little hooked toes gripping downward. These cute feet will soon perch on a lovely branch!
You nailed it—our parrot is ready to stand proud!
Step 7: Add the Tail Feathers

Now let’s give our parrot its signature long tail feathers! 🪶
Draw three long, rounded feathers extending from under the wing. Make sure they’re slightly curved and overlap a little at the base to give that layered look.
These elegant feathers add balance and beauty—your parrot is really coming together!
Step 8: Draw the Eye

Let’s bring your parrot to life with a bright eye! 👀
Draw a small circle for the eye, then add a tiny circle inside it for the shiny highlight. You can fill in the outer circle later to make it pop.
Just one little eye, and suddenly your parrot has personality!
Step 9: Add Feather Details to the Wing

Let’s add some beautiful texture to that wing! 💫
Draw a few slanted curved lines across the wing to show the layered feathers. Start from the tip of the wing and space them evenly as you go upward.
These lines give your parrot that polished, feathery look—just like a real one!
Step 10: Draw Feather Patterns on the Body

Time to decorate our parrot’s belly and wing! 🎨
Add some small wavy “M”-shaped lines across the chest and upper wing to represent soft, fluffy feathers. These little details add texture and charm.
Now your parrot looks extra cuddly and cartoon-perfect!
Step 11: Draw the Branch

Time to give your parrot a cozy perch! 🌳
Draw a long, curved branch under the parrot’s feet. Let it extend out to both sides, and add a few small offshoots to make it look natural. Make sure the feet rest firmly on top!
Now your parrot looks right at home in its jungle scene.
Step 12: Add the Leaves

Let’s liven up the branch with some leafy details! 🍃
Draw a few sets of simple pointed leaves on each side of the branch. Cluster them in groups of two or three for a balanced, natural look.
These leaves add freshness and fun—your parrot’s perch is now picture-perfect!
Step 13: Add Veins to the Leaves

Let’s give those leaves a little extra detail! 🍃✨
Draw a single curved line inside each leaf to create a vein down the center. It’s a simple touch, but it makes the leaves look more real and full of life.
Now the whole branch looks lush and complete—nice work!
Step 14: Final Touches

Take a moment to review your lines and clean up any extra sketch marks if you drew with pencil. You can now go over the outlines with a black pen or marker to make everything crisp and clear.
Your parrot drawing is now complete in line art form—awesome job!
Step 15: Add Color

Now let’s bring your parrot to life with some color! 🖍️
Use bright shades like turquoise for the feathers, yellow for the beak, and green for the leaves. Feel free to use your favorite colors and make it your own—parrots come in all sorts of vibrant combinations!
Once you’re done, you’ve got a cheerful, colorful parrot ready to show off!
Tips for Drawing Your Own Parrot
If you’re drawing this in your sketchbook or planner, here are a few friendly tips:
- Use a light pencil first, then go over it with pen or marker.
- Don’t worry about perfection—parrots come in all kinds of colors and shapes!
- Try printing out your finished drawing and turning it into stickers or mini cards.
- Want to share it? I’d love to see your version on Pinterest! Tag me at @cozymomjournal.
Want More Easy and Fun Drawing Ideas?
If you had fun drawing this parrot, you’ll definitely enjoy these tutorials too:
- 🦋 How to Draw a Butterfly – Easy and Fun
- 🐸 How to Draw Frogs – 10 Cute Ideas
- 🐰 12 Cute Animal Drawing Ideas You’ll Love
Final Thoughts – Colorful Creations Start with a Simple Line
I truly hope you enjoyed this little creative moment with me. I drew this parrot in Procreate, but every single line you see here can be drawn with a simple pencil and paper, or even in the corner of your journal during a cozy Sunday. Whether you’re 5 or 55, creating something with your hands (and heart) is always worth it.
So go ahead—bring your parrot to life with colors, patterns, or even a pirate hat if you’re feeling adventurous!
And don’t forget to pin your favorite step or final result to your own inspiration boards:
👉 Follow me on Pinterest for more tutorials, doodle ideas, and creative sparks.
Now tell me:
Have you drawn your parrot yet? Did you give it a name?
Let me know in the comments on Pinterest or tag me with your version—I’d love to cheer you on! 💛