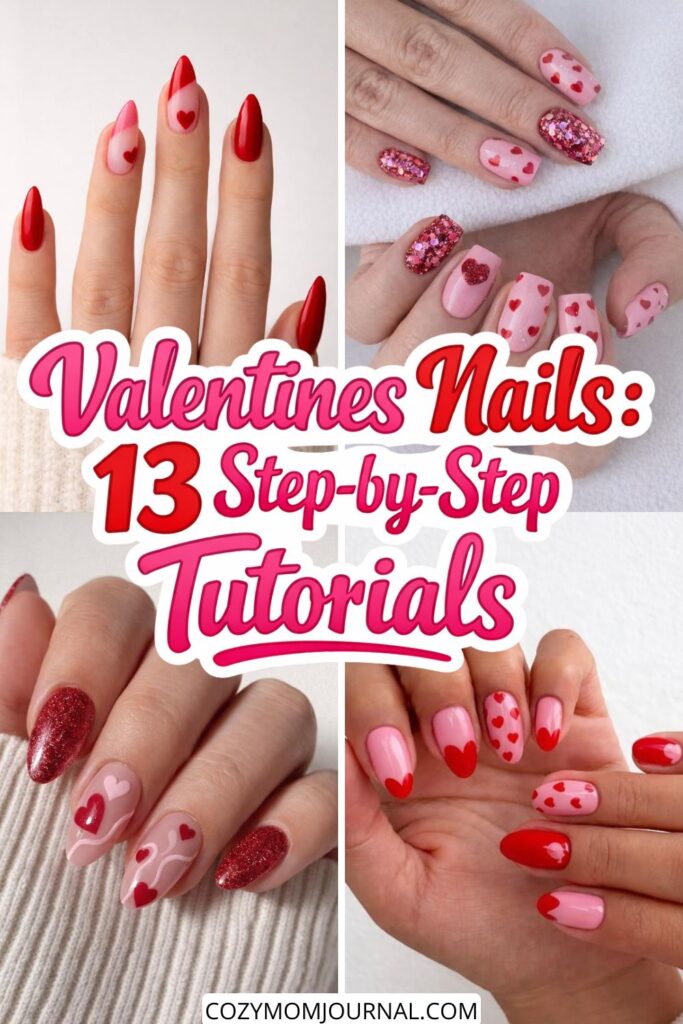
Valentines nails are one of those things that instantly put me in a better mood. There’s just something about soft pinks, glossy reds, and tiny hearts that makes February feel cozy instead of gray. Every year, I tell myself I’ll keep my nails simple… and every year I end up surrounded by bottles of pink polish, testing “just one more design.”
If you’re here, I already know one thing about you: you love nails too. Or at least, you want to love them, but maybe you’ve been burned before by designs that looked easy on Pinterest and turned into a full cleanup situation at home. I’ve absolutely been there — heart shapes that turned into blobs, glitter that refused to stay where it belonged, and nails that somehow looked better on my non-dominant hand.
That’s exactly why I created this list of valentines nails you can actually do yourself. No salon appointment required, no professional tools you don’t own, and no techniques that only work under perfect lighting with a nail tech hovering nearby. These are designs I genuinely believe real people can recreate at home, even if you’re working at your kitchen table with a coffee going cold next to you.
Inside this post, you’ll find 13 step-by-step Valentine’s nail designs ranging from minimal and elegant to playful and full-on heart overload. Some are perfect if you love a clean, classy look. Others are made for those days when subtle just isn’t the vibe. You don’t need to do all 13 — pick one, mix a few together, or save them for later when the urge to repaint your nails hits again.
And yes, I’ll say it proudly: I’m a total nail addict. Testing colors, layering pinks, finding the right red — it’s my version of self-care, and I want this post to feel like we’re doing it together.
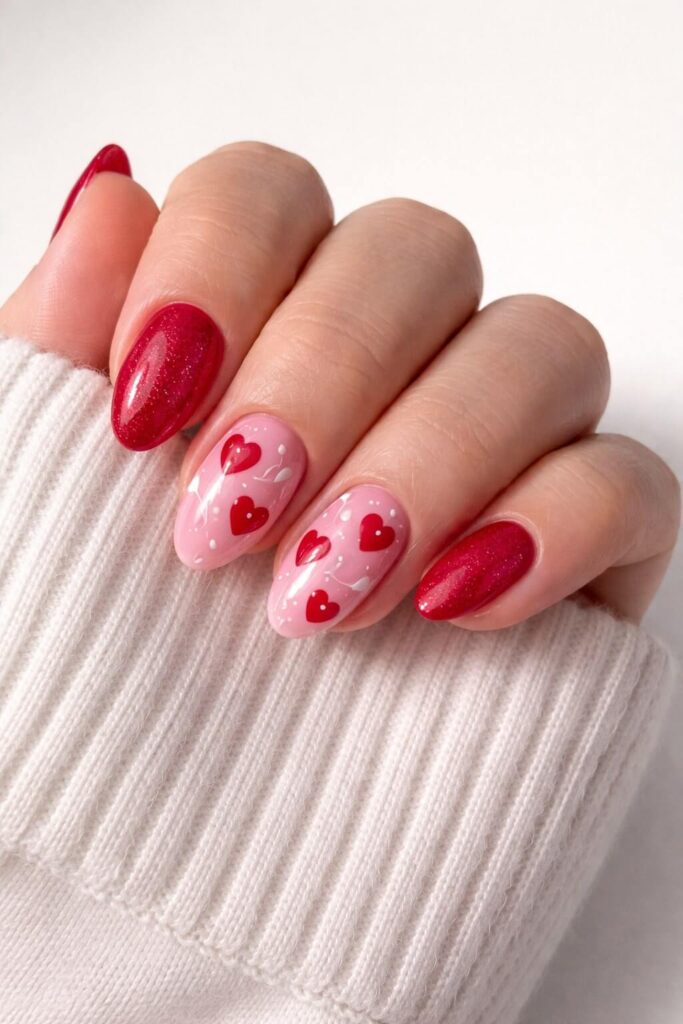
Sweet Red Hearts on Nude Base
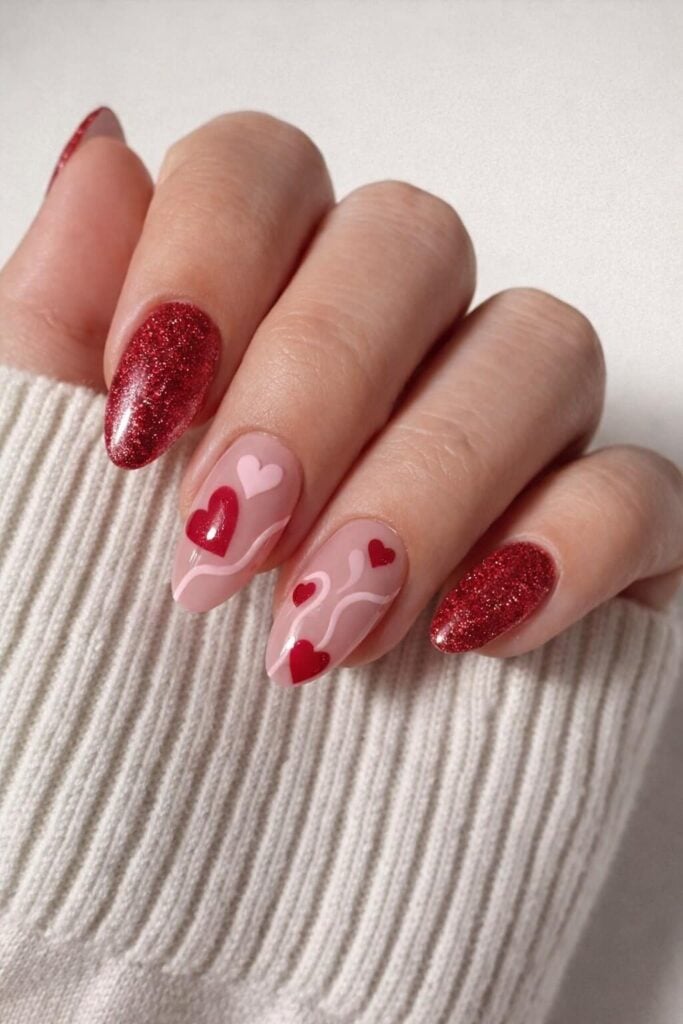
This design is a soft, romantic Valentine’s Day look that feels special but still totally doable at home. The mix of a sheer nude base, glossy red hearts, delicate white lines, and a touch of red glitter makes it look salon-level without being overwhelming. Let’s break it down step by step.
Before You Start: Nail Prep
Since this will be a longer blog post with multiple Valentine’s Day nail designs, think of this section as your foundation. You don’t need to repeat these steps for every design — once your nails are prepped, you can jump straight into the fun part.
Start by removing any old polish and gently shaping your nails. This design looks best on almond or oval nails, but it works on shorter shapes too. Lightly buff the nail surface to remove shine (don’t overdo it), then push back your cuticles carefully. Clean the nails with alcohol or nail cleanser so your polish sticks properly.
Finish prep with a base coat. This smooths the nail and prevents staining, especially important because we’ll be using red.
Colors You’ll Need (regular polish friendly)
You don’t need gel for this design — classic nail polish works perfectly.
Nude / Pink Base
- Essie – Ballet Slippers
- OPI – Bubble Bath
- Zoya – Bela or Dot
You want something sheer and soft, not opaque.
Red for Hearts
- OPI – Big Apple Red
- Essie – Really Red
- Zoya – Sooki
A true, clean red works best for crisp hearts.
White for Lines
- Essie – Blanc
- OPI – Alpine Snow
Red Glitter Accent
- Essie – Rock at the Top (fine red shimmer)
- OPI – Big Apple Red over a red glitter topper
- Any fine red glitter polish (avoid chunky glitter)
Top Coat
- Seche Vite or Essie Gel Setter for a glossy finish
Tools That Make This Easy
- Dotting tool (or a bobby pin / toothpick)
- Thin nail art brush or striping brush
- Small cleanup brush (optional, but helpful)
- Cotton pads + nail polish remover
If you don’t own nail art tools, don’t worry — this design is very forgiving.
Step-by-Step: How to Create the Design
1. Apply the Nude Base
Apply 1–2 thin coats of your nude or blush polish on all nails. Let each coat dry properly. The base should look soft and natural, not thick.
2. Create the Glitter Accent Nails
Choose two nails (usually thumb and pinky, or index and pinky). Apply 2 coats of your red glitter polish. These nails balance the softer heart design and make everything feel festive.
Let them dry while you work on the heart nails.
3. Paint the Red Hearts
On the nude nails, dip your dotting tool into red polish.
- Place two small dots next to each other.
- Gently drag them downward with the tool or a toothpick to form a heart shape.
Vary the heart sizes slightly — that’s what makes the design look hand-painted and cute rather than stiff.
Let the hearts dry for a minute before moving on.
4. Add the Soft White Lines
Using a thin brush and white polish, draw gentle, flowing lines across the nail, weaving around the hearts. These lines don’t need to be perfect — a slightly wavy look is actually better and more romantic.
If your hand shakes, rest your pinky on the table for stability.
5. Clean Up If Needed
If a line goes wrong, dip a small brush in remover and gently clean the edges. This step instantly makes the design look more professional.
6. Seal Everything In
Finish all nails with a generous layer of glossy top coat. This smooths the design, adds shine, and helps everything last longer.
Tips for a Salon-Level Result at Home
If one nail goes wrong, remember: accent nails exist for a reason.
Thin layers are everything. Thick polish is the fastest way to ruin details.
If hearts feel intimidating, practice one or two on paper first.
Let each step dry slightly before adding the next — patience pays off here.
Playful Valentine Mix & Match Hearts

This second design is a fun, cheerful Valentine’s Day look that doesn’t take itself too seriously. It’s a true mix & match set: different base colors, different heart styles, but all tied together with pinks and reds so it still feels cohesive. This is a great option if you like variety on your nails or want something eye-catching.
Color Palette (easy to find, beginner-friendly)
Soft Pink Base
- Essie – Fiji
- OPI – Mod About You
- Zoya – Jordan
True Red
- OPI – Big Apple Red
- Essie – Really Red
Sheer White / Milky Base
- Essie – Marshmallow
- OPI – Funny Bunny
Light Pink for Hearts
- Essie – Romper Room
- Zoya – Dot
White for Details
- Essie – Blanc
- OPI – Alpine Snow
Top Coat
- Glossy top coat is key here to unify the different designs.
Tools You’ll Need
- Dotting tool (or bobby pin)
- Thin nail art brush or toothpick
- Optional: very fine liner brush for outlines
This design looks detailed, but every element is made from simple dots and lines.
Nail-by-Nail Design Breakdown
This set works best when you assign a design to each nail, instead of trying to make everything identical.
1. Pink Minimal Nail (Index or Pinky)
Paint the nail with a soft pink shade.
- Apply 2 thin coats.
- No design needed here — this nail acts as a visual break and makes the heart nails pop more.
Sometimes doing less on one nail actually makes the whole set look more polished.
2. White Base With Floating Hearts
Use a milky white or sheer white base.
- Apply 2 thin coats and let it dry.
With a dotting tool:
- Create small hearts in different shades of pink and red.
- Scatter them lightly, leaving space between each heart.
This nail should feel airy and playful, not crowded.
3. Red Accent With Framed Heart
Paint the nail with a solid, glossy red.
- Two thin coats for full coverage.
Using white polish:
- Draw a simple heart outline in the center.
- Add tiny white dots underneath in a soft curve to frame the heart.
This nail anchors the whole look and adds contrast.
4. Pink Base With Heart Outline
Paint the nail with a light pink base.
Once dry:
- Use red polish to draw a loose heart outline.
- Don’t aim for perfection — slightly uneven lines give it a hand-drawn, modern feel.
This nail balances the bold red accent without overpowering it.
5. Red Base With Mini Hearts
Paint the nail red.
Using a dotting tool and white or light pink polish:
- Add tiny hearts scattered across the nail.
- Keep them small and evenly spaced.
This ties back to the white heart nail but feels bolder thanks to the red base.
Finishing Touch
Seal all nails with a glossy top coat.
This step is especially important for mix & match designs — it visually blends everything together and makes the set look intentional rather than random.
Classic Red French With Scattered Hearts
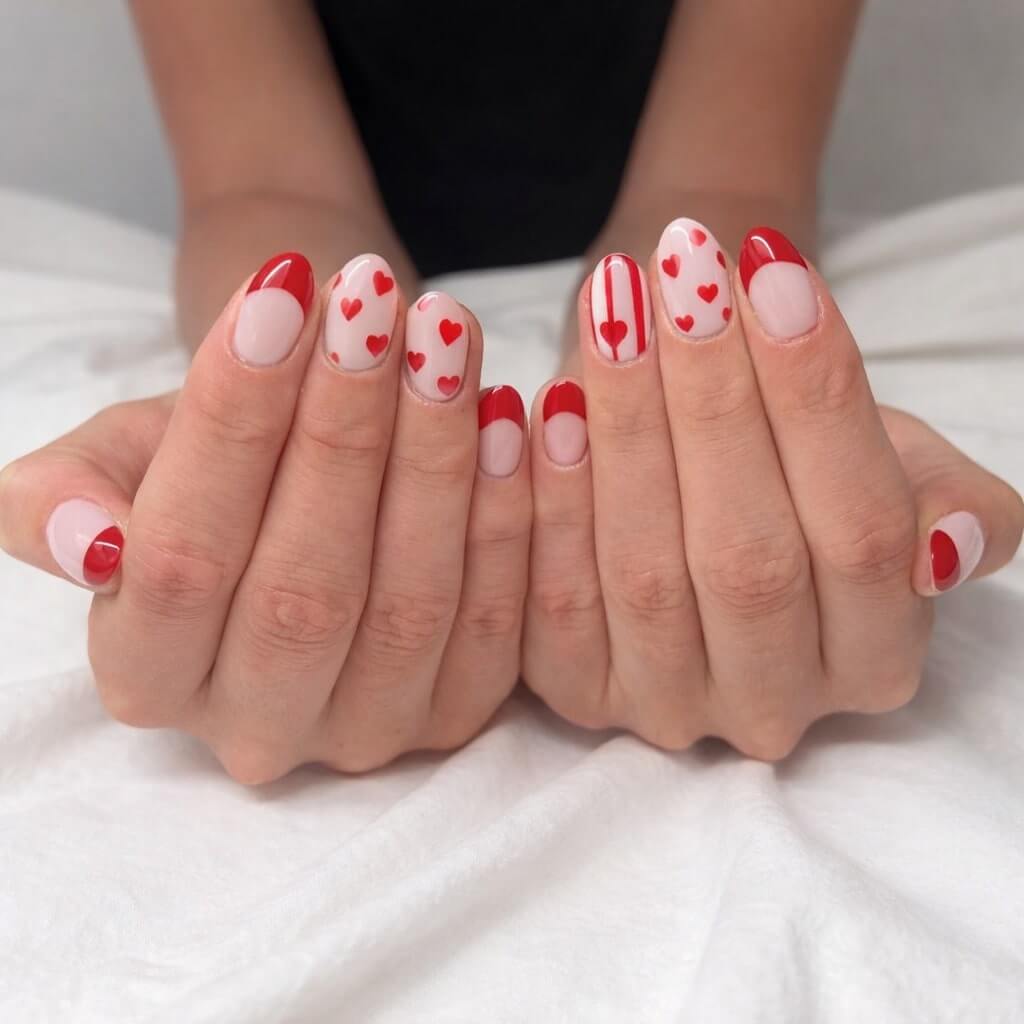
This third design is a Valentine’s Day classic with a playful twist. At first glance it feels clean and elegant thanks to the nude base and red French tips, but the tiny hearts and striped accent nails make it fun and modern. It’s perfect if you love traditional styles but still want something festive for February.
Color Palette (simple but effective)
Sheer Nude / Blush Base
- OPI – Bubble Bath
- Essie – Ballet Slippers
- Zoya – Bela
This should be soft and semi-sheer, not opaque.
True Red
- OPI – Big Apple Red
- Essie – Really Red
- Zoya – Sooki
A bold, classic red is essential for this look.
White (optional, for cleanup or light detailing)
- Essie – Blanc
- OPI – Alpine Snow
Top Coat
- High-gloss top coat to seal everything and smooth out the designs.
Tools You’ll Need
- Thin nail art brush or striping brush
- Dotting tool (or toothpick / bobby pin)
- Cleanup brush for crisp edges
This design looks detailed, but it’s mostly built from very basic shapes.
How to Create the Look
This set works best when you mix French tips, heart accents, and one statement nail across both hands.
1. Apply the Nude Base
Paint all nails with your sheer nude or blush shade.
- Use 1–2 thin coats.
- Let it dry completely before adding any red details.
This base keeps the design elegant and prevents it from feeling too busy.
2. Create the Red French Tips
Using a thin brush:
- Paint a curved red French tip on selected nails.
- Keep the curve soft and rounded rather than sharp.
If you’re new to French tips, start with a thin line and build it up slowly. Imperfect symmetry actually works well here.
3. Add Scattered Hearts on Accent Nails
On one or two nails per hand:
- Use a dotting tool to create small red hearts over the nude base.
- Space them evenly but not perfectly aligned.
This gives the design that sweet Valentine’s feel without overwhelming the nail.
4. Striped Heart Accent Nail
Choose one nail (usually the ring finger) for the boldest detail.
- Paint two thin vertical red stripes down the nail.
- Add a small heart in the center, overlapping the stripes slightly.
This nail becomes the focal point and ties all the other elements together.
5. Mix and Balance
Across both hands, aim for:
- A few classic red French tips
- A few nude nails with scattered hearts
- One striped heart accent per hand
The key here is balance. Not every nail needs a design, and that’s what makes this set feel polished rather than busy.
Final Step: Seal the Design
Apply a glossy top coat to all nails.
This smooths out the layered details, enhances the red, and helps the manicure last longer.
Pink Love Collage Nails
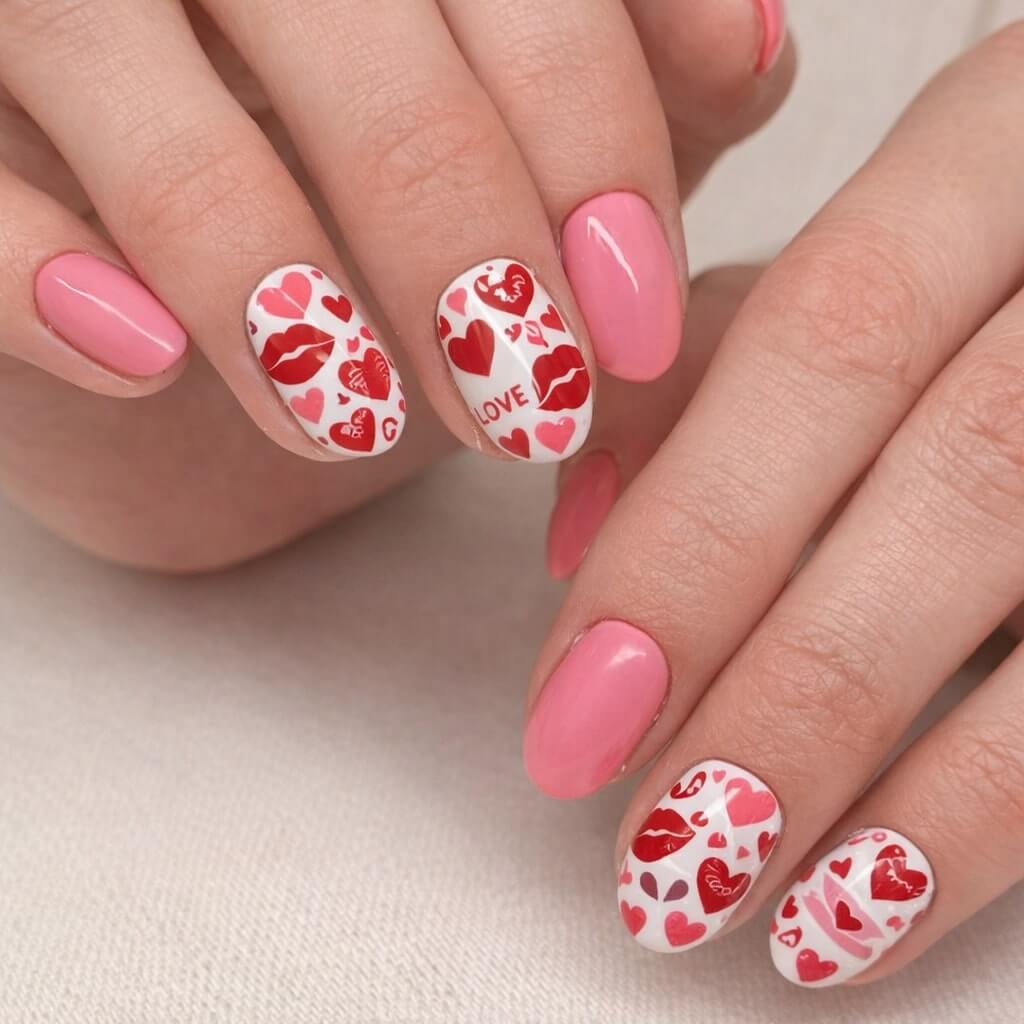
This design is bold, playful, and unapologetically Valentine’s Day. It mixes solid pink nails with statement accent nails covered in hearts, lips, and “love” motifs. Even though it looks detailed, it’s actually very approachable at home — especially if you’re open to using nail stickers or decals.
Color Palette (bright, cheerful Valentine tones)
Pink Base (solid nails)
- Essie – Pink-A-Boo
- OPI – Strawberry Margarita
- Zoya – Lola
Choose a medium pink that’s glossy and opaque in two coats.
White Base (accent nails)
- Essie – Blanc
- OPI – Alpine Snow
A clean white is essential to make the red designs stand out.
Red for Details
- OPI – Big Apple Red
- Essie – Really Red
Optional:
- A slightly darker red or berry shade for contrast if hand-painting.
Top Coat
- High-shine top coat to smooth everything together.
Tools & Extras
You can go two ways with this design:
Option 1: Stickers / Decals (easiest)
- Valentine-themed nail stickers (hearts, lips, love text)
- Tweezers for placement
Option 2: Hand-Painted
- Dotting tool
- Thin nail art brush
- Toothpick (for tiny details)
Both approaches work — stickers are faster, hand-painting feels more personal.
How to Create the Design
1. Paint the Solid Pink Nails
Choose two or three nails per hand for solid pink.
- Apply 2 thin coats.
- Let them dry fully before moving on.
These nails calm down the busy accent nails and keep the overall look wearable.
2. Create the White Accent Base
On the remaining nails:
- Apply 2 coats of white polish.
- Make sure the surface is smooth and fully dry.
A clean white base is important — any streaks will show once the designs go on.
3. Add the Valentine Collage
This is where the design really comes to life.
If using stickers:
- Apply stickers randomly across the nail.
- Mix hearts, lips, and small text elements.
- Avoid lining them up — scattered placement looks more modern.
If hand-painting:
- Use a dotting tool to create hearts in different sizes.
- Paint simple lip shapes using two curved strokes.
- Add tiny text-like lines or dots to mimic printed details.
The key is variety. Each accent nail should look slightly different.
4. Balance the Layout
Try not to overload every accent nail.
- Leave small white spaces between designs.
- If one nail is very busy, keep the next one simpler.
This keeps the manicure fun, not chaotic.
5. Seal and Smooth
Apply a generous layer of glossy top coat.
This step is crucial:
- It seals stickers so they don’t lift.
- It smooths hand-painted details.
- It gives the nails that finished, salon look.
If the surface still feels textured, add a second top coat after the first one dries.
Soft Pink Hearts With Red Sparkle Accents
This design is the definition of sweet but polished. The soft pink base with scattered red hearts feels romantic and light, while the deep red shimmer accent nails add just enough drama to keep it from looking too simple. It’s one of those Valentine’s designs that works for everyday wear, not just February 14.
Color Palette (soft + sparkly contrast)
Soft Pink Base
- Essie – Fiji
- OPI – Mod About You
- Zoya – Jordan
Look for a creamy, baby-pink shade that’s opaque in two coats.
True Red for Hearts
- OPI – Big Apple Red
- Essie – Really Red
Red Shimmer / Glitter Accent
- Essie – Rock at the Top (layered over red)
- OPI – Big Apple Red with a red shimmer topper
- Any fine red shimmer polish (no chunky glitter)
White for Tiny Details
- Essie – Blanc
- OPI – Alpine Snow
Top Coat
- High-gloss top coat to seal everything and enhance the sparkle.
Tools You’ll Need
- Dotting tool (or bobby pin / toothpick)
- Thin nail art brush or toothpick
- Optional cleanup brush
This design is very beginner-friendly — most of it is just dots.
How to Create the Look
1. Choose Your Accent Nails
Decide which nails will be:
- Red shimmer accents (usually thumb and pinky, or index and pinky)
- Heart design nails (middle and ring finger)
Planning this ahead keeps the design balanced.
2. Paint the Red Shimmer Nails
On your chosen accent nails:
- Apply 2 thin coats of red shimmer polish.
- Let them dry fully.
These nails frame the softer heart design and give the manicure depth.
3. Apply the Pink Base
On the remaining nails:
- Apply 2 thin coats of soft pink polish.
- Make sure the surface is smooth and fully dry before adding details.
This soft background is what makes the hearts pop.
4. Create the Red Hearts
Using a dotting tool dipped in red polish:
- Place two small dots close together.
- Drag them gently downward to form a heart.
Vary the heart sizes slightly and scatter them across the nail. Avoid lining them up perfectly — randomness makes the design feel more natural and hand-painted.
5. Add Tiny White Details
With white polish:
- Add tiny dots around the hearts.
- If you like, include a few delicate, curved strokes or leaf-like shapes.
These subtle details add dimension without overpowering the hearts.
6. Seal the Design
Finish all nails with a glossy top coat.
This step:
- Smooths the nail art
- Enhances the shimmer
- Makes the manicure last longer
If the heart nails feel slightly textured, add a second top coat after the first one dries.
Pink Valentine Love Letter Nails
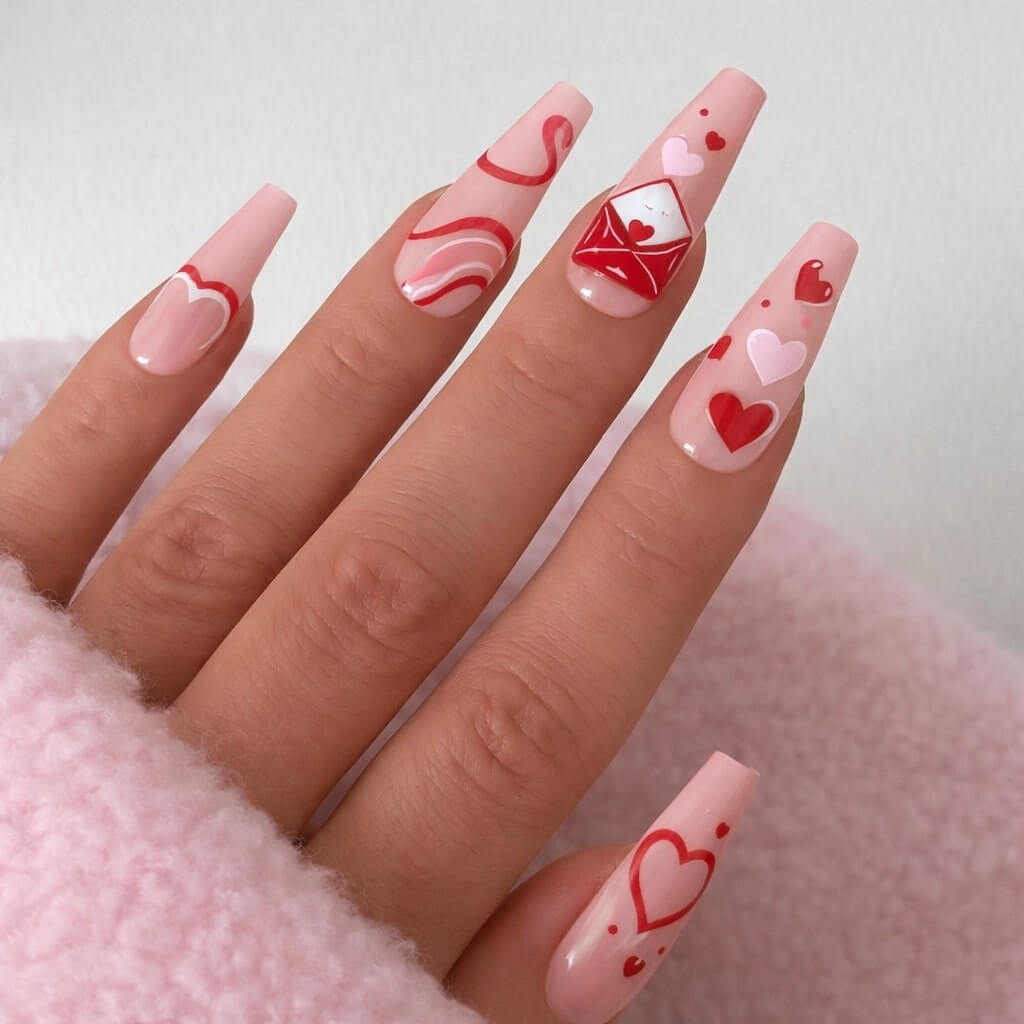
This design feels extra special — like a tiny Valentine’s story told across your nails. Soft pink bases, flowing red lines, sweet hearts, and that adorable love letter accent make this look romantic without being childish. It’s more detailed than the previous designs, but still very doable at home if you take it step by step.
Color Palette (romantic and cohesive)
Sheer or Milky Pink Base
- Essie – Ballet Slippers
- OPI – Bubble Bath
- Zoya – Bela
This should be soft and slightly translucent, not fully opaque.
True Red
- OPI – Big Apple Red
- Essie – Really Red
Used for hearts, lines, and the envelope.
White (for highlights and lines)
- Essie – Blanc
- OPI – Alpine Snow
Optional but recommended for contrast and clarity.
Top Coat
- A glossy top coat is essential to smooth out the layered designs.
Tools You’ll Need
- Thin nail art brush (striping brush works best)
- Dotting tool or toothpick
- Optional cleanup brush
This design relies more on lines than dots, so a thin brush makes everything much easier.
How to Create the Design
This manicure works best as a full set of coordinated accent nails, where every nail is slightly different but clearly part of the same theme.
1. Apply the Pink Base
Paint all nails with your sheer pink polish.
- Use 1–2 thin coats.
- Let them dry completely before adding details.
This soft base keeps the overall look delicate, even with bold red accents.
2. Flowing Red Line Nails
On one or two nails:
- Use a thin brush to draw soft, wavy red lines.
- Let them curve naturally from top to bottom.
You can add a thin white line next to the red for a layered effect. These nails add movement and keep the set from feeling static.
3. Heart Accent Nails
On a few nails:
- Create hearts using red polish and a dotting tool.
- Mix outlined hearts and filled hearts for variety.
Add tiny dots or micro hearts around them to give that scattered, romantic look.
4. The Love Letter Accent Nail
This is the statement nail of the set.
- Paint a small red envelope shape in the center of the nail.
- Add diagonal lines to suggest folded paper.
- Paint a tiny heart seal where the envelope closes.
You can outline parts of the envelope with white to make it pop more against the pink base. Take your time here — this nail doesn’t need to be perfect to be charming.
5. Balance the Set
Avoid repeating the same design on every nail.
A good balance might look like:
- One love letter nail
- One flowing line nail
- One heart-heavy nail
- One simpler heart outline nail
This keeps the design interesting and editorial-looking.
6. Seal Everything In
Apply a glossy top coat to all nails.
If the love letter nail feels textured, add a second top coat once the first one dries.
This final step ties all the different elements together and gives that smooth, salon-finish look.
Modern Red French Tips With a Soft Pink Base
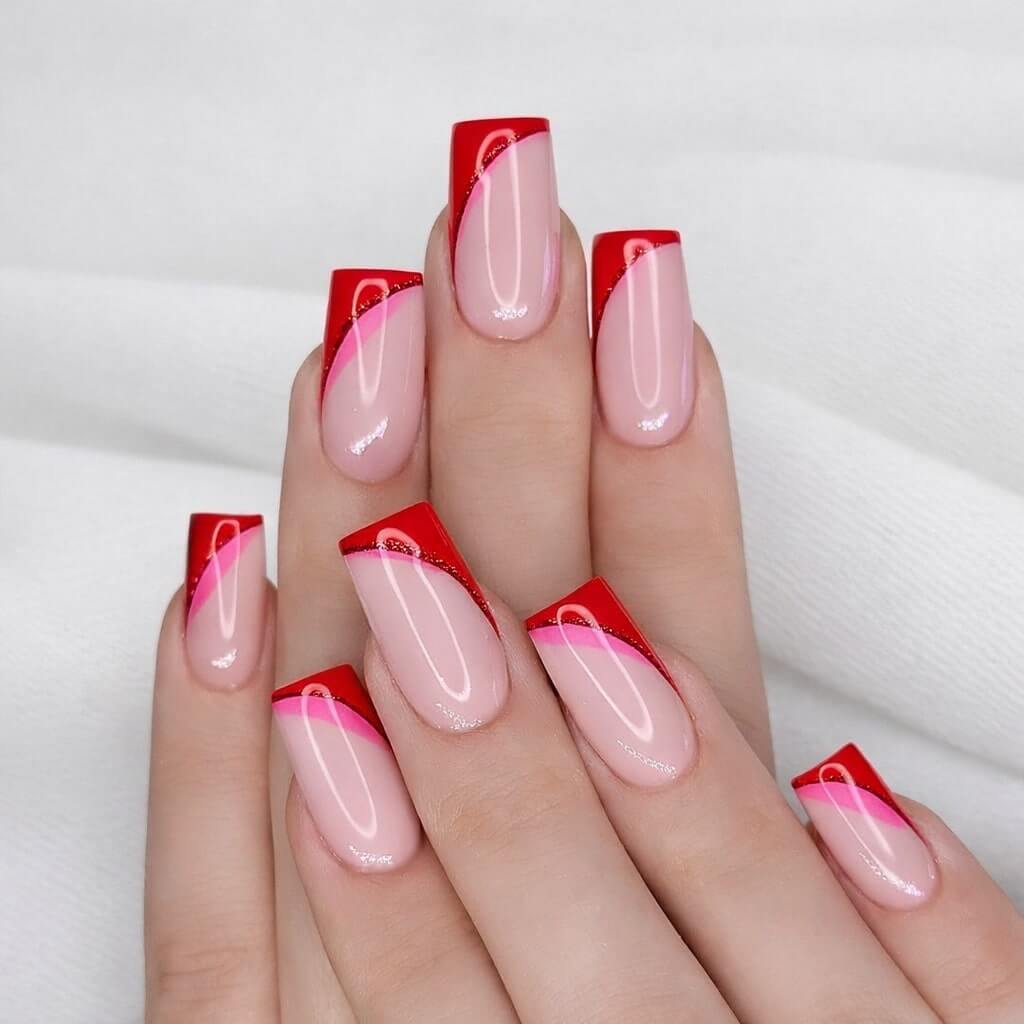
This design is sleek, elegant, and very grown-up Valentine’s Day. It’s a modern twist on the classic French manicure, using a soft pink base and bold red tips with a subtle curved accent line. No hearts, no extras — just clean lines and strong color contrast.
Color Palette (clean and sophisticated)
Sheer Pink / Nude Base
- OPI – Bubble Bath
- Essie – Ballet Slippers
- Zoya – Bela
You want a smooth, milky pink that evens out the nail but still looks natural.
Classic Red
- OPI – Big Apple Red
- Essie – Really Red
- Zoya – Sooki
This red should be bold and opaque — it’s the star of the design.
Optional Accent Pink (for the inner curve)
- Essie – Fiji
- OPI – Mod About You
This lighter pink adds softness and depth but can be skipped if you want an even cleaner look.
Top Coat
- High-gloss top coat for that glassy, salon-style finish.
Tools You’ll Need
- Thin nail art brush or angled brush
- Cleanup brush (very helpful for sharp edges)
This design is all about precision, so brushes matter more here than dotting tools.
How to Create the Look
1. Apply the Pink Base
Paint all nails with your sheer pink polish.
- Use 1–2 thin coats.
- Let the base fully dry before starting the French tips.
A smooth base is essential here because the design is very clean and minimal.
2. Shape the Red French Tips
Using a thin or angled brush:
- Paint a bold red French tip at the edge of each nail.
- Keep the tip shape slightly squared to match the modern look.
Don’t worry if the line isn’t perfect on the first pass — it’s easier to fix edges than to remove polish entirely.
3. Add the Curved Inner Line
This is what makes the design feel special.
- Using the same red (or a lighter pink for contrast), draw a thin curved line just below the French tip.
- Follow the shape of the tip, but leave a small gap between the two lines.
This creates depth and gives the manicure that layered, designer feel.
4. Clean Up for Sharp Edges
Dip a cleanup brush in remover and:
- Sharpen the corners of the French tips
- Smooth out the curved line if needed
Taking a few extra minutes here makes a huge difference with this style.
5. Seal With Gloss
Apply a glossy top coat to all nails.
This step enhances the color contrast and gives the manicure a smooth, reflective finish.
If you want extra durability, add a second top coat once the first one dries.
Soft Pink Valentine Hearts With Sweet Swirls

This design is gentle, cozy, and very wearable — the kind of Valentine’s manicure you could happily keep on for weeks. It combines soft pink bases, tiny red hearts, subtle swirls, and a touch of glitter for just enough sparkle. It feels romantic without being loud, which makes it a great “everyday Valentine” option.
Color Palette (soft, romantic, and cohesive)
Soft Baby Pink Base
- Essie – Ballet Slippers
- OPI – Bubble Bath
- Zoya – Bela
This should be sheer to semi-sheer, creating that delicate, clean look.
Red for Hearts & Swirls
- OPI – Big Apple Red
- Essie – Really Red
A classic red works best — not too dark, not too orange.
Red Glitter (optional accent)
- Essie – Rock at the Top (used very sparingly)
- Any fine red glitter polish
Top Coat
- High-gloss top coat to smooth everything out.
Tools You’ll Need
- Dotting tool (or bobby pin / toothpick)
- Thin nail art brush or toothpick
- Optional cleanup brush
This design is all about small, simple movements — no advanced skills required.
How to Create the Look
1. Apply the Pink Base
Paint all nails with your soft pink polish.
- Use 1–2 thin coats.
- Let them dry completely before adding any designs.
This light base is what keeps the manicure airy and fresh.
2. Decide Your Accent Nails
For a balanced look:
- Choose 2–3 nails per hand for heart and swirl designs
- Leave 1–2 nails simpler, with minimal or no decoration
This contrast makes the details feel intentional.
3. Add the Small Red Hearts
Using a dotting tool dipped in red polish:
- Create tiny hearts by placing two dots and gently dragging downward
- Scatter them lightly, mostly toward the center or upper half of the nail
Keep the hearts small — this design is meant to feel delicate.
4. Paint the Swirl Lines
With a thin brush or toothpick:
- Draw soft, flowing red lines across selected nails
- Let them curve naturally around the hearts
You can add a tiny heart at the end of a swirl for a playful touch.
5. Optional Glitter Accent
If you want a bit of sparkle:
- Add a small red glitter heart or dot to one nail per hand
- Keep it minimal — too much glitter will overpower the softness
This step is optional but adds a nice visual highlight.
6. Seal With Gloss
Apply a glossy top coat to all nails.
This blends the designs together, smooths out texture, and gives that clean, finished look.
If needed, add a second top coat after the first one dries.
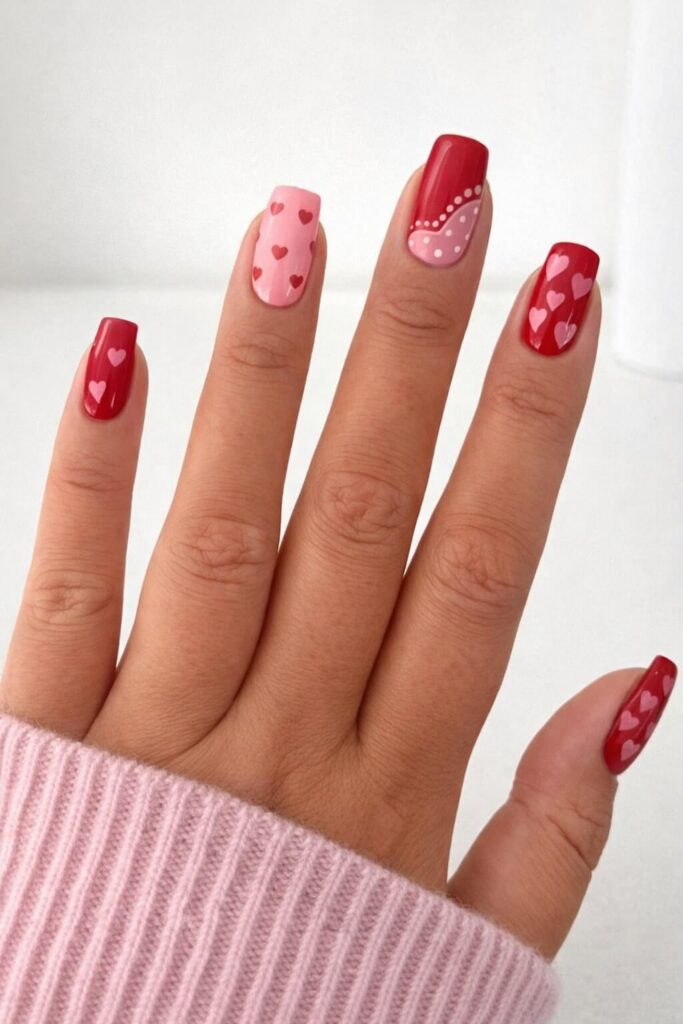
Minimal Red Hearts on Nude Nails
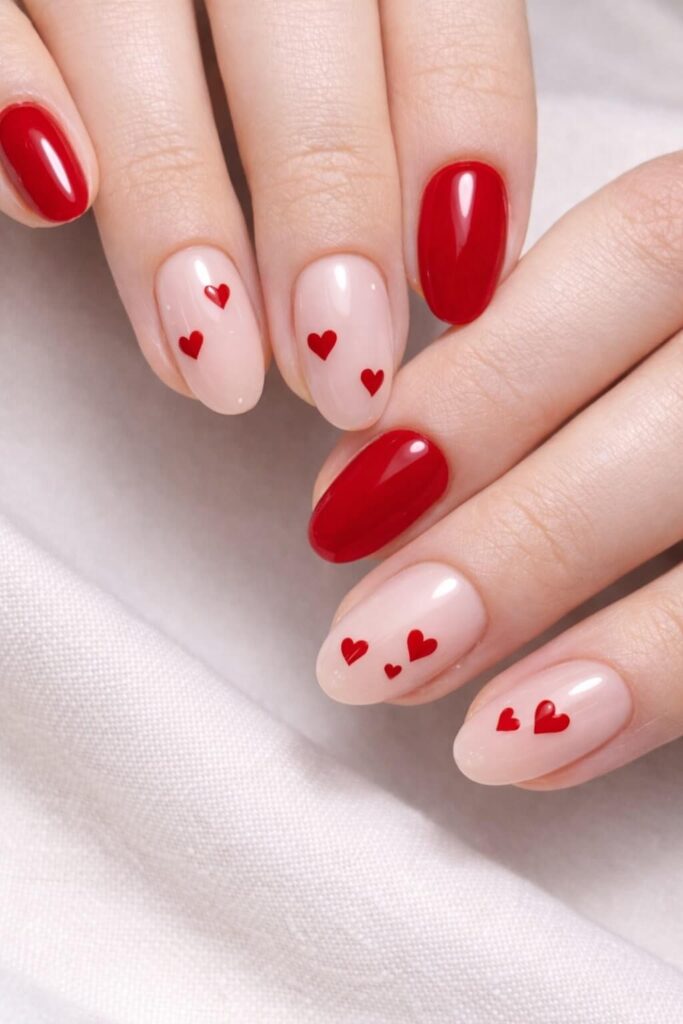
This design proves that Valentine’s nails don’t have to be complicated to be beautiful. It’s clean, timeless, and incredibly easy to wear. A soft nude base, glossy red accent nails, and just a few tiny hearts create a look that feels romantic but very grown-up. This is the kind of manicure that works just as well for the office as it does for a Valentine’s dinner.
Color Palette (simple and classic)
Sheer Nude / Milky Pink Base
- OPI – Bubble Bath
- Essie – Ballet Slippers
- Zoya – Bela
This should be semi-sheer and natural-looking.
Classic Red
- OPI – Big Apple Red
- Essie – Really Red
- Zoya – Sooki
A true, glossy red is essential for both the accent nails and the hearts.
Top Coat
- High-gloss top coat to keep the finish clean and polished.
Tools You’ll Need
- Dotting tool (or bobby pin / toothpick)
- Optional thin brush for tiny adjustments
- Cleanup brush if you want ultra-crisp edges
This is one of the most beginner-friendly designs in the entire list.
How to Create the Look
1. Choose Your Accent Nails
For each hand:
- Pick one or two nails for solid red
- Leave the rest nude with heart details
This balance keeps the design elegant and intentional.
2. Paint the Solid Red Nails
On your chosen accent nails:
- Apply 2 thin coats of red polish
- Let them dry fully
These nails ground the design and give it that classic Valentine contrast.
3. Apply the Nude Base
On the remaining nails:
- Apply 1–2 thin coats of your nude or milky pink polish
- Let the base dry completely before adding hearts
A smooth base makes the tiny hearts stand out beautifully.
4. Add the Tiny Hearts
Using a dotting tool dipped in red polish:
- Place two very small dots close together
- Drag gently downward to form a heart
Keep the hearts small and minimal. Most nails only need one or two hearts to look finished.
You can vary placement slightly:
- One heart near the center
- Two hearts near the tip or side of the nail
5. Keep It Airy
Avoid filling the nail with too many hearts.
Negative space is what makes this design feel modern and chic rather than busy.
6. Seal With Gloss
Apply a glossy top coat to all nails.
This step:
- Smooths the surface
- Enhances the red
- Makes the manicure last longer
If you want extra durability, add a second top coat after the first one dries.
Playful Red & Pink Valentine Mix With Heart Waves
This design is fun, flirty, and a little bit retro in the best way. It mixes solid red nails, soft pink bases, tiny hearts, and that cute wavy heart-detail accent nail that instantly catches the eye. It feels cheerful and expressive without being messy
Color Palette (bold but balanced)
Classic Red
- OPI – Big Apple Red
- Essie – Really Red
- Zoya – Sooki
This should be glossy and fully opaque.
Soft Pink Base
- Essie – Ballet Slippers
- OPI – Bubble Bath
- Zoya – Bela
A sheer-to-milky pink works best for contrast.
Light Pink (for hearts and details)
- Essie – Fiji
- OPI – Mod About You
Optional, but it adds depth to the heart designs.
White (for dots and accents)
- Essie – Blanc
- OPI – Alpine Snow
Top Coat
- High-gloss top coat to unify all the different elements.
Tools You’ll Need
- Dotting tool (or bobby pin / toothpick)
- Thin nail art brush or striping brush
- Cleanup brush for crisp lines
This design looks detailed, but it’s built from very simple shapes.
How to Create the Look
1. Plan the Nail Layout
Before painting, decide your mix:
- A few solid red nails
- One soft pink nail with scattered hearts
- One statement nail with the wavy heart design
Planning this first helps the set feel intentional instead of random.
2. Paint the Solid Red Nails
On selected nails:
- Apply 2 thin coats of red polish
- Let them dry completely
These nails ground the design and give it that classic Valentine energy.
3. Apply the Pink Base Nails
On the remaining nails:
- Apply 1–2 thin coats of soft pink polish
- Let them dry fully before adding details
This softer base balances out the bold red.
4. Add the Scattered Heart Nail
Using a dotting tool:
- Create small hearts in red or light pink
- Scatter them loosely across the nail
Keep the hearts small and evenly spaced so the nail doesn’t feel overcrowded.
5. Create the Wavy Heart Accent Nail
This is the standout detail.
- Paint a curved, wavy pink shape across the nail
- Outline or border it with red
- Add small white dots along the curve for a playful, decorative finish
This nail doesn’t need to be perfect — the charm is in the soft, hand-drawn look.
6. Final Balance Check
Make sure:
- Not every nail has a heart
- The boldest nail appears only once per hand
- Red and pink are evenly distributed
This keeps the design lively but still cohesive.
7. Seal With Gloss
Finish all nails with a glossy top coat.
This step smooths the layered designs and gives the manicure a polished, salon-style finish.
Add a second top coat if the accent nail feels textured.
Elegant Red Fade With Heart Accent
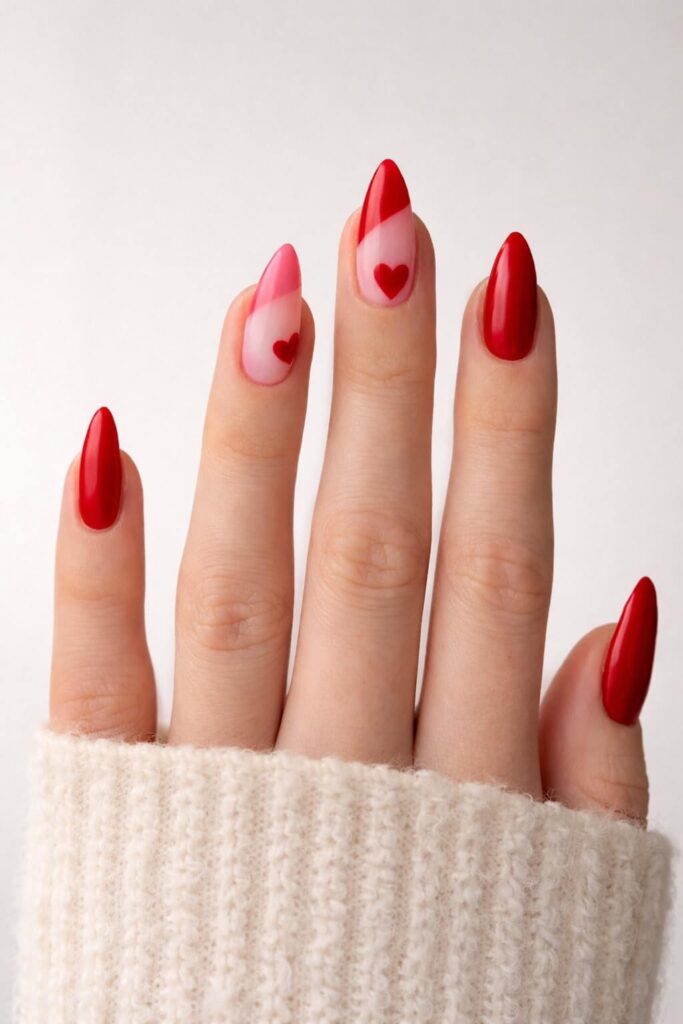
This design is pure Valentine elegance. It’s bold, romantic, and surprisingly simple once you break it down. Solid glossy red nails are paired with a soft pink-to-red fade and a single heart detail, which makes the whole set feel intentional and high-end. This is the kind of manicure that looks amazing in photos but still feels wearable in real life.
Color Palette (minimal but powerful)
Classic Glossy Red
- OPI – Big Apple Red
- Essie – Really Red
- Zoya – Sooki
This should be rich, opaque, and very glossy.
Sheer Pink / Milky Nude
- OPI – Bubble Bath
- Essie – Ballet Slippers
- Zoya – Bela
Used as the base for the faded accent nails.
Red for Heart Detail
- Same red as the solid nails for a cohesive look.
Top Coat
- High-gloss top coat is essential for the smooth fade effect.
Tools You’ll Need
- Makeup sponge (small wedge sponge works best)
- Dotting tool or toothpick
- Thin brush (optional, for cleanup)
- Cleanup brush with remover
The sponge is the key tool here — it makes the fade much easier than trying to blend with a brush.
How to Create the Look
1. Choose the Accent Nails
For each hand:
- Pick one or two nails for the pink-to-red fade with heart
- Paint the rest as solid glossy red
This contrast is what makes the design feel so polished.
2. Paint the Solid Red Nails
On the non-accent nails:
- Apply 2 thin coats of red polish
- Let them dry fully
These nails frame the softer accent nails beautifully.
3. Create the Pink Base on Accent Nails
On the accent nails:
- Apply 1–2 thin coats of sheer pink polish
- Let it dry completely before blending the red
The base should look clean and even.
4. Sponge on the Red Fade
This step looks harder than it is.
- Apply a bit of red polish onto a makeup sponge
- Dab it gently onto the tip of the nail
- Build the color slowly, working upward to create a soft gradient
Less polish is better here. You can always add more, but removing excess is harder.
5. Add the Heart Detail
Once the fade is fully dry:
- Use a dotting tool with red polish
- Place two small dots and drag them downward to form a heart
- Position the heart slightly above the center of the nail
Keep it simple — one heart per accent nail is enough.
6. Clean Up the Edges
Use a cleanup brush with remover to:
- Sharpen the sides of the nail
- Remove any sponge marks around the cuticle
This step makes a big difference in how professional the manicure looks.
7. Seal With Gloss
Apply a generous layer of glossy top coat to all nails.
This:
- Smooths the fade
- Intensifies the red
- Locks in the heart design
If the fade nail feels textured, add a second top coat once the first one dries.
Pink Heart Confetti With Glitter Accent Nails
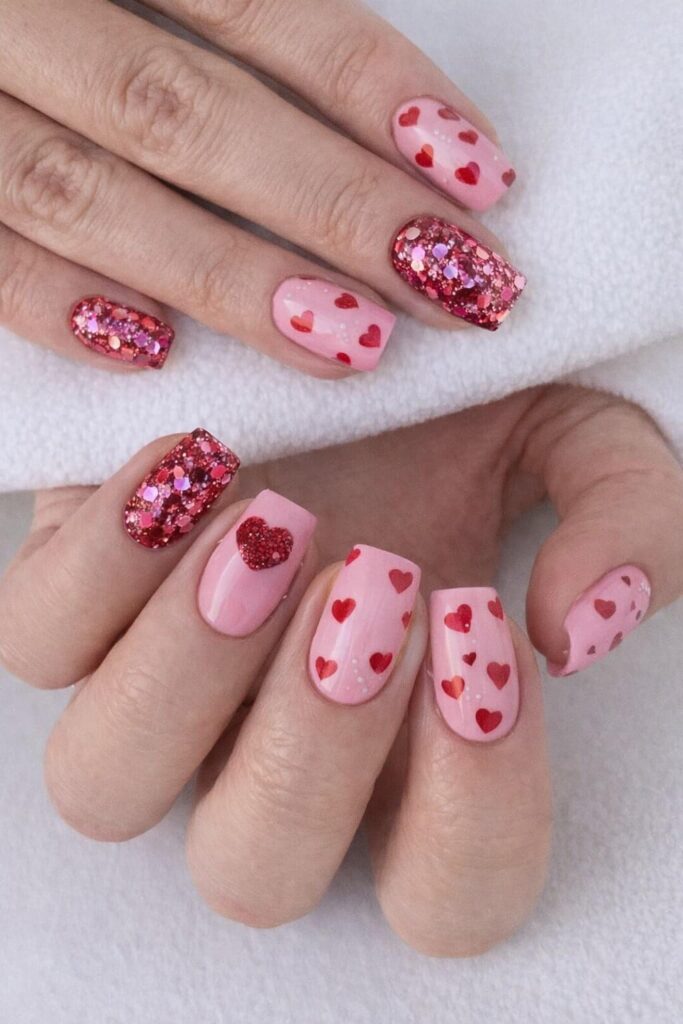
This design is pure Valentine joy. Soft pink nails covered in tiny red hearts are paired with bold glitter accent nails and a single textured heart detail. It’s playful, sparkly, and eye-catching, but still very achievable at home because most of the magic comes from layering, not complex painting.
Color Palette (sweet base + bold sparkle)
Soft Pink Base
- Essie – Fiji
- OPI – Mod About You
- Zoya – Jordan
Choose a creamy pink that’s opaque in two coats.
Red for Hearts
- OPI – Big Apple Red
- Essie – Really Red
Pink / Red Glitter Polish
- Essie – Leading Lady
- OPI – I Snow You Love Me (layered over pink)
- Any chunky pink-red glitter mix
Optional Textured Heart
- Red glitter polish OR red glitter powder mixed into clear polish
Top Coat
- One regular glossy top coat
- Optional thicker “gel-look” top coat for smoothing glitter
Tools You’ll Need
- Dotting tool or bobby pin
- Toothpick (for small heart adjustments)
- Optional small brush for cleanup
- Tweezers (if placing glitter carefully)
This design is very forgiving, which makes it great for beginners.
How to Create the Look
1. Decide the Nail Layout
Before painting, choose:
- 2 accent nails per hand for full glitter
- 1 feature nail for the glitter heart
- Remaining nails for pink heart confetti
Planning this first keeps the design balanced and intentional.
2. Paint the Glitter Accent Nails
On your chosen accent nails:
- Apply 1–2 coats of glitter polish
- Dab rather than swipe to pack the glitter evenly
If the glitter feels rough, don’t worry — the top coat will fix that later.
3. Apply the Pink Base
On the remaining nails:
- Apply 2 thin coats of soft pink polish
- Let it dry fully before adding hearts
This clean base is what makes the hearts pop.
4. Add the Heart Confetti
Using a dotting tool dipped in red polish:
- Create tiny hearts by placing two dots and dragging downward
- Scatter them evenly across the nail
Try not to make them all the same size — variation makes the design look more playful and hand-done.
5. Create the Glitter Heart Accent
On one pink nail per hand:
- Paint a single heart using red glitter polish
- You can build it up slowly to keep the edges clean
This nail becomes the focal point, so keep the surrounding nails simpler.
6. Optional Tiny White Dots
If you want extra detail:
- Add a few micro white dots between hearts
- Keep them subtle — they’re just there to add dimension
This step is optional and easy to skip if you prefer a cleaner look.
7. Seal and Smooth Everything
Apply a generous layer of glossy top coat to all nails.
For glitter nails:
- Use a thicker top coat or apply two layers
- Let the first coat dry before adding the second
This step transforms the manicure from DIY to polished.
Sweet Heart French Tips With Playful Pink & Red Mix
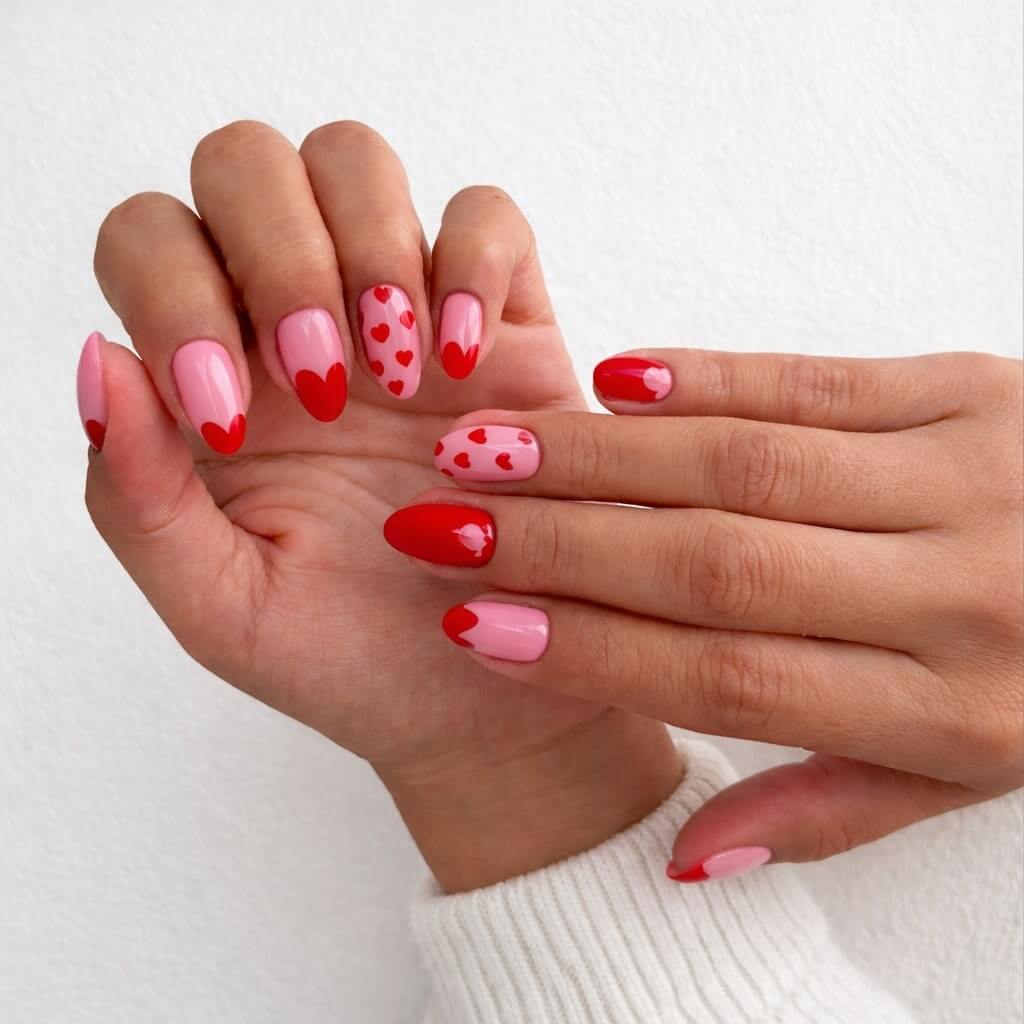
This last design is the perfect way to close the Valentine’s collection. It’s cheerful, balanced, and very “February-coded” without going over the top. Classic heart-shaped French tips, soft pink bases, scattered mini hearts, and bold red accents all come together in a fun but polished mix & match set. It feels youthful and romantic, yet still clean enough for everyday wear.
Color Palette (classic Valentine combo)
Soft Pink Base
- Essie – Ballet Slippers
- OPI – Bubble Bath
- Zoya – Bela
This should be a soft, milky pink that looks natural on the nail.
Classic Red
- OPI – Big Apple Red
- Essie – Really Red
- Zoya – Sooki
Used for French tips, hearts, and accent nails.
Optional Light Pink (for variety)
- Essie – Fiji
- OPI – Mod About You
This helps add depth when mixing multiple pink nails.
Top Coat
- High-gloss top coat to unify all designs.
Tools You’ll Need
- Dotting tool or bobby pin
- Thin nail art brush (or toothpick)
- Cleanup brush for crisp edges
This design is very beginner-friendly because it’s made from simple shapes.
How to Create the Look
1. Plan the Mix & Match Layout
Before painting, decide on:
- A few solid red nails
- A few pink nails with heart French tips
- One or two pink nails with scattered mini hearts
Planning this first keeps the final look cohesive instead of chaotic.
2. Paint the Solid Red Nails
On selected nails:
- Apply 2 thin coats of red polish
- Let them dry completely
These nails anchor the design and add bold contrast.
3. Apply the Pink Base
On the remaining nails:
- Apply 1–2 thin coats of soft pink polish
- Let the base dry fully before adding details
This soft base is what makes the hearts stand out so clearly.
4. Create the Heart French Tips
This is the signature detail of the design.
- Using red polish, paint a small curved tip at the edge of the nail
- Shape the curve into a soft heart point in the center
- Build the shape slowly rather than trying to do it in one stroke
If the heart isn’t perfect, don’t stress — the slightly hand-drawn look is part of the charm.
5. Add the Scattered Heart Nails
On one or two pink nails:
- Use a dotting tool to create tiny red hearts
- Scatter them evenly, keeping the design light and airy
Avoid overcrowding — negative space keeps this look fresh.
6. Optional Mini Heart Accent on Red Nails
If you want extra detail:
- Add one tiny pink or white heart on a solid red nail
- Keep it subtle so it doesn’t compete with the French tips
This step is optional but adds a cute finishing touch.
7. Seal Everything With Gloss
Finish all nails with a glossy top coat.
This:
- Smooths the surface
- Enhances the colors
- Makes the manicure last longer
Add a second top coat if needed, especially on the French tip nails.
Final Thoughts: Which Valentine’s Nails Are You Trying First?
If there’s one thing I hope you take away from this list, it’s this: valentines nails don’t have to be perfect to be beautiful. They just have to feel fun, wearable, and you. Some of my favorite manicures ever were the ones where one heart was a little crooked or one accent nail turned out better than the rest.
I also know how overwhelming it can feel to choose just one design. Do you go minimal and elegant? Soft pink and romantic? Or full glitter, hearts everywhere, no regrets? My honest advice: start with the one that made you stop scrolling. That’s usually the right answer.
If you’re still craving more inspiration, you might love these nail posts too:
- 35 Pink Nails Ideas You’ll Absolutely Fall In Love With
- 20 Valentine’s Day Nails To Love This Season
- 20 Pink Nail Designs That Will Make You Love Pink Nails Even More
And if you’re anything like me, you’ll want to save half of these ideas for later. You can always find more nail inspiration, color combos, and cozy creative ideas on my Pinterest profile — and yes, I’d love to see which designs you save or recreate.
Before you go, tell me this:
- Which of these valentines nails would you actually wear?
- Are you more team minimal or team hearts-on-every-nail?
- And if you try one of these designs, will you share it on Pinterest so we can all admire it?
I’ll be right there with you, probably repainting my nails for the third time this week — purely for research, of course.