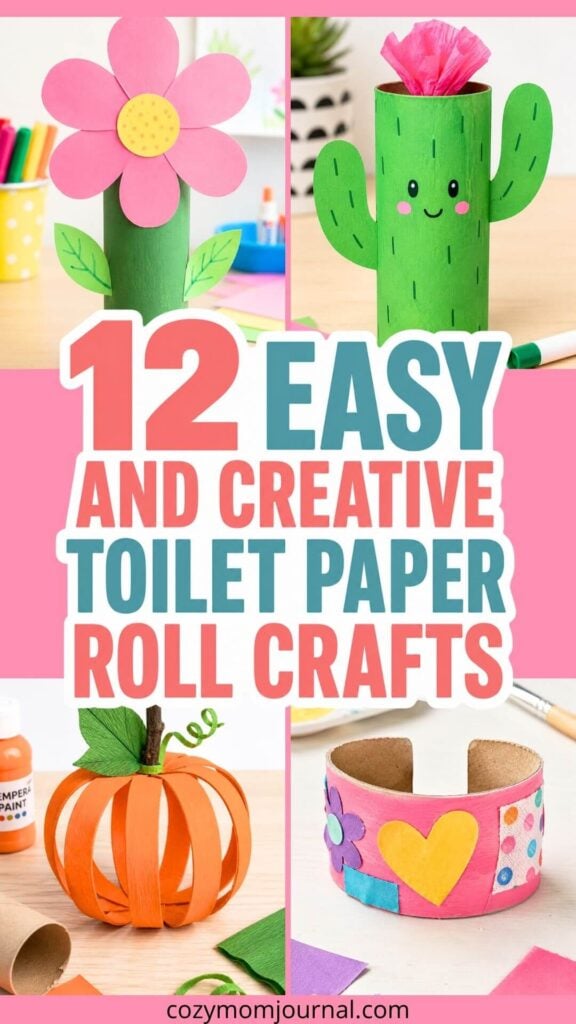
Toilet paper roll crafts are one of my favorite ways to turn an ordinary household item into something colorful, playful, and completely unexpected. Instead of throwing those little cardboard rolls away, you can transform them into flowers, robots, rockets, bracelets, and plenty of other cheerful creations with just a few basic supplies.
I especially love these projects because they do not require a perfectly organized craft room or a long shopping list. Most of the time, I simply use leftover colored paper, a little paint, glue, and whatever scraps are already hiding in my craft drawer. That drawer may look like a tiny paper tornado has visited it, but it always seems to contain exactly what I need.
These easy paper crafts are ideal for rainy afternoons, classroom activities, quiet weekends, or those moments when children announce that they are bored approximately three minutes after you have cleaned the table. Each project is simple enough for beginners, but there is still plenty of room to experiment with colors, faces, patterns, and decorations.
The goal is not to create something flawless. The real fun comes from painting, cutting, gluing, and watching a plain cardboard tube slowly turn into a character, plant, toy, or decoration.
Before You Start: A Few Simple Crafting Tips
Before choosing your first project, collect a few empty toilet paper rolls and check that they are clean, dry, and not bent too badly. Slightly squashed rolls can usually be reshaped by gently pressing them from the inside.
Cover your table with old newspaper, cardboard, or a reusable craft mat. Washable paint is usually the easiest option, especially when crafting with younger children.
It also helps to prepare the basic materials before you begin:
- Empty toilet paper rolls
- Washable paint and paintbrushes
- Colored paper or cardstock
- Crepe paper and paper scraps
- Child-safe scissors
- Glue or glue sticks
- Markers and pencils
- Optional decorations such as pom-poms, stickers, pipe cleaners, fabric scraps, or googly eyes
Do not worry if you do not have every material listed in a tutorial. Crafting often becomes more interesting when you improvise. No pom-poms? Use paper circles. No googly eyes? Draw them. No purple paint? Congratulations, your monster has just decided to be orange.
What If My Child Finds the Project Too Difficult?
One of the most common problems with children’s crafts is that a project looks easy in the finished photo but becomes frustrating during the cutting or gluing stage. The simplest solution is to divide the activity according to ability.
You can prepare the trickier shapes in advance while leaving the painting, arranging, and decorating to the child. Older children can trace and cut their own pieces, while younger children can choose colors, add paper scraps, and draw faces.
Try not to correct every uneven edge or misplaced decoration. A flower with six different-sized petals or a robot with slightly crooked eyes often has much more personality than a perfectly symmetrical one.
How Can I Stop the Paper Pieces From Falling Off?
Light paper pieces usually stay in place with a glue stick, but heavier decorations may need liquid craft glue. Apply only a thin layer, because too much glue can soften the cardboard and make the paper slide around.
After attaching larger pieces, such as wings, flower heads, or tree branches, hold them in place for several seconds. Then lay the craft flat or support it with small objects until the glue begins to dry.
Patience is not always the most popular craft supply, but it makes a huge difference. Giving each painted or glued section enough drying time helps prevent smudged faces, collapsing flowers, and rockets that lose a fin before takeoff.
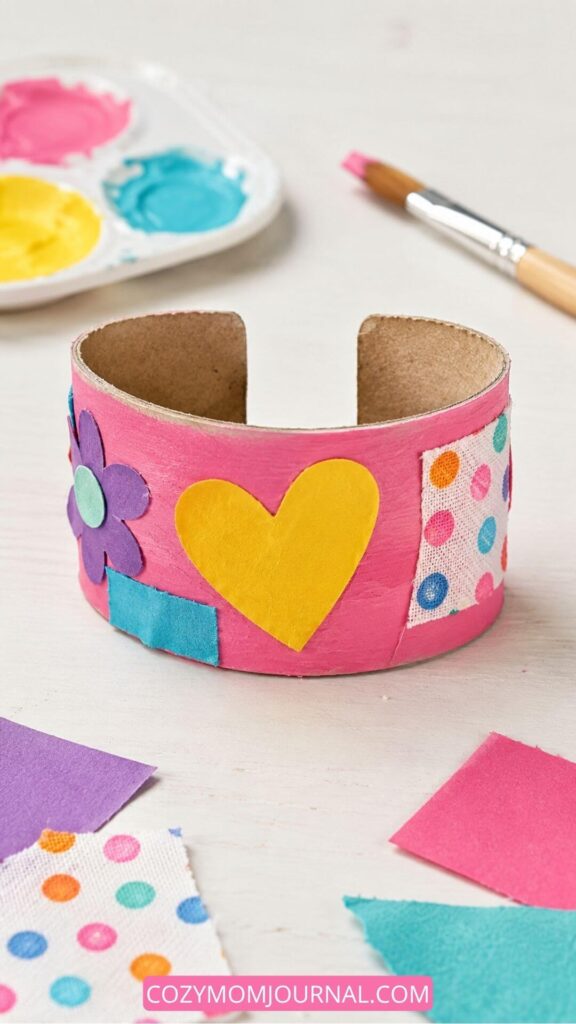
1. Toilet Paper Roll Bracelet
Materials
- Empty toilet paper roll
- Child-safe acrylic or tempera paint
- Paintbrush
- Scissors
- Glue
- Colored paper scraps
- Small fabric scraps
- Pencil
- Optional decorations, such as foam shapes, stickers, or paper hearts
How to Make the Paper Roll Bracelet
- Prepare the paper roll
Gently flatten the toilet paper roll and cut it into two or three wide rings. Each ring will become one bracelet. - Create the opening
Cut through one side of the cardboard ring. This creates an open cuff shape that can slide onto the wrist. - Adjust the size
Carefully bend the cardboard into a bracelet shape. Trim the ends slightly if the bracelet is too large. - Paint the bracelet
Paint the outside of the cardboard with your chosen color. Leave the inside unpainted, or paint it too. Let it dry completely. - Prepare the decorations
Cut simple shapes from colored paper or fabric scraps. Hearts, circles, flowers, squares, and strips are easy for children to make. - Decorate the bracelet
Glue the shapes onto the painted cardboard. Press each piece gently so it stays in place. - Let it dry
Place the bracelet on the craft table and wait until the glue is completely dry. - Wear the bracelet
Gently open the cuff and slide it onto the wrist. Do not pull the cardboard too far apart, because it may bend or tear.
Adult supervision is recommended when children use scissors.
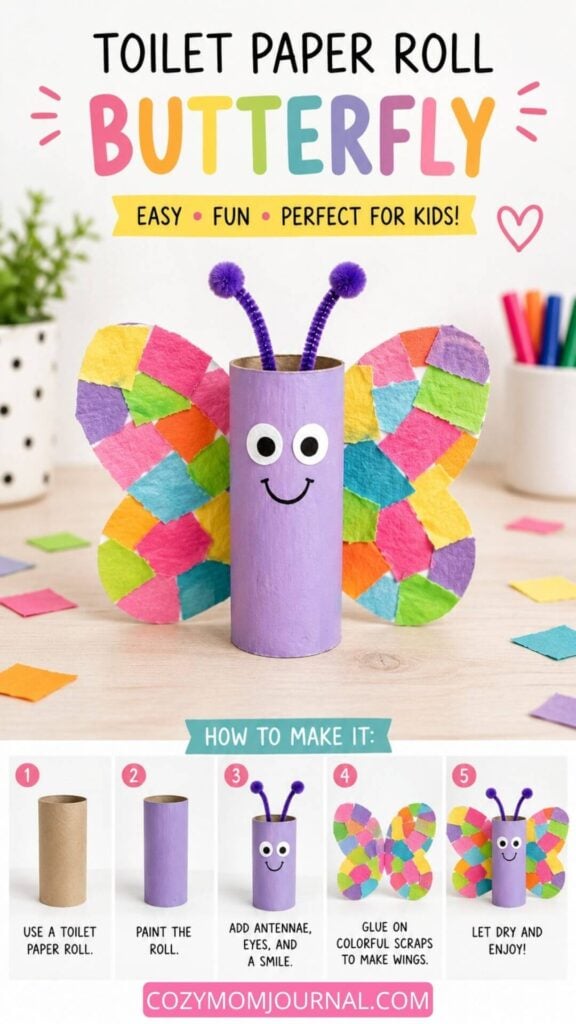
2. Toilet Paper Roll Butterfly
Materials
- 1 empty toilet paper roll
- Purple or another color of washable paint
- Paintbrush
- Cardstock or thick paper for the wings
- Small colorful paper or tissue paper scraps
- 2 pipe cleaners for the antennae
- 2 small pom-poms
- Googly eyes or white and black paper
- Black marker
- Child-safe glue
- Scissors
- Pencil
How to Make the Paper Roll Butterfly
- Paint the paper roll
Paint the outside of the toilet paper roll. Let it dry completely. - Make the wings
Fold a piece of cardstock in half. Draw a simple butterfly wing shape along the folded edge, then cut it out. Open the paper to reveal two matching wings. - Decorate the wings
Tear or cut colorful paper scraps into small pieces. Glue them onto the wings to create a bright patchwork pattern. Let the glue dry. - Add the face
Glue two googly eyes onto the front of the paper roll. Draw a simple smile underneath with a black marker. - Make the antennae
Cut a pipe cleaner into two pieces. Glue a small pom-pom to the end of each piece. Attach the antennae inside the top of the paper roll. - Attach the wings
Glue the decorated wings to the back of the paper roll. Hold them in place for a few moments, then leave the butterfly flat until the glue has dried.
Your paper roll butterfly is ready to display.
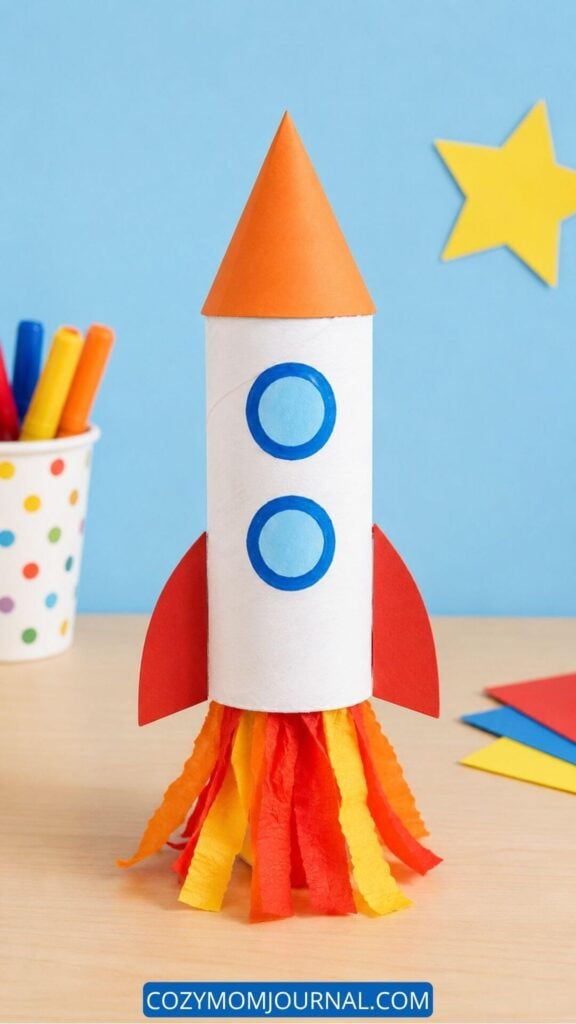
3. Toilet Paper Roll Rocket
Materials
- 1 empty toilet paper roll
- White paint and a paintbrush, or white paper to wrap around the roll
- Orange construction paper
- Red construction paper
- Blue and light blue paper, or blue paint
- Red, orange and yellow crepe paper
- Scissors
- Glue or a glue stick
- Pencil
- Optional: markers or extra paper scraps for decoration
How to Make the Paper Roll Rocket
- Paint the toilet paper roll white and leave it to dry. You can also wrap the roll in white paper and glue it in place.
- Cut two small circles from light blue paper for the windows. Cut slightly larger circles from dark blue paper, then glue the light blue circles on top. Attach the windows to the front of the rocket.
- Draw a large circle on orange paper and cut it out. Cut a straight line from the edge to the middle of the circle. Overlap the cut edges to form a cone, then glue them together.
- Glue the orange paper cone to the top of the toilet paper roll.
- Cut two simple curved triangle shapes from red paper. These will be the rocket fins. Glue one fin to each side near the bottom of the roll.
- Cut several strips of red, orange and yellow crepe paper. The strips do not need to be exactly the same size.
- Glue the crepe paper strips around the inside edge at the bottom of the toilet paper roll. Let them hang down to create the rocket flames.
- Allow the glue to dry before standing up or playing with the finished rocket.
For younger children, an adult should help with cutting the paper cone and attaching it securely.
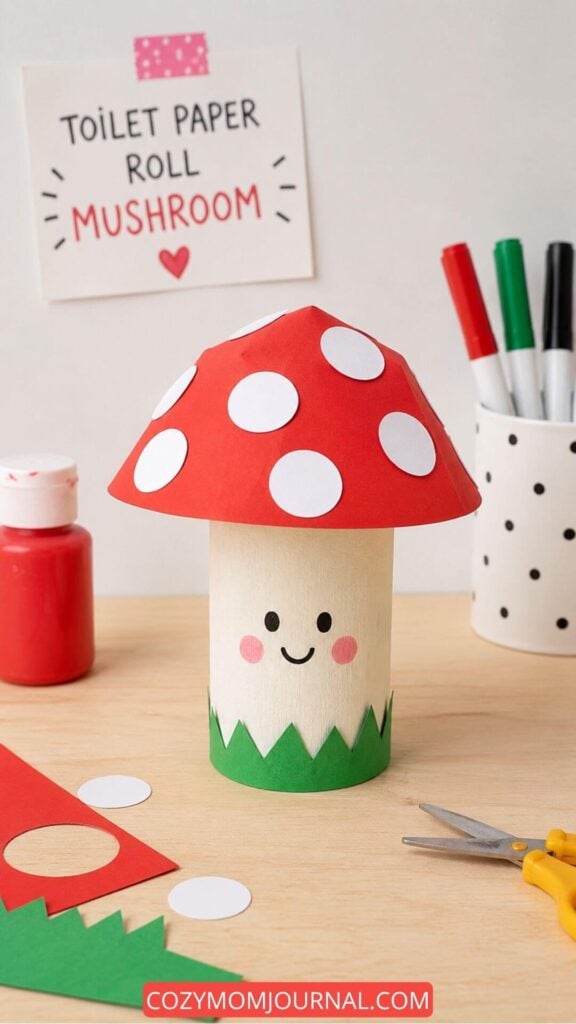
4. Toilet Paper Roll Mushroom Craft
Materials
- 1 empty toilet paper roll
- Red construction paper
- White construction paper
- Green construction paper
- Light beige or white paint
- Black marker
- Pink marker or pink paint
- Paintbrush
- Child-safe scissors
- Glue
- Pencil
- A round object to trace, such as a cup or small plate
Instructions
- Let it dry
Leave the finished mushroom standing upright until all the glue has dried. - Paint the paper roll
Paint the toilet paper roll light beige or white. Leave it to dry completely. - Make the mushroom cap
Trace a large circle onto red construction paper and cut it out. Cut a straight line from the edge of the circle to the centre. - Shape the cap
Slightly overlap the two cut edges to create a shallow cone shape. Glue the overlapping section in place. - Add the white spots
Cut several small circles from white paper. Glue them onto the red mushroom cap. - Make the grass
Cut a strip of green paper long enough to wrap around the bottom of the toilet paper roll. Cut small triangle shapes along one edge to create grass blades. - Attach the grass
Wrap the green strip around the bottom of the roll and glue it in place. - Draw the face
Use a black marker to draw two eyes and a small smiling mouth. Add pink cheeks with a marker or a little paint. - Attach the mushroom cap
Apply glue around the top edge of the paper roll. Place the red cap on top and press it gently until it stays in place.
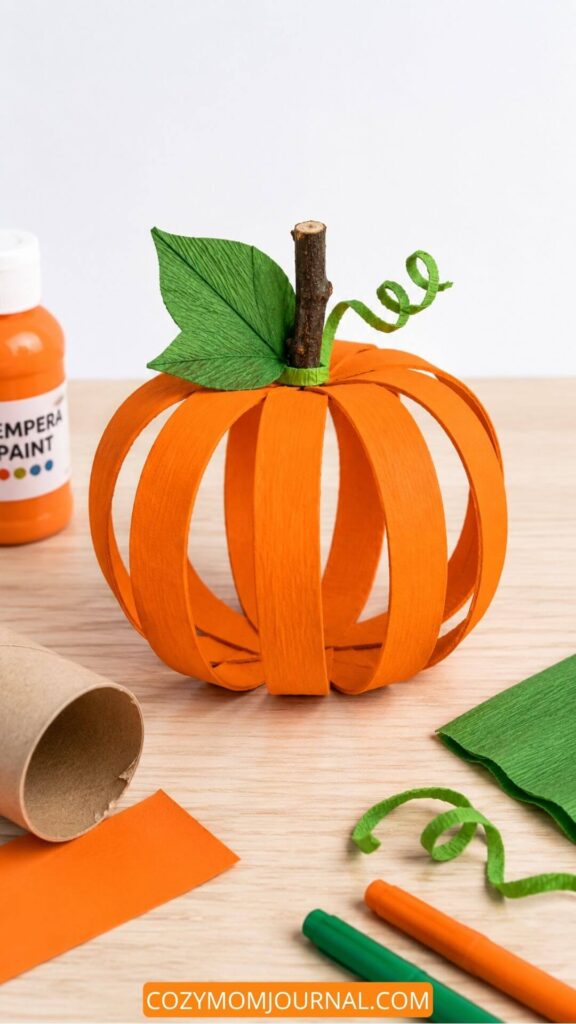
5. Toilett Paper Roll Pumpkin
Materials
- 1 toilet paper roll
- Orange paint
- Paintbrush
- Scissors
- Strong craft glue or a hot glue gun
- A small twig for the stem
- Green crepe paper
- Pencil
- Optional: green paper or felt for the leaf
How to Make the Paper Roll Pumpkin
- Paint the outside and inside of the toilet paper roll orange. Leave it to dry completely.
- Flatten the paper roll slightly and cut it into several rings. Try to make the rings approximately the same width.
- Gently reshape each ring so it becomes oval again.
- Arrange the orange rings next to each other in a circle. Spread them evenly to create a round pumpkin shape.
- Glue the rings together where they touch. Hold them in place until the glue is secure.
- Place a short twig in the centre at the top of the pumpkin. Glue it firmly to make the stem.
- Cut a simple leaf shape from green crepe paper, coloured paper or felt. Glue it beside the stem.
- Cut a thin strip of green crepe paper and wrap it around a pencil. Slide it off carefully to create a curly pumpkin vine.
- Glue the curly vine next to the leaf and stem.
- Allow everything to dry before displaying the finished pumpkin.
Adult supervision is recommended when children use scissors or a hot glue gun.
6. Toilet Paper Roll Cactus
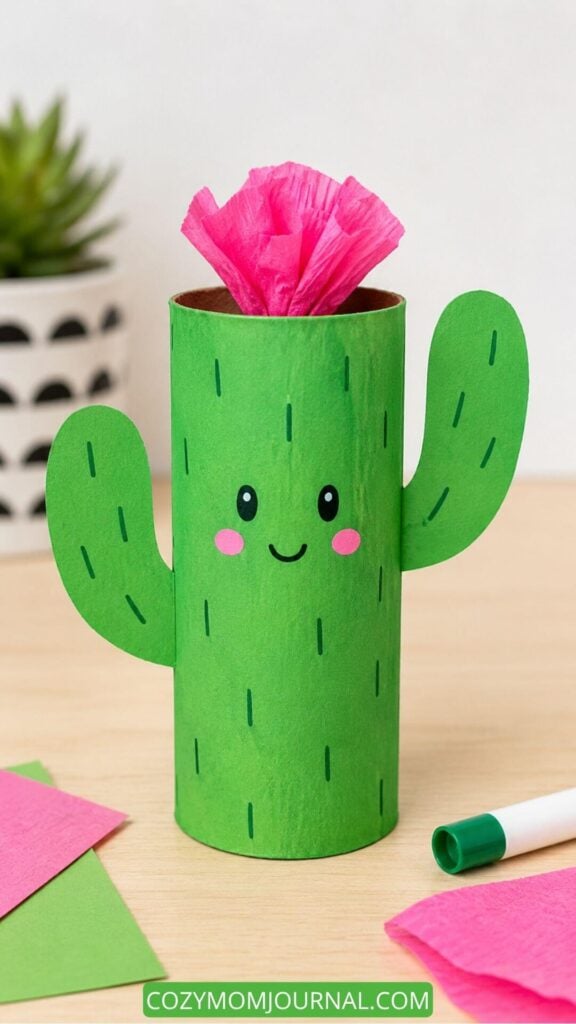
Materials
- 1 toilet paper roll
- Green paint
- Paintbrush
- Green colored paper or cardstock
- Pink crepe paper
- Black marker
- Pink marker or pink paper
- Scissors
- Craft glue
- Pencil
How to Make the Paper Roll Cactus
- Paint the paper roll
Paint the outside of the toilet paper roll green. Leave it to dry completely. - Make the cactus arms
Draw two simple curved cactus arms on green paper. Cut them out with scissors. - Add the arms
Glue one paper arm to each side of the painted roll. Hold them in place until the glue starts to dry. - Draw the cactus details
Use a black or dark green marker to draw short lines around the roll and the paper arms. These lines represent the cactus spines. - Add the face
Draw two eyes and a small smile on the front. Add pink cheeks with a marker or glue on two small circles of pink paper. - Make the flower
Cut a small piece of pink crepe paper. Fold or gently crumple it into a simple flower shape. - Attach the flower
Glue the crepe-paper flower inside the top of the toilet paper roll. - Let it dry
Place the cactus upright and allow all the glue to dry before displaying or playing with it.
Adult supervision is recommended when children use scissors or glue.
7. Toilet Paper Roll Monster Craft
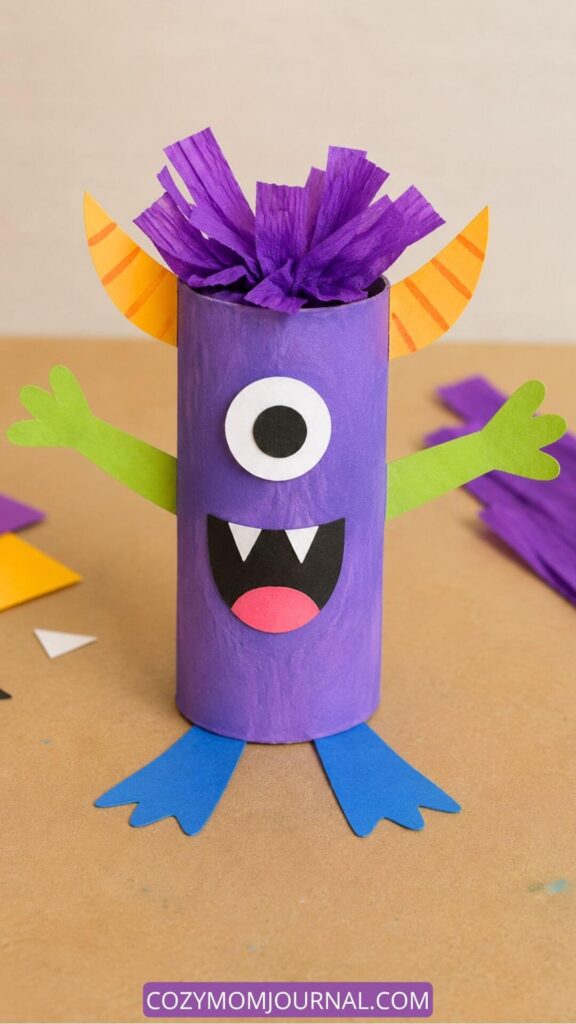
Materials
- 1 toilet paper roll
- Purple paint
- Paintbrush
- Green, blue, orange, white, black and pink paper
- Purple crepe paper
- Scissors
- Glue
- Black marker or pencil
How to Make the Paper Roll Monster
- Paint the toilet paper roll purple and let it dry completely.
- Cut one large circle from white paper and a smaller circle from black paper. Glue the black circle onto the white circle to make the monster’s eye.
- Cut a mouth shape from black paper. Add two small white paper teeth and a pink paper tongue. Glue the finished mouth below the eye.
- Cut two simple arms from green paper. Make three rounded fingers at the end of each arm, then glue the arms to the sides of the roll.
- Cut two feet from blue paper and glue them underneath the toilet paper roll.
- Cut two curved horns from orange paper. Add a few darker orange stripes with paint or a marker, then glue the horns near the top of the roll.
- Cut several short strips of purple crepe paper. Gather or gently crumple them, then glue them inside the top of the roll to create messy monster hair.
- Leave the glue to dry before displaying or playing with the monster.
Adult supervision is recommended when children use scissors.
8. Toilet Paper Roll Robot Craft
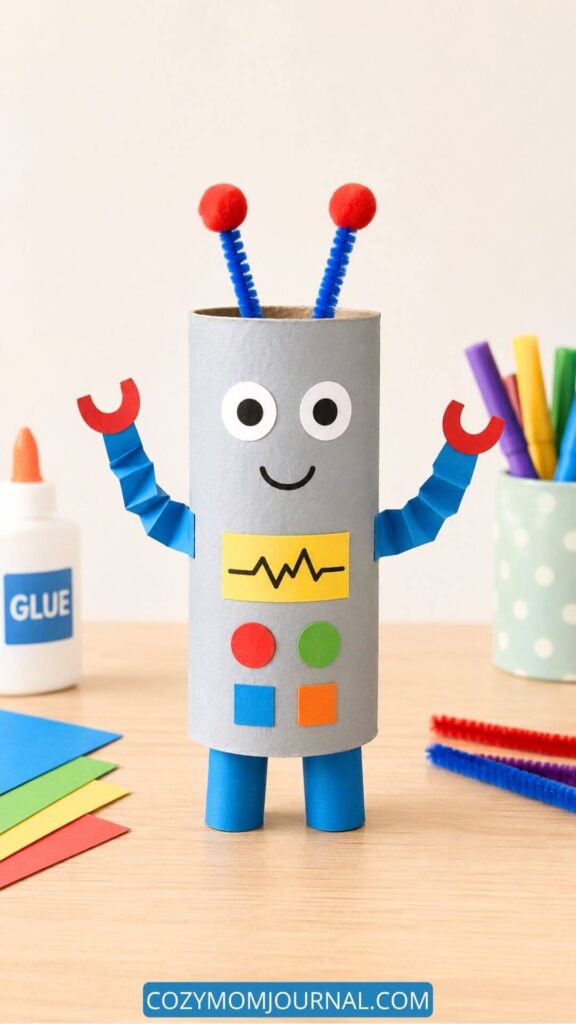
Materials
- 1 toilet paper roll
- Gray or silver paint
- Paintbrush
- Colored paper: blue, red, yellow, green, orange, black and white
- 2 pipe cleaners
- 2 small pom-poms
- Black marker
- Scissors
- Glue
- Pencil
How to Make the Paper Roll Robot
- Paint the toilet paper roll gray or silver. Leave it to dry completely.
- Cut two white circles for the eyes and two smaller black circles for the pupils. Glue them onto the upper part of the roll.
- Draw a simple curved smile under the eyes with a black marker.
- Cut two long strips from blue paper. Fold each strip back and forth like an accordion to create the robot’s arms.
- Cut two simple claw shapes from red paper. Glue one claw to the end of each arm.
- Glue the arms to the sides of the toilet paper roll.
- Cut a small yellow rectangle for the robot’s control panel. Draw a zigzag line on it with a black marker and glue it to the front.
- Cut small circles and squares from colored paper. Glue them below the control panel to make buttons.
- Cut two short pieces from a pipe cleaner or use two simple folded paper strips for the antennae. Glue them inside the top of the roll.
- Glue a small pom-pom to the top of each antenna.
- For the legs, roll two small pieces of blue paper into short tubes and glue them to the bottom of the robot.
- Allow all the glue to dry before playing with or displaying the robot.
Adult supervision is recommended when children use scissors.
9. Paper Roll Tree Craft
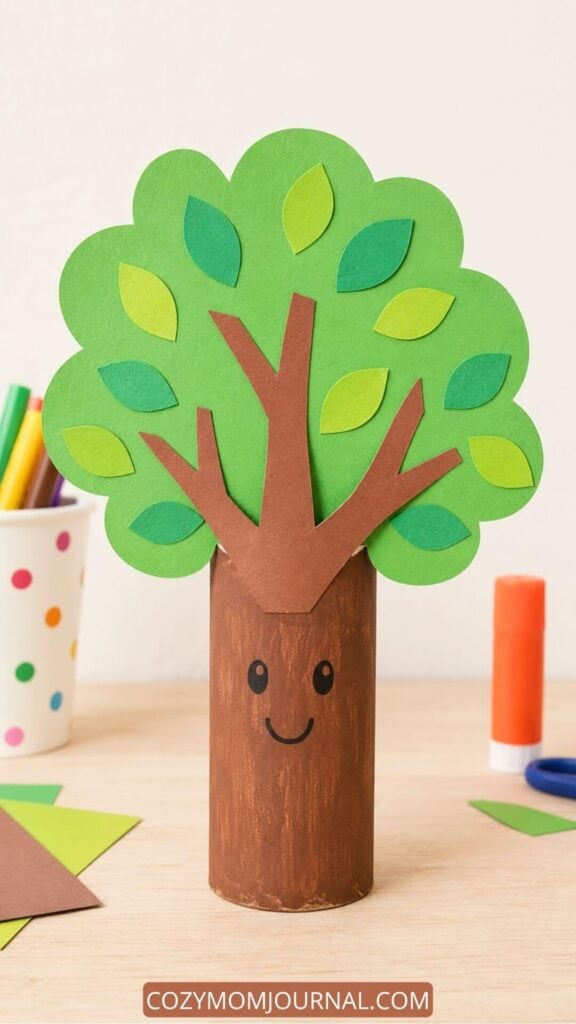
Materials
- 1 toilet paper roll
- Brown paint
- Paintbrush
- Green construction paper
- Brown construction paper
- Light and dark green paper scraps
- Black marker
- Scissors
- Glue
- Pencil
How to Make It
- Paint the toilet paper roll brown. Set it aside until the paint is completely dry.
- Draw a large, rounded treetop shape on green construction paper. Make the edges slightly bumpy, like a cloud.
- Cut out the green treetop.
- Draw a simple tree branch shape on brown construction paper. Keep the branches wide and easy to cut.
- Cut out the branches and glue them onto the front of the green treetop.
- Cut several simple leaf shapes from light and dark green paper.
- Glue the leaves around the branches.
- Glue the finished treetop to the upper part of the painted toilet paper roll.
- Use a black marker to draw two eyes and a smiling mouth on the front of the roll.
- Let the glue dry before displaying or playing with the tree craft.
Adult supervision is recommended when children are using scissors.
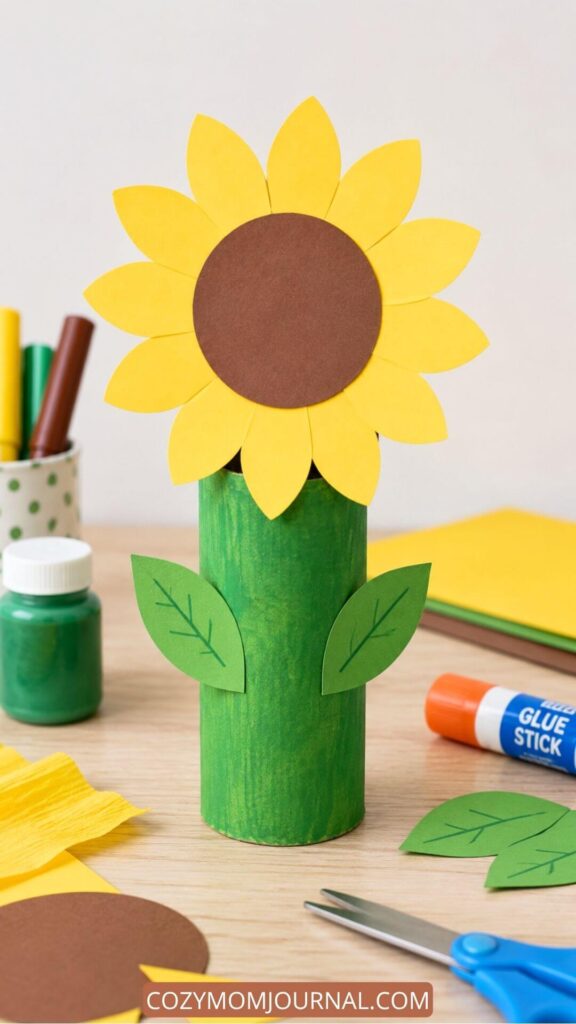
10. Toilet Paper Sunflower Craft
Materials
- 1 toilet paper roll
- Green paint
- Paintbrush
- Yellow colored paper
- Brown colored paper
- Green colored paper
- 1 wooden skewer
- Glue
- Scissors
- Green marker or felt-tip pen
- Pencil
How to Make the Paper Roll Sunflower
- Allow all the glue to dry before standing up or displaying the sunflower.
- Paint the toilet paper roll green. Leave it to dry completely.
- Draw several simple petal shapes on yellow paper and cut them out.
- Cut a large circle from brown paper for the center of the sunflower.
- Arrange the yellow petals in a circle and glue them together. Glue the brown circle over the middle of the petals.
- Glue one end of the wooden skewer to the back of the flower head. Let the glue dry well so the flower stays securely attached.
- Place the other end of the wooden skewer inside the toilet paper roll. Glue it to the inside of the roll so the flower head is firmly connected to the green stem.
- Cut two simple leaf shapes from green paper.
- Draw leaf veins with a green marker, then glue the leaves onto the sides of the toilet paper roll.
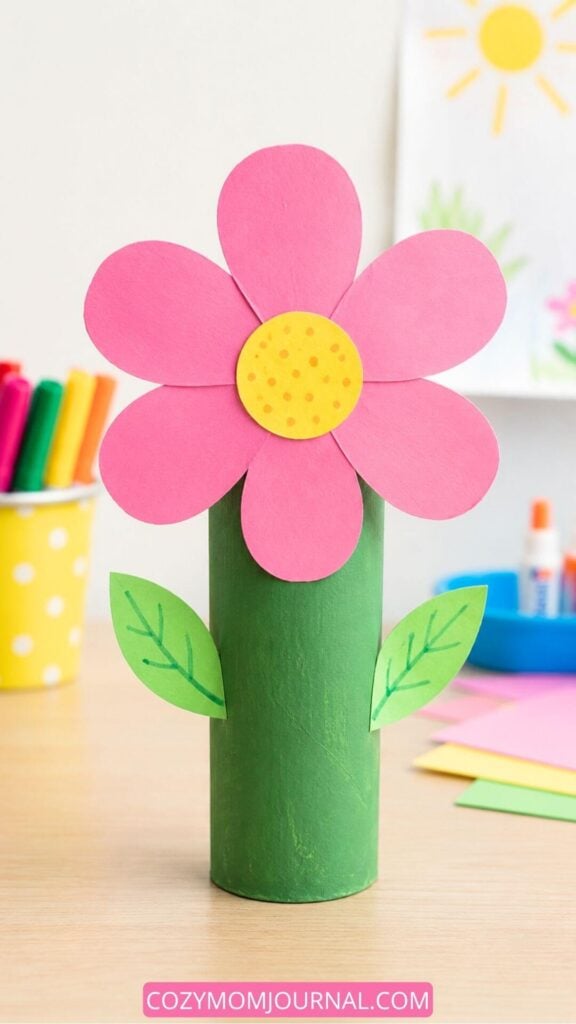
11. Toilet Paper Roll Flower
Materials
- 1 toilet paper roll
- Green paint
- Paintbrush
- Pink colored paper
- Yellow colored paper
- Green colored paper
- Scissors
- Glue
- Green marker
- Pencil
How to Make the Paper Roll Flower
- Paint the toilet paper roll green. Leave it to dry completely.
- Draw five or six large, rounded flower petals on pink paper.
- Cut out the pink petals.
- Cut a circle from yellow paper for the center of the flower.
- Arrange the pink petals in a flower shape and glue them together.
- Glue the yellow circle in the middle of the petals. You can add small dots with a marker or paint.
- Glue the completed flower head to the top front of the painted toilet paper roll.
- Draw two simple leaf shapes on green paper and cut them out.
- Use a green marker to draw veins on the leaves.
- Glue one leaf to each side of the toilet paper roll.
- Allow all the glue to dry before displaying the finished flower.
Adult supervision is recommended when children are using scissors.
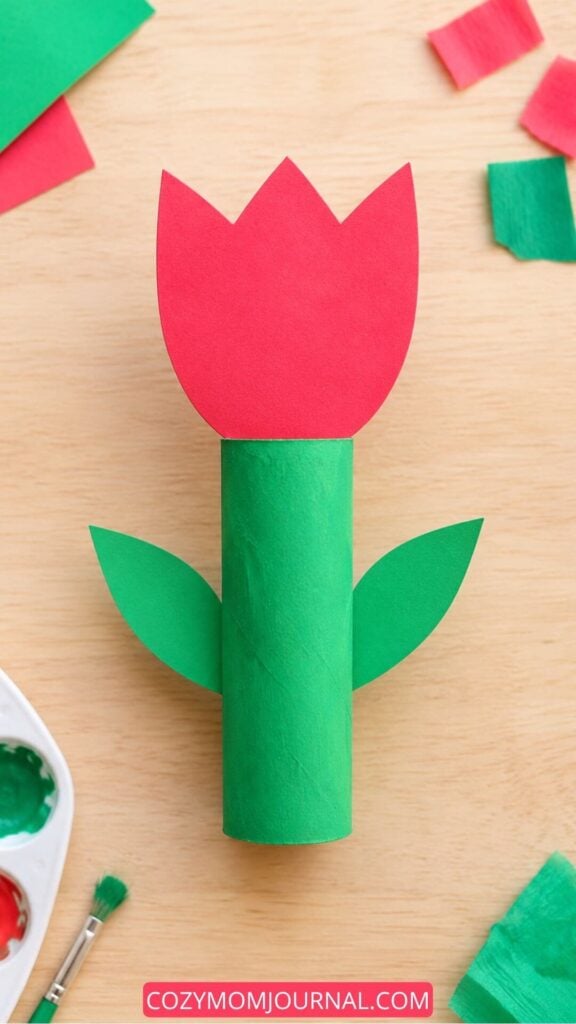
12. Toilet Paper Roll Tulip
Materials
- 1 toilet paper roll
- Green paint
- Paintbrush
- Red, pink, or another colored paper
- Green paper
- Pencil
- Scissors
- Glue
- Black marker, optional
- A small piece of cardboard or newspaper to protect the table
How to Make the Paper Roll Tulip
- Paint the toilet paper roll green. This will be the stem of the tulip.
- Leave the roll to dry completely.
- Draw a simple tulip flower shape on red or pink paper. Make a rounded flower shape with three pointed petals at the top.
- Cut out the tulip flower.
- Draw two simple leaf shapes on green paper and cut them out.
- Glue the tulip flower to the top of the toilet paper roll.
- Glue one green leaf to each side of the roll.
- Press the paper pieces gently and allow the glue to dry.
The finished craft is a simple standing tulip made from one painted toilet paper roll and a few paper shapes.
Easy Drawing and Decorating Tips for Better Results
The little drawn details are often what bring these toilet paper roll crafts to life. A simple smile, a few leaf veins, or a row of tiny robot buttons can completely change the finished project.
You do not need advanced drawing skills. In fact, simple shapes usually work best on the curved surface of a paper roll.
Sketch the Details First
Use a pencil to lightly mark the position of eyes, mouths, buttons, cactus spines, or leaf veins before using a marker. Pencil lines are easier to adjust if the face looks too high, too low, or unexpectedly surprised.
Keep facial features simple:
- Dots or small ovals for eyes
- A curved line for a smile
- Tiny circles for cheeks
- Short lines for eyelashes, texture, or plant details
- Squares and circles for robot controls
Keep the Face Near the Center
Because a toilet paper roll is curved, details placed too close to the sides may disappear when viewed from the front. Try to keep the main facial features within the center section of the roll.
Before drawing, place the craft upright and decide which side will be the front. This quick step prevents the face from accidentally ending up beside an arm, leaf, or wing.
Use Paper Shapes When Drawing Feels Tricky
Not every detail needs to be drawn directly onto the cardboard. Cut circles for eyes, triangles for teeth, and curved shapes for mouths.
Layering paper pieces is especially helpful for butterflies, monsters, and robots. It also gives children the freedom to move the pieces around before gluing them permanently.
Create Templates for Repeated Shapes
If you need several petals, leaves, or pumpkin rings, make one paper template first. Trace it several times instead of drawing every shape separately.
For matching butterfly wings, fold the paper in half before cutting. For flower petals, stack a few sheets of thin paper and cut them together with adult help.
Add Details After the Paint Dries
Markers do not work well on wet paint, and the tips may become damaged or stained. Allow the painted roll to dry completely before drawing the face or adding decorative lines.
When the paint still feels slightly cool or sticky, it probably needs more time. This is a perfect moment for a snack break or for cutting the remaining paper decorations.
Let Children Make Creative Choices
Offer a few colors and materials, but let the child decide how the final craft should look. The butterfly does not have to be symmetrical, the cactus can have blue flowers, and the monster can have seven eyes if that is where the creative process leads.
Giving children control over the small choices helps them feel proud of the finished result. It also turns the activity into genuine creative play rather than a project they must copy exactly.
How to Make Craft Time Less Messy
Mess is often the biggest reason parents hesitate to begin a craft project. Fortunately, these activities can stay manageable with a little preparation.
Pour paint onto a small washable plate instead of giving children the entire bottle. Keep a damp cloth nearby for quick cleanups, and place paper scraps in a bowl so they do not spread across the floor.
A shallow tray can also keep each child’s project and materials together. When craft time ends, you can move the entire tray without disturbing pieces that still need to dry.
I also like keeping useful scraps instead of throwing them away immediately. A tiny green triangle may become a leaf, a yellow circle can become a flower center, and a narrow strip of paper might be exactly what the next robot needs.
More Easy Crafts to Try
Once you have made these projects, you may discover that saving cardboard rolls becomes strangely addictive. Suddenly, every empty roll looks less like recycling and more like a future butterfly, rocket, or tiny smiling cactus.
For even more inspiration, take a look at my 15 Easy Animal Toilet Paper Roll Crafts Kids Will Love. It is a great next step for children who want to turn their cardboard rolls into cute animals.
You may also enjoy this Paper Bunny Craft With a Free Printable Template. The printable template makes the project easier when you want a little extra help with the shapes.
For another creative way to reuse household items, explore these 12 Easy Animal Mason Jar Crafts for Kids. They are colorful, playful, and perfect for anyone who enjoys simple recycled crafts.
You can also follow Cozy Mom Journal on Pinterest for more paper projects, seasonal crafts, drawing ideas, and creative inspiration.
Final Thoughts
These toilet paper roll crafts prove that creative activities do not need expensive supplies or complicated instructions. A cardboard tube, a few paper scraps, and a little imagination can become a bracelet, butterfly, rocket, mushroom, pumpkin, cactus, monster, robot, tree, sunflower, flower, or tulip.
Some projects may turn out exactly as planned, while others may develop their own slightly crooked personality. Both results are worth celebrating. Handmade crafts should feel joyful and personal, not perfect.
Choose one idea, collect the materials you already have, and begin with the easiest step. Once the paintbrushes and paper scraps come out, new ideas usually follow on their own.
Which of these projects would you like to make first? Did your child add a funny detail or invent a completely new paper roll character?
Share your creation in the comments on Pinterest, or post a photo on Instagram and tag @cozymomjournal. I would love to see how you make these ideas your own.